How to Bottom Water Plants the Right Way: A Complete Guide to Healthier Roots and Greener Growth
Have you ever wondered why some plant parents seem to have a magical touch with their greenery while others struggle with wilting leaves and root rot? The secret might be simpler than you think. It could be hiding in the way they water their plants. Today, I want to share with you one of the most transformative watering techniques I’ve discovered: bottom watering. This method has genuinely changed how my plants thrive, and I’m excited to walk you through it.
Understanding Bottom Watering: What It Really Is
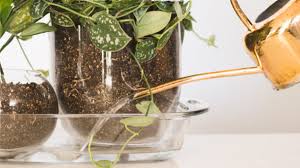
Bottom watering might sound like a fancy gardening term, but it’s actually quite straightforward. Instead of pouring water from above and letting it trickle down through the soil, you’re doing the opposite. You’re placing your plant pot in a container filled with water and allowing the soil to absorb moisture upward through the drainage holes. Think of it like your plant drinking through a straw rather than you pouring liquid down its throat.
Why This Method Matters More Than You’d Think
I used to water my plants the traditional way for years without realizing I might be doing more harm than good. When you water from the top, gravity pulls the water downward, and sometimes it doesn’t distribute evenly throughout the soil. Worse, top watering can compact your soil over time and wash away nutrients. Bottom watering works with nature’s capillary action, allowing water to move upward naturally and saturate the entire root system evenly. It’s like the difference between force-feeding someone and letting them eat at their own pace.
The Science Behind Bottom Watering
How Capillary Action Powers Your Plants
Capillary action is a physical phenomenon where water naturally moves upward through tiny spaces in soil, almost defying gravity. The soil particles create these microscopic channels, and water molecules are attracted to them, pulling water up from the bottom. When you bottom water, you’re essentially working with this natural process instead of against it. Your plants’ roots can draw exactly what they need, and they won’t be oversaturated at the top while remaining dry at the bottom.
Root Development and Strength
When plants have to work harder to find water, their roots develop stronger and more extensive systems. Bottom watering encourages roots to grow downward and throughout the soil mass, creating a more resilient root system. This is especially beneficial for younger plants that are still establishing themselves. A stronger root system means better nutrient absorption and a hardier plant overall.
Which Plants Benefit Most from Bottom Watering
Ideal Candidates for This Technique
Not every plant has the same watering preferences, but many genuinely thrive with bottom watering. Here are the plants that seem happiest with this method:
- African violets and other fuzzy-leaved plants that hate water on their foliage
- Succulents and cacti that prefer well-draining conditions
- Ferns that need consistent moisture without waterlogging
- Begonias and other delicate flowering plants
- Seedlings and young plants establishing their roots
- Orchids that require careful hydration control
- Herbs like mint and basil that need regular moisture
Plants to Be Cautious With
While most plants can tolerate bottom watering, some prefer traditional methods. Large-leafed plants like calatheas sometimes do better with top watering, and plants with extremely fine, shallow root systems might struggle. Always observe your specific plants and adjust accordingly. The beauty of plant parenting is learning what your individual green friends prefer.
Getting Started: Essential Materials You’ll Need
Creating Your Bottom Watering Setup
The wonderful thing about bottom watering is that you probably already have everything you need at home. Let me break down what you’ll actually use:
- A container larger than your plant pot (bowls, trays, buckets, or basins work perfectly)
- Room-temperature water
- Your potted plant with drainage holes
- Optional: a timer if you want consistency
- Optional: a small sponge or cloth for cleanup
Choosing the Right Container
Your outer container should be deep enough to hold water and wide enough to accommodate your plant pot comfortably. I use everything from ceramic bowls to plastic storage bins, depending on my plant size. The container doesn’t need to be fancy—it just needs to hold water without leaking. Make sure it’s clean before use to prevent introducing any pathogens to your plant.
Step-by-Step Instructions for Bottom Watering
The Basic Process Explained Simply
Let me walk you through this process exactly as I do it with my plants:
Step One: Prepare Your Workspace
I always set up my bottom watering station in a location where water splashes won’t damage anything—typically my kitchen sink or a waterproof tray. This keeps my home clean and makes the process stress-free. If you’re doing this in your living room, place newspaper or a towel underneath for protection.
Step Two: Fill Your Container with Water
Pour room-temperature water into your outer container. The depth should be roughly one-third to one-half of your pot’s height. You’re not trying to submerge the entire pot; you’re just creating enough water for capillary action to work its magic. Using filtered or distilled water is ideal, but tap water works fine for most plants.
Step Three: Place Your Plant Pot in the Water
Gently set your potted plant into the water container. The pot’s drainage holes should be in direct contact with the water. Don’t force it down—just let it sit naturally. If your pot doesn’t have adequate drainage holes, now would be an excellent time to add a few more by carefully drilling them out.
Step Four: Let Nature Do the Work
Here’s where patience becomes your superpower. Leave your plant sitting in the water for about ten to fifteen minutes. Some people use a timer, which I actually recommend when you’re starting out. During this time, you’ll literally see the soil darkening as water travels upward. It’s actually quite satisfying to watch.
Step Five: Check the Soil Surface
After your timer goes off, check the top of the soil. You should see moisture reaching the surface. If it still feels completely dry on top, give it another five minutes. Once the top layer feels slightly damp, you’re finished.
Step Six: Remove and Drain Your Plant
Carefully lift your pot out of the water and place it somewhere it can drip excess moisture. I use my sink or a draining tray. Let any excess water drain completely—your plant should never sit in standing water. This draining step is crucial because it prevents root rot and ensures your plant isn’t overwatered.
How Often Should You Bottom Water
Finding the Perfect Watering Schedule
This is where I have to be honest: there’s no universal answer. The frequency depends on several factors. Your plant’s species matters, your home’s humidity levels matter, the season matters, and even the size of your pot matters. Rather than following a strict calendar, I recommend the finger test. Stick your finger about an inch into the soil. If it feels dry at that depth, your plant is probably ready for bottom watering. If it still feels moist, wait a few more days.
Seasonal Adjustments
During spring and summer when plants are actively growing, they typically need more frequent watering. I find myself bottom watering my tropical plants weekly during these seasons. In fall and winter, growth slows down, and watering needs decrease significantly. Sometimes I’ll water every two or three weeks during dormancy. Pay attention to your plant’s growth patterns and adjust accordingly.
Common Mistakes People Make With Bottom Watering
Leaving Plants Sitting Too Long
One of the biggest mistakes I see people make is leaving their plants in water for extended periods. More than twenty minutes, and you risk waterlogging your soil and creating conditions where root rot thrives. Bottom watering isn’t a “set it and forget it” method—it requires attention and presence.
Using Water That’s Too Cold
Plants genuinely prefer room-temperature water. Cold water can shock delicate root systems and stress your plant. I always let tap water sit for a few minutes before using it, or I use water that’s been sitting indoors for a while. This small step makes a noticeable difference in plant health.
Not Checking Drainage Holes
If your pot doesn’t have adequate drainage holes, bottom watering becomes problematic. Water needs to enter from below, which means those holes are essential. If your favorite decorative pot lacks drainage, use it as a cover pot and keep your plant in a draining pot inside it.
Ignoring Plant-Specific Needs
I’ve learned the hard way that not every plant appreciates bottom watering equally. Some plants that prefer drier conditions between waterings might develop issues with consistent bottom watering. Always observe how your individual plant responds and adjust your technique accordingly.
Combining Bottom Watering with Other Plant Care
Humidity and Misting Considerations
Bottom watering doesn’t replace misting for plants that love humidity. If you have tropical plants that enjoy moisture on their leaves, you can still mist them on non-watering days. I find that bottom watering and occasional misting create the ideal environment for humidity-loving plants.
Fertilizing While Bottom Watering
You can absolutely add diluted liquid fertilizer to your bottom watering container. This method actually distributes nutrients more evenly throughout the soil than top watering does. I typically fertilize every two weeks during growing season and monthly during dormancy. This gentle, consistent nutrient delivery seems to support healthier growth.
Troubleshooting Common Bottom Watering Issues
Plant Leaves Turning Yellow
If you notice yellowing leaves after starting bottom watering, you might be watering too frequently. Yellow leaves often indicate overwatering. Try extending the time between waterings by a few days and see if your plant recovers.
Soil Staying Dry at the Top
This usually means your watering time was too short. Increase it to fifteen or twenty minutes and monitor the results. You might also have very dense soil that needs longer for capillary action to reach the top layers.
Wilting Despite Moist Soil
Wilting with wet soil typically indicates root rot rather than underwatering. If this happens, you might be bottom watering too frequently or for too long. Let your plant dry out more between waterings and reduce watering duration.
Advanced Tips for Bottom Watering Success
Creating a Bottom Watering Station
Once I realized how much I loved bottom watering, I created a dedicated watering station in my home. I use a large plastic storage container that holds multiple pots simultaneously. This saves time and makes the entire process more efficient. You could do the same with a large tray or even a bathtub for multiple plants.
Mixing Plant Groupings by Water Needs
I’ve started grouping plants with similar watering requirements together. All my succulents go in one watering session, my tropical plants in another, and my seedlings in a third. This system prevents me from overwatering plants that prefer drier conditions or underwatering thirsty plants.
The Long-Term Benefits You’ll Notice
Healthier Root Systems
After several months of consistent bottom watering, you’ll notice your plants developing stronger, more extensive root systems. When you repot your plants, you’ll see roots that are white and vigorous rather than mushy or underdeveloped. This alone makes the technique worthwhile.
Reduced Disease and Pest Issues
Many fungal diseases thrive when plant foliage stays wet. By keeping leaves dry with bottom watering, you’re reducing the environments where problems develop. I’ve noticed significantly fewer fungal issues and pest problems since switching to this method.
Improved Plant Appearance
Plants watered from below develop fuller, more vibrant foliage. There’s no splashing water to damage delicate leaves, and the consistent moisture availability supports better photosynthesis and growth. Your plants will simply look happier and more beautiful.
Conclusion
Bottom watering has genuinely transformed my relationship with plant care. What started as an experiment with my finicky African violets has become my preferred method for nearly all my houseplants. This technique works with nature’s capillary systems rather than against them, resulting in stronger roots, healthier foliage, and fewer plant problems overall. The process is simple enough for beginners yet offers enough nuance for experienced plant parents to refine their technique. Whether you’re struggling with consistently overwatered plants or searching for a method that promotes robust growth, bottom watering deserves a place in your plant care routine. Start with one or two plants, observe the results, and gradually expand the technique to your entire collection. Your plants will thank you with vibrant growth and resilient health.
Frequently Asked Questions About Bottom Watering
Can I use bottom watering for all my houseplants?
While most houseplants tolerate bottom watering well, not all prefer it exclusively. Plants with extremely shallow root systems or those that prefer drier conditions between waterings might do better with traditional top watering. The best approach is to try bottom watering with your plants and observe their response over several weeks. If a plant thrives, continue the method. If it shows signs of stress, switch back to top watering. Many experienced plant parents use a combination of both methods, choosing based on seasonal needs and individual plant preferences.
How long can I leave my plant in the water while bottom watering?
I typically recommend leaving your plant in water for ten to twenty minutes maximum. The exact time depends on your soil type and pot size. Sandy soils absorb water quickly and might need only ten minutes, while heavier clay-based soils might benefit from the full twenty. The key is watching for moisture reaching the soil surface and then removing your plant promptly. Leaving plants sitting in water longer than twenty minutes significantly increases the risk of root rot and waterlogging.
Is bottom watering better than top watering?
Neither method is universally better—they simply serve different purposes. Bottom watering promotes even moisture distribution and encourages deep root development, making it excellent for most houseplants. Top watering is faster for multiple plants and sometimes necessary for plants with specific requirements. Many successful plant parents use both methods strategically. I use bottom watering for regular maintenance and top watering occasionally to flush accumulated salts from the soil.
What water temperature should I use for bottom watering?
Room-temperature water is ideal for bottom watering. Cold water can shock plant roots and cause stress, potentially leading to leaf drop or stunted growth. Warm water works fine but isn’t necessary. I typically use water that’s been sitting indoors for several hours or filtered tap water that’s naturally at room temperature. If you’re using freshly run tap water, let it sit in your container for five to ten minutes before adding your plant.