How to Clean Pool Green Water: A Complete Guide to Restoring Crystal Clear Water
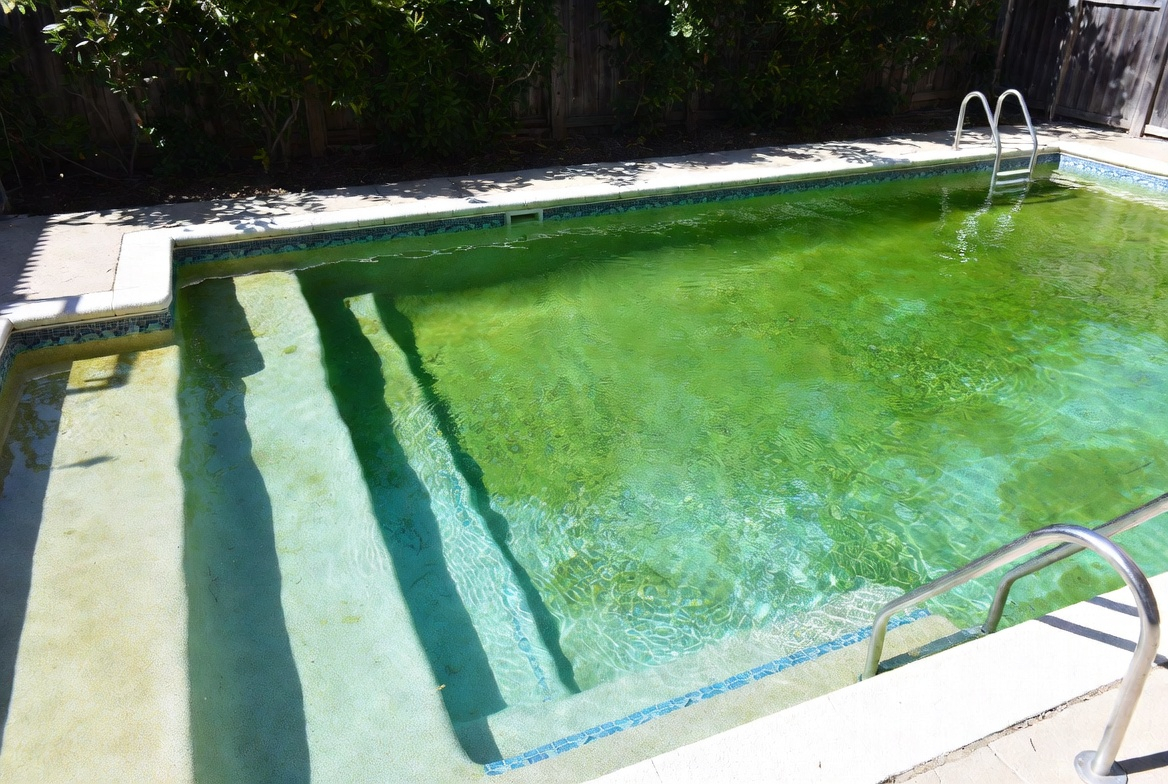
There’s nothing quite like the disappointment of walking outside on a beautiful summer day, ready to dive into your pool, only to find it transformed into what looks like a murky swamp. Green pool water is one of the most common problems pool owners face, and honestly, it can feel pretty overwhelming when you’re staring at that murky mess. But here’s the good news—I’m going to walk you through exactly how to clean pool green water and get your swimming oasis back to its sparkling best.
Whether you’re a new pool owner or someone who’s been maintaining a pool for years, dealing with green water doesn’t have to be a nightmare. In this comprehensive guide, I’ll share everything you need to know about identifying the problem, understanding why it happens, and most importantly, fixing it the right way.
Understanding What Green Pool Water Actually Means
Before we jump into the solutions, let’s talk about what’s actually happening in your pool when the water turns green. Green pool water is typically caused by algae growth, and when you see that color change, it’s essentially your pool’s way of sending out an SOS signal.
The Three Types of Algae You Might Encounter
Not all green water is created equal, and understanding which type of algae you’re dealing with is crucial for treatment. Let me break down the three main culprits:
- Green Algae: This is the most common type and is responsible for that typical cloudy, green appearance. It floats freely in the water, making it look like pea soup. The good news? Green algae is the easiest to treat.
- Yellow or Mustard Algae: This sneaky variety tends to settle on pool surfaces and walls. It’s more resistant to treatment and can be tricky to eliminate completely.
- Black Algae: This is the troublemaker of the algae world. It clings to pool surfaces with stubborn roots and is definitely the hardest to deal with. If you see dark spots on your pool walls, you’re likely dealing with this type.
The green water you’re seeing is most likely green algae, which actually makes your job easier. This type responds well to proper treatment and doesn’t require the extended effort that black algae demands.
Why Does Your Pool Turn Green in the First Place?
Understanding the root cause helps you prevent this situation from happening again. Think of it like this: you wouldn’t try to fix a leaky roof without understanding why it’s leaking, right? Same principle applies to pool maintenance.
Common Culprits Behind Green Pool Water
Several factors can turn your crystal clear pool into a green lagoon:
- Inadequate Chlorine Levels: Chlorine is your pool’s primary defense against algae. When levels drop too low, algae seizes the opportunity to multiply rapidly.
- Poor Water Circulation: If your pump and filter aren’t working properly, dead spots develop where water stagnates and algae thrives.
- Imbalanced pH Levels: When your pool’s pH swings out of the ideal range, chlorine becomes less effective, leaving your pool vulnerable.
- Algae Spores from Outside: Wind, rain, and debris carry algae spores directly into your pool.
- Insufficient Filtration: A clogged or malfunctioning filter can’t remove algae particles effectively.
- High Phosphate Levels: Phosphates feed algae like fertilizer feeds plants, so high levels create ideal growing conditions.
Step-by-Step Process to Clean Green Pool Water
Now for the part you’ve been waiting for—how to actually fix this problem. I’ll walk you through each step, and I recommend following them in order for the best results.
Step One: Test Your Water Chemistry
You can’t treat what you don’t measure, so this is your essential first step. Grab a quality water test kit—a digital one is more accurate than test strips, though strips work in a pinch. You need to check:
- Free chlorine levels (should be 1-3 ppm normally, 5-10 ppm for heavily algae-infested pools)
- Total chlorine
- pH level (ideal range is 7.2-7.6)
- Alkalinity (80-120 ppm is ideal)
- Calcium hardness
Take notes on these readings because you’ll reference them throughout your treatment process.
Step Two: Brush the Pool Walls and Floor Thoroughly
This might seem obvious, but it’s absolutely crucial. Grab a sturdy pool brush and get to work. Brush every wall, the floor, and any steps or ledges. You’re essentially dislodging algae from surfaces and preventing it from settling back down. Don’t rush this step—take your time and be thorough.
Why does this matter? When you brush, you’re breaking algae loose and making it easier for your filtration system and chemicals to do their job. You’re also increasing water circulation in areas that might have been stagnant.
Pro Tip for Vigorous Scrubbing:
If you have a lot of debris or dead algae settling on the bottom, consider using a pool vacuum before brushing to remove the bulk of it. This prevents you from stirring up all that debris when brushing.
Step Three: Balance Your pH and Alkalinity
Here’s where chemistry comes into play. If your pH is too high, your chlorine won’t be effective. Think of chlorine as a soldier that needs the right conditions to fight the enemy—if the pH isn’t right, that soldier is weakened.
If your pH is above 7.6, use a pH decreaser (sodium bisulfate). If it’s below 7.2, use a pH increaser (sodium carbonate). Always follow the product instructions for dosing based on your pool size.
Similarly, adjust alkalinity to the 80-120 ppm range. Alkalinity acts as a buffer, helping keep pH stable. Low alkalinity means pH can swing wildly, making treatment inconsistent.
Step Four: Shock Your Pool with High Chlorine Treatment
This is where the real magic happens. Pool shocking is essentially flooding your water with a massive dose of chlorine to overwhelm the algae. You’re not going to use your regular daily dose—you’re going to supercharge it.
How Much Shock Do You Need?
For moderately green water, most pool owners need to use 2-3 times the normal shock dose. For heavily green water that you can barely see through, you might need to do multiple shock treatments over consecutive nights.
Always follow your shock product’s instructions, as different products have different potencies. Generally, you’ll want to add shock in the evening when the pool won’t be in direct sunlight (because UV rays break down chlorine).
What Type of Shock Should You Use?
Calcium hypochlorite and sodium hypochlorite are both effective. Avoid stabilized chlorine products during the shock phase—you want fast-acting chlorine that hits hard and fast. Some people swear by liquid chlorine, while others prefer powder. Both work; it’s often a preference and availability issue.
Step Five: Run Your Filter Continuously
After you’ve shocked your pool, your filter becomes your best friend. Run it 24 hours a day until the water clears up. Your filter’s job is to physically remove dead algae particles and debris from the water, which is essential for clarity to return.
Monitor your filter pressure gauge. As debris accumulates, pressure will increase. When pressure rises 8-10 psi above normal, it’s time to backwash your filter (if you have a sand filter) or clean/replace the cartridge (if you have a cartridge filter).
Important Filter Maintenance Note:
Depending on how green your water is, you might need to backwash multiple times over the course of a few days. This is completely normal and expected. Each backwash removes trapped debris, allowing your filter to work more effectively.
Step Six: Add an Algaecide (If Necessary)
Here’s where opinions differ among pool professionals. Some argue that proper shocking and filtration is enough for green algae. Others insist that adding an algaecide provides extra insurance and speeds up the process.
My recommendation? If you’re not seeing improvement within 24 hours of shocking, add an algaecide. There’s no harm in it, and it can help ensure you eliminate all algae cells. Choose a non-copper algaecide to avoid staining your pool surfaces.
Step Seven: Test and Maintain Proper Chlorine Levels
After 24 hours, test your water again. Your free chlorine should be significantly higher than where you started. As days go by and the water clears, your chlorine levels will naturally decrease as it works to kill algae. You want to maintain 5-10 ppm of free chlorine until the water is completely clear.
Once clarity returns, test again and bring your chlorine back down to normal maintenance levels (1-3 ppm) to prevent over-chlorination and eye irritation.
How Long Does It Take to Clear Green Pool Water?
I know you’re eager to get back in that pool, so let’s talk timeline. How fast you can clear green water depends on several factors:
- The Severity of Algae Growth: Slightly hazy water might clear in 24-48 hours. Heavy, pea-soup green water can take 3-7 days.
- Your Pool’s Filtration System: A high-quality filter running constantly will clear water much faster than an older, worn-out system.
- Water Temperature: Warmer water encourages faster algae death. Cold water can slow the process.
- Sunlight Exposure: UV rays help break down chlorine but also help inhibit algae growth to some degree.
- Your Consistency with Treatment: If you’re diligent about brushing, shocking properly, and maintaining chemicals, you’ll see faster results.
Don’t expect your pool to transform overnight, but you should see noticeable improvement within the first 24-48 hours if you’re doing everything right.
When to Call a Professional Pool Service
Let’s be honest—sometimes the DIY approach isn’t practical or effective. Consider calling in the professionals if:
- Your pool has been green for more than a week and isn’t improving despite your best efforts
- You’re dealing with black algae that keeps returning
- Your pump or filter isn’t working properly, and you’re not comfortable repairing it yourself
- You’re unsure about proper chemical dosing and worried about damaging your pool
- You simply don’t have the time or energy to maintain the treatment process
Professional pool services have commercial-grade equipment and years of experience. They can often clear a pool faster and more efficiently than DIY methods, which might save you money in chemicals and time.
Prevention: Keeping Your Pool Green-Free Going Forward
Once you’ve cleared that green water, you never want to see it again, right? Prevention is absolutely worth the effort.
Regular Testing and Maintenance Schedule
Test your water at least twice a week during swimming season. This allows you to catch chemical imbalances before they become problems. Check your free chlorine, pH, and alkalinity regularly. It takes five minutes and could save you days of hassle.
Keep Your Filter Clean and Running
Clean or backwash your filter every two weeks minimum, more often if needed. Make sure your pump runs at least 8 hours daily, longer during peak swimming season. A pump that’s off half the day is asking for trouble.
Brush and Vacuum Regularly
Brush your pool walls and floor at least once weekly. Vacuum when debris accumulates. This prevents dead spots where algae can thrive and keeps water circulation optimal.
Control Phosphate Levels
Phosphates are algae food. Try to keep them below 100 ppb (parts per billion). Use a phosphate test kit periodically, and if levels are high, consider using a phosphate remover.
Maintain Proper Chlorine Levels Consistently
Never let your chlorine drop below 1 ppm. During swimming season, aim for 2-3 ppm. This consistent level prevents algae from gaining a foothold in the first place.
Special Considerations for Different Pool Types
Not all pools are created equal, and some require slightly different approaches.
Above-Ground Pools
Above-ground pools are more vulnerable to algae growth due to smaller filtration systems and less water volume. They also tend to have less water circulation. If you have an above-ground pool, be extra diligent with chemical maintenance and circulation. You might consider adding an algaecide preventatively during summer.
Salt Water Pools
Salt water systems use chlorine generators to produce chlorine from salt, which is great for consistent chlorine levels. However, they still need proper brush and filter maintenance. The shock treatment process is similar, though you might use different products designed for salt systems.
Inflatable Pools
These temporary pools are even more prone to algae growth due to minimal filtration. Shock more frequently, test more often, and consider replacing the water entirely if it becomes too green. Sometimes it’s easier and more cost-effective than extensive treatment on a small inflatable pool.
Common Mistakes People Make When Cleaning Green Pool Water
Learning from others’ mistakes can save you time and frustration. Here are the biggest errors I see people make:
Not Brushing the Pool Before Shocking
Some people just dump chemicals in and hope for the best. That’s backwards. Brushing loosens algae and makes chemicals way more effective. Always brush first.
Under-Dosing on Shock Treatment
People sometimes use too little shock, thinking they’ll save money. This doesn’t kill all the algae, and it survives to grow back. Better to shock properly once than shock inadequately three times.
Turning Off the Filter to Save Money
Your filter does the heavy lifting of removing dead algae. Running it 24/7 during treatment is non-negotiable. Yes, it uses electricity, but it ensures your pool clears quickly.
Ignoring pH Balance
You can’t just add chlorine and hope chlorine works if your pH is way off. Balance your chemistry first, then shock. This makes treatment way more effective.
Swimming in the Pool During Treatment
I get the temptation, but please don’t. The high chlorine levels can irritate your skin and eyes significantly. Wait until the water is clear and chlorine levels have normalized.
The Equipment You’ll Need to Have on Hand
If you’re going to take the DIY approach, having the right tools makes everything easier.
<ul