How to Draw a Droplet of Water: A Complete Guide to Realistic Water Art
Understanding the Basic Structure of a Water Droplet
Before you even pick up your pencil, it’s crucial to understand what you’re actually drawing. A water droplet isn’t just a random blob of blue color. It has a specific shape that’s determined by surface tension and the laws of physics. Think of it like a tiny, transparent marble that’s been slightly flattened on top.
The Shape and Geometry of Water Droplets
Water droplets naturally form into what’s called a oblate spheroid shape—which is basically a sphere that’s been slightly compressed from top to bottom. The bottom tends to be rounder and more pronounced, while the top is more flattened. This isn’t accidental; it’s nature’s way of minimizing surface tension and creating the most stable form.
When you’re planning your drawing, remember that most water droplets are approximately circular when viewed from the side, with a width that’s roughly 60 to 80 percent of its height. This proportion is key to making your droplet look authentic rather than cartoony.
How Droplets Sit on Different Surfaces
The shape of your water droplet will change depending on what it’s sitting on. On a hydrophobic surface (one that water beads up on), you’ll get a much rounder, more pronounced dome shape. On a hydrophilic surface (one that water spreads across), the droplet becomes flatter and wider. Understanding these variations will help you create more dynamic and realistic compositions.
Essential Materials and Tools You’ll Need
You don’t need expensive supplies to draw a beautiful water droplet. In fact, the magic is more about technique than equipment. However, having the right tools does make the process smoother and more enjoyable.
Drawing Papers and Surfaces
For pencil drawing, I recommend using a smooth, heavyweight paper like Bristol board or mixed media paper. These papers have just enough tooth to hold graphite well without being so textured that it interferes with your fine details. The weight matters too—heavier paper (around 140 lbs or 300 gsm) resists buckling when you apply water or other media.
Pencils and Graphite Tools
You’ll want a range of graphite pencils to create the full spectrum from light grays to deep blacks. Here’s what I suggest keeping in your arsenal:
- HB pencil for initial sketching and light outlines
- 2B and 4B pencils for mid-tone shading
- 6B and 8B pencils for deep shadows and dark areas
- Mechanical pencil (0.5mm or 0.7mm) for precise details and highlights
Blending and Shading Tools
Blending stumps (also called tortillons) and blending brushes are absolutely essential for creating the smooth, gradual transitions that make water look translucent. A kneaded eraser is invaluable too—it lets you gently lift out highlights without damaging your paper. Regular erasers are too harsh for detailed work.
Optional but Helpful Supplies
If you want to take your water droplet drawings to the next level, consider adding these items to your toolkit: white gel pens for crisp highlights on darker papers, fixative spray to protect finished work, a ruler or straightedge for establishing accurate proportions, and a light pad or tracing paper for transferring initial sketches.
The Importance of Light and Reflection in Water Droplet Drawing
Here’s something that separates amateur water droplet drawings from professional-looking ones: understanding light. A water droplet is essentially a tiny lens. Light enters it, bends (refracts), and creates highlights and shadows in specific, predictable places. When you understand where these light effects appear, your drawings instantly become more convincing.
How Light Interacts with Water
Imagine a single light source, like a lamp or window, shining on your water droplet. The light doesn’t just bounce off the surface; it actually passes through the water because water is transparent. This creates multiple visual effects happening simultaneously: a bright highlight on top, a darker shadow area, and sometimes a secondary reflection or refraction inside the droplet.
The key insight here is that the brightest highlight on a water droplet is usually not at the very top center. Instead, it’s slightly off to one side where the light hits the curved surface at just the right angle. This is called specular reflection, and it’s what gives water that distinctive gleaming, liquid appearance.
Identifying the Light Source in Your Composition
Before you start drawing, decide where your light is coming from. Is it from the top left? Top right? Above? The position of your light source will determine everything about your shadows, highlights, and the overall mood of your piece. Consistency is crucial—all your highlights and shadows need to tell the same story about where the light is coming from.
Creating the Shadow Side of Your Droplet
Every droplet has a light side and a shadow side. The shadow side (the side facing away from your light source) should be noticeably darker. But here’s the nuance: it shouldn’t be uniformly dark. There’s usually a gradual transition from the brighter side to the darker side, with the darkest area appearing near the middle or slightly off-center on the shadow side.
Step-by-Step Drawing Process for a Realistic Water Droplet
Now we’re getting into the good stuff. Let me walk you through the actual process of drawing a water droplet from start to finish.
Step 1: Establish Your Reference and Composition
Start by finding a reference image or, even better, creating your own reference by photographing an actual water droplet. You can do this by placing a droplet on a smooth surface near a window or lamp. Study it carefully for several minutes. Notice the exact shape, where the highlights are, how dark the shadows get, and how the transparency works.
Step 2: Sketch the Basic Outline
Using your HB pencil, lightly sketch the outline of your droplet. Don’t press hard—you want this to be barely visible. Use light, confident strokes. Don’t worry about perfection at this stage; you’re just establishing the general shape and proportions. If you find it helpful, you can use a circle or oval template to ensure symmetry, though imperfection can sometimes look more natural.
Step 3: Identify and Mark Your Highlight Areas
Before you start shading, mark where your brightest highlights will be. Use your kneaded eraser to create small, clean areas that you’ll keep white (or light, depending on your paper). The main highlight is usually a small, bright area near the top or upper portion of the droplet. Some artists like to mark this with a tiny dot to remind themselves not to shade over it.
Step 4: Begin Light Shading
Start applying light layers of shading with your 2B pencil. This is where patience becomes your best friend. Build up the tone gradually in layers rather than trying to get the right darkness in one or two applications. Focus on the shadow side first, laying down a light, even tone across the entire shadow area.
Step 5: Deepen the Shadows Progressively
Switch to your 4B or 6B pencil and continue building up the shadow areas. The darkest shadows should be directly opposite your highlight area. Create a subtle gradient from the shadow side toward the middle of the droplet. This gradient is what creates the three-dimensional, rounded appearance.
Step 6: Blend for Smooth Transitions
This is where your blending stump becomes essential. Gently blend the shaded areas using circular motions. The goal is to eliminate harsh lines and create smooth, gradual transitions between light and shadow. This blending is what makes the droplet look like glass rather than a flat, drawn object.
Step 7: Create the Secondary Shadow
Many realistic water droplets have a darker line or band that appears where the bottom of the droplet meets the surface it’s sitting on. This is called a contact shadow, and it grounds your droplet in space. Make this subtle but visible—it helps anchor your droplet to the composition.
Step 8: Refine Your Highlight
Come back to your main highlight and make sure it’s truly the brightest part of your drawing. If needed, gently clean it up with your eraser and perhaps add additional white using a white gel pen on darker backgrounds. The highlight should be sharp and well-defined, creating that reflection that makes water look wet and reflective.
Creating Realistic Highlights and Shadows
The distinction between a mediocre water droplet and a stunning one often comes down to how you handle highlights and shadows. Let me dive deeper into these crucial elements.
The Anatomy of a Perfect Highlight
A highlight on a water droplet isn’t just a random white spot. It has a specific character. The brightest part (the core of the highlight) is usually quite small and sharp. This bright core is then surrounded by a slightly larger, slightly softer glow. This secondary glow is what tells your brain that light is being reflected off a curved, reflective surface.
The position of your highlight matters too. It should always be on the side of the droplet facing your light source. If your light is coming from the upper left, your highlight should be in the upper left portion of the droplet. Violating this rule is one of the quickest ways to make a drawing look wrong.
The Dark Line: Subtle but Essential
Many water droplets have a thin, dark line that appears near the outline on the shadow side. This isn’t a border you’re adding; it’s an optical effect where the eye perceives a thin band of darkness where the curved surface changes angle sharply. It’s subtle, but including it makes an enormous difference in realism.
Internal Shadows and Depth
The interior of a water droplet isn’t uniformly the same tone. There’s often a slight darkening toward the bottom, and sometimes you can see hints of internal shadows that suggest the three-dimensional structure inside. These are achieved through careful layering and blending, never through heavy, aggressive shading.
Mastering Transparency and Glass-Like Effects
What makes water water, and not just a blue blob? Transparency. This quality can be incredibly challenging to convey in a drawing, but once you understand the principles, it becomes much more manageable.
Using Contrast to Suggest Transparency
The background or surface behind your water droplet plays a huge role in making the transparency visible. If your droplet is on a light surface, the bottom of the droplet might appear slightly darker. If it’s on a darker surface, you might see the background showing through the top of the droplet. This interaction between the droplet and what’s behind it is crucial for suggesting transparency.
Maintaining the Glass-Like Quality
Water droplets have a smooth, slick quality that should come through in your rendering. Avoid any rough or grainy appearance in your shading. Keep your transitions smooth and your tones even. Use light layers and careful blending. Think of it like polishing glass—multiple light applications create a smoother, more refined appearance than heavy, aggressive shading.
The Role of the Background
Consider what your water droplet is sitting on. Is it on a leaf? A piece of metal? Glass? The surface beneath and around your droplet will affect how you render it. On a glossy surface, you might see clear reflections. On a matte surface, the droplet might appear more isolated. Paying attention to these environmental factors elevates your entire composition.
Common Mistakes to Avoid
I’ve made these mistakes myself, so I’m speaking from experience when I say these are the things that hold back most beginning water droplet artists.
Mistake 1: Making the Highlight Too Large
One of the most common errors is creating a highlight that’s too big or covers too much of the droplet. Real water droplet highlights are relatively small and focused. A highlight that covers half your droplet will look cartoonish rather than realistic.
Mistake 2: Using Uniform Shading
Another frequent problem is shading the entire shadow side the same darkness. Reality is more nuanced. Even in the shadow side, there’s variation in tone. The darkest area is usually concentrated in a specific region, while the rest of the shadow side is lighter.
Mistake 3: Neglecting the Contact Shadow
That small shadow or dark line where the droplet meets the surface it’s sitting on might seem minor, but it’s crucial. Without it, your droplet looks like it’s floating in space rather than resting on something.
Mistake 4: Overworking the Drawing
Sometimes less is more. If you keep adding layers and details indefinitely, you’ll actually make your drawing look worse. There’s a point where a water droplet drawing is done, and continuing to work on it past that point introduces artifacts and losses the freshness. Learn to recognize when to stop.
Mistake 5: Forgetting About the Light Source
Inconsistency in light direction ruins realism. If your highlight is in the top right but your shadow is deeper on the left, something’s wrong with your light direction. Before you start, decide definitively where your light is coming from and stick with that decision throughout your drawing.
Advanced Techniques for Experienced Artists
If you’ve mastered the basics and want to push your water droplet drawings further, here are some advanced techniques to explore.
Multiple Water Droplets and Composition
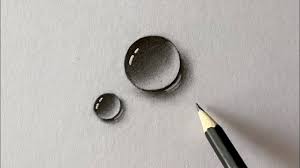
Drawing a single droplet is one thing; creating a compelling composition with multiple droplets is another. When drawing several droplets, consider their arrangement. Do they overlap? Are they clustered together? How do their highlights and shadows interact? A single large droplet surrounded by smaller ones can create visual interest and hierarchy.
Advanced Refractive Effects
Water droplets can refract light in complex ways. Sometimes you’ll see an inverted image of the background refracted through the droplet. Capturing these effects requires careful observation and sometimes working