How to Adjust Toilet Tank Water Level: A Complete Guide to Fixing Your Bathroom Plumbing
Have you ever noticed that your toilet runs constantly, or perhaps the water level seems too low when you flush? You’re not alone. Many homeowners face issues with their toilet tank water levels, yet most assume they need to call an expensive plumber. Here’s the truth: adjusting your toilet tank water level is something you can absolutely do yourself, and it takes just a few minutes of your time.
In this comprehensive guide, I’ll walk you through everything you need to know about toilet tank water levels, why they matter, and how to adjust them like a pro. Whether you’re dealing with a running toilet or just want to fine-tune your bathroom’s efficiency, you’ll find practical solutions right here.
Table of Contents
Understanding Your Toilet Tank: The Basics You Need to Know
Before we dive into adjustments, let’s understand what we’re working with. Your toilet tank is essentially a water storage chamber that fills and empties with each flush. Think of it like a water balloon that refills automatically—but instead of a balloon, it’s a porcelain or ceramic tank hidden behind your bathroom wall or sitting visibly on top of your toilet bowl.
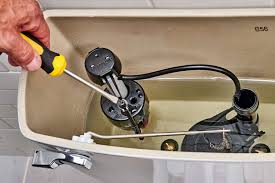
The Key Components Inside Your Toilet Tank
Inside your toilet tank, several important parts work together in harmony. Understanding these components helps you make adjustments confidently. Let me break them down for you:
- The fill valve (ballcock): This is the mechanism that lets water enter the tank after you flush
- The float: A ball or cup-shaped device that rises and falls with the water level
- The flush valve: The drain mechanism at the bottom that releases water into the bowl
- The overflow tube: A safety feature that prevents tank overflow
- The flapper: A rubber seal that controls water flow from tank to bowl
The float is really the star player here. As water fills the tank, the float rises. When it reaches a certain height, it signals the fill valve to stop. If your water level is off, it’s usually because this float mechanism needs adjustment.
Why Does Your Toilet Tank Water Level Matter?
You might think, “Does it really matter?” The answer is yes, and here’s why. The water level directly affects how well your toilet flushes and how efficiently it operates. It’s like the difference between a car with the right amount of oil versus one running dry—eventually, something goes wrong.
Problems Caused by Incorrect Water Levels
Getting your water level wrong creates a cascade of issues:
- Weak flushes: Too little water means inadequate flushing power, leading to multiple flushes and wasted time
- Running toilets: Water trickling into the bowl constantly, which wastes thousands of gallons annually
- Higher water bills: Constant running directly translates to increased utility costs
- Sediment buildup: Improper water levels can cause mineral deposits and damage
- Wear and tear: An improperly adjusted toilet works harder and fails faster
The Sweet Spot: What’s the Ideal Water Level?
Most toilet manufacturers recommend keeping the water level about one inch below the overflow tube. This gives you enough water for a powerful flush while preventing overflow situations. Think of it as the Goldilocks principle—not too much, not too little, just right.
How to Check Your Current Toilet Tank Water Level
Before making any adjustments, you need to know where you stand. Let’s check your current water level together.
Step-by-Step Inspection Process
First, lift the lid off your toilet tank carefully. Here’s a pro tip: most toilet lids are simply sitting on top—don’t be afraid, but do be gentle. These porcelain covers can break easily if dropped.
Once you can see inside, look at where the water sits in relation to the overflow tube. The overflow tube is that vertical pipe in the center of the tank. Your water should reach about one inch below the top of this tube. If you can’t clearly see the water level, you might have a cloudy tank or mineral buildup—that’s a separate issue we can address another time.
Take a moment to examine the float mechanism. Is the float a ball attached to an arm, or is it a cup-shaped cylinder? This matters because adjustment methods differ slightly depending on your float type.
Adjusting Toilet Tank Water Level: The Detailed Guide
Now for the main event—actually making the adjustments. Don’t worry; this is genuinely simple once you know what you’re doing.
Method One: Adjusting a Ballcock Float Arm
If your toilet has an older-style float ball attached to a long arm, this method applies to you. This design has been around for decades and is still common in many homes.
Locate the float arm—it’s the long metal or plastic rod connected to the float ball. Here’s what you do: gently bend the arm downward slightly. That’s it. Bending the arm down lowers the float, which signals the fill valve to shut off earlier, reducing water level. Conversely, bending it upward increases the water level.
Make small adjustments—we’re talking quarter-inch increments here. After each adjustment, flush the toilet and observe the new water level. This trial-and-error approach ensures you hit that perfect mark without overshooting.
Method Two: Adjusting a Modern Cylinder Float
Newer toilets often feature a cylinder-shaped float that slides up and down on a vertical rod or clip. This design is more user-friendly and precise.
Look for a small clip or set screw on the fill valve that holds the float. On most modern models, you’ll simply pinch the clip and slide the float up or down. Moving it up increases water level; moving it down decreases it. Some models have a screwdriver adjustment instead of a clip.
After repositioning, test your toilet. You’re aiming for that one-inch-below-the-overflow-tube sweet spot we discussed earlier.
Method Three: Fill Valve Adjustment Screw
Some fill valves have an adjustment screw at the top. If you can locate a small screw on your fill valve, turning it clockwise decreases water level, while counterclockwise increases it. Usually, a quarter-turn makes a noticeable difference.
This method is less common on residential toilets but worth knowing about. Always turn slowly and test frequently—you don’t want to over-adjust and create a new problem while solving the original one.
Troubleshooting Common Adjustment Problems
What happens if you’ve made adjustments but the water level still won’t cooperate? Let’s explore some scenarios and solutions.
The Water Level Keeps Rising: What’s Happening?
If the water level continuously rises until it spills into the overflow tube, you have a fill valve issue. The fill valve isn’t shutting off properly, even after you’ve adjusted the float. This usually means the fill valve is stuck or damaged and needs replacement. It’s more involved than a simple adjustment, but still a DIY-able project with the right kit from your hardware store.
The Water Level Drops Below Your Target: Finding the Leak
If you set the water level correctly but it gradually drops, you likely have a slow leak somewhere. Check the flapper first—this rubber piece at the base of the overflow tube can deteriorate over time. A leaking flapper lets water slowly escape into the bowl, even when you haven’t flushed. Replacing a flapper is inexpensive and straightforward, requiring just a few minutes of work.
The Float Mechanism Seems Stuck
Sometimes floats get stuck in position, unable to move freely. This is often caused by mineral buildup or debris. Try gently moving the float by hand to free it. If it’s completely stuck, remove it entirely and soak it in vinegar for an hour. This dissolves mineral deposits and usually restores function.
Tools and Materials You’ll Need
Good news—you probably don’t need to buy anything special. Here’s what you might already have:
- Adjustable wrench: Helpful for removing components if needed
- Screwdriver set: For adjustment screws and potential repairs
- Bucket: To catch water if you need to disassemble anything
- Towels: For cleanup and drying
- White vinegar: Great for cleaning mineral deposits
- Replacement kit: Optional, but good to have if you discover a damaged component
That’s really all you need for most adjustments. No expensive plumber tools required.
Safety Considerations When Working Inside Your Tank
Before you reach in there, let’s talk safety. Your toilet tank water is generally clean and safe to handle—it’s fresh water straight from your supply line. However, a few precautions make sense:
- Shut off the water supply before making any adjustments to fill valves or float mechanisms
- Flush the tank empty before working inside it
- Avoid touching the flapper with bare hands if you can help it
- Wear old clothes you don’t mind getting wet
- Keep the bathroom well-ventilated
Following these simple guidelines prevents accidents and keeps your workspace clean and hygienic.
When to Call a Professional Plumber
Most water level adjustments fall within the DIY zone, but sometimes you need professional help. Here’s when to call your plumber:
Signs You Need Expert Help
- Water leaking from the tank base: This indicates a crack or damaged seal that you can’t adjust away
- Fill valve replacement needed: While possible for DIYers, some prefer professional installation
- Multiple components failing: When several parts are damaged, replacement becomes complex
- Persistent overflow: If water keeps running after your adjustments, the fill valve likely needs professional attention
Remember, calling a plumber for a $200 repair beats calling them for a $2,000 water damage repair. Sometimes prevention through professional service makes financial sense.
Preventative Maintenance Tips for Long-Term Success
Once you’ve adjusted your water level perfectly, you want to keep it that way. Prevention is always easier than repair.
Regular Inspection Habits
Check your toilet tank quarterly. Open the lid and look for any obvious issues—running water, mineral buildup, or float mechanism problems. Catching issues early prevents bigger headaches down the road.
Cleaning Your Tank Annually
Hard water areas should clean their tanks once yearly. Vinegar works wonderfully—just pour two cups into the tank and let it sit for several hours. The acidity dissolves mineral deposits without harmful chemicals.
Monitoring Your Water Bills
If your water bills suddenly spike, suspect a running toilet before anything else. This is often the first sign that water level adjustment is needed. Paying attention to your utility bills gives you an early warning system.
Advanced Adjustments: Fine-Tuning for Optimal Performance
Once you’ve mastered basic adjustments, you can fine-tune your toilet for maximum efficiency.
Customizing Water Level for Your Specific Needs
Some people prefer slightly more water for a stronger flush, while others prioritize water conservation. You have flexibility here. The one-inch-below-overflow rule is a guideline, not an absolute law. If you want more flushing power, add half an inch more water. If you’re in drought conditions or want to reduce usage, lower it slightly.
Testing Different Configurations
Try different water levels and see how your toilet performs. Does it flush completely? Does it run afterward? Is the flush quiet or loud? Your ideal setting balances flush power, water efficiency, and noise level.
Understanding Modern Eco-Friendly Toilets
If you have a newer, eco-friendly toilet, water level adjustments might work slightly differently. Many modern toilets have dual-flush mechanisms where you control water volume based on waste type.
High-Efficiency Toilet Specifications
These toilets use 1.28 gallons per flush or less, compared to older models using 3.5 to 7 gallons. The water level is pre-set to work optimally with these systems, so you have less flexibility. However, the same adjustment principles still apply if you need to troubleshoot.
Conclusion
Adjusting your toilet tank water level is genuinely one of the easiest home maintenance tasks you can tackle. It requires minimal tools, takes only minutes, and solves problems that otherwise cost hundreds in plumber fees or thousands in water waste. Whether you’re dealing with a running toilet that’s driving you crazy or simply want to optimize your bathroom’s efficiency, these adjustments put you in control.
Start by understanding your toilet’s anatomy, inspect your current water level, and make small, deliberate adjustments. Test frequently, and don’t hesitate to call a professional if you encounter something beyond your comfort zone. With the knowledge and confidence you’ve gained from this guide, you’re ready to keep your toilet running smoothly for years to come. Your wallet and your water bill will thank you.
Frequently Asked Questions About Toilet Tank Water Level Adjustment
What is the ideal water level in a toilet tank?
The ideal water level sits approximately one inch below the top of the overflow tube in the center of your toilet tank. This provides enough water for a powerful, complete flush while maintaining safety by preventing overflow situations. Most toilet manufacturers design their systems with this measurement in mind, making it the universal standard for residential toilets. If your water level falls significantly below this mark, you’ll experience weak flushes and may need multiple flushes per use, wasting water and defeating the purpose of adjustment.
How often should I check and adjust my toilet tank water level?
You should inspect your toilet tank water level at least quarterly, or about four times per year. More frequent checks benefit households with hard water or older plumbing systems, which are prone to mineral buildup and component wear. If you notice signs of problems—such as running toilets, weak flushes, or unusually high water bills—inspect immediately rather than waiting for your scheduled check. Regular monitoring catches small issues before they become expensive problems requiring professional intervention.
Can a low toilet tank water level cause weak flushes?
Absolutely, and this is one of the most common reasons people need adjustment. The water in your tank provides the pressure and volume needed to push waste through the plumbing system. When the water level drops too low, you don’t have enough water to create sufficient force for a complete flush. This results in multiple flushes per use, which ironically wastes more water than having the proper level would. Raising the water level to the recommended one inch below the overflow tube typically resolves weak flush issues immediately.
What should I do if my toilet continues running after I adjust the water level?
A continuously running toilet after adjustment usually indicates a problem with the fill valve or flapper, not simply a water level issue. The