How to Apply Water Based Stain Like a Pro: Your Complete Guide
I’ll be honest with you—when I first picked up a brush to apply water-based stain, I thought it would be just like painting a wall. Spoiler alert: it’s not. But here’s the good news—once you understand the fundamentals, applying water-based stain becomes an incredibly rewarding DIY project that can transform your furniture and wood surfaces in ways you never imagined.
Water-based stains have become increasingly popular among both professionals and homeowners, and for good reason. They’re less toxic than their oil-based counterparts, dry faster, and produce less odor. But here’s what I discovered through trial and error: applying them correctly requires a different approach than traditional stains. Let me walk you through everything I’ve learned.
Understanding Water-Based Stain Before You Begin
What Exactly Is Water-Based Stain?
Think of water-based stain as a suspension of pigment particles floating in water. Unlike oil-based stains that sit on top of the wood and create a rich, deep finish, water-based stains work somewhat differently. They penetrate the wood grain while remaining environmentally friendly and easy to clean up. The pigments are suspended in a water solution, which means they behave quite differently once they contact your wood surface.
When you apply water-based stain, you’re not just adding color—you’re also raising the wood grain slightly due to the moisture content. This is actually something I didn’t expect the first time, and it caught me off guard. But once you understand this characteristic, you can work with it rather than against it.
Why Choose Water-Based Over Oil-Based?
Here are some compelling reasons why I’ve made the switch to water-based stains:
- Lower VOC (volatile organic compounds) means better air quality in your workspace
- Quick drying time, typically 2-4 hours between coats
- Easy cleanup with just soap and water
- Less odor, making it suitable for indoor projects
- Environmentally responsible choice
- No flammability concerns like oil-based products
The trade-off? Water-based stains don’t always achieve that deep, rich color that oil-based stains provide, but modern formulations have closed that gap significantly.
Essential Materials and Tools You’ll Need
Gathering Your Supplies
Before you even think about opening that can of stain, you need to prepare your workspace and gather everything you’ll need. Running back and forth to find supplies is not only annoying but can also affect your staining results if you leave wet work sitting too long.
Here’s what I keep on hand for every staining project:
- Water-based stain (obviously)
- Sandpaper in various grits (120, 150, 220)
- Tack cloth or damp cotton rag
- Natural bristle or microfiber applicator brushes
- Foam rollers or applicator pads
- Lint-free cloths for wiping
- Stir sticks or wooden dowels
- Drop cloth or plastic sheeting
- Gloves and eye protection
- Adequate ventilation (fan or open windows)
- Clean water in a separate container
- Paint tray or shallow container
Choosing the Right Application Tool
This is where many people stumble. Not all brushes are created equal, especially when dealing with water-based products. I’ve learned that synthetic bristle brushes work better with water-based stains than natural bristles, which can absorb moisture and become floppy.
Microfiber applicator pads are my personal favorite because they provide even coverage without streaking. Foam rollers work wonderfully on large, flat surfaces. For detailed work or edges, a quality synthetic brush is essential. The investment in good tools pays for itself in superior results.
Preparing Your Wood Surface: The Foundation of Success
Why Surface Preparation Is Non-Negotiable
I can’t stress this enough—proper preparation determines about 80 percent of your final result. You can have the best stain and the best technique, but if your surface isn’t prepared correctly, you’ll be disappointed. Think of it like trying to apply makeup to unwashed skin; it just won’t work the way you want.
The Sanding Process
Start by assessing your wood surface. Is it previously finished or raw? Is it smooth or rough? These questions guide your sanding approach.
For raw wood, I begin with 120-grit sandpaper to remove any surface imperfections and rough spots. Then I progress to 150-grit, and finally finish with 220-grit for a smooth, receptive surface. This progression takes longer than jumping straight to 220-grit, but the results are noticeably better.
If you’re working with previously stained or finished wood, you might need to start with 100-grit or even 80-grit to remove the old finish completely. Sand until you’ve eliminated the sheen and revealed fresh wood grain. Go with the grain whenever possible to avoid cross-grain scratches that will show through your stain.
Cleaning Away the Dust
After sanding, I can’t just brush off the dust and call it done. All that fine sawdust will interfere with stain absorption and create a gritty texture. I always use a tack cloth first, which is essentially a sticky cloth that grabs fine particles. Then I follow up with a slightly damp cotton rag to catch any remaining dust.
Here’s a pro tip I picked up: let your freshly cleaned surface sit for about 15 minutes before staining. This ensures all the moisture from cleaning has evaporated and the wood is ready to accept the stain evenly.
Testing Your Stain on Scrap Wood
I learned this lesson the hard way. Always test your water-based stain on a hidden area or scrap wood first. Colors can vary depending on the wood species, previous finishes, and even the moisture content of the wood itself. A test run takes five minutes but saves you from potential heartbreak.
Mixing and Preparing Your Water-Based Stain
Why Proper Mixing Matters
Water-based stains need to be stirred thoroughly before application. The pigments can settle at the bottom of the container, and if you’re not careful, you’ll get uneven color. Some people shake the can, others stir. I prefer gentle stirring with a wooden stick, going slowly to avoid incorporating air bubbles.
Stir for at least two minutes, making sure to reach all areas of the container, especially the bottom where pigments tend to accumulate. Don’t be tempted to just give it a quick shake—you want a homogeneous mixture.
Thinning Your Stain Correctly
One question I get asked frequently is whether to thin water-based stain. The answer depends on your desired intensity. For a lighter shade, you can add small amounts of clean water to your stain. I typically use a ratio of about 90 percent stain to 10 percent water, but adjust based on your preferences.
If you thin your stain significantly for a lighter appearance, remember that you might need additional coats to achieve color depth. It’s a balancing act between intensity and the number of applications you want to do.
Application Techniques for Professional Results
The Right Way to Apply Water-Based Stain
Here’s where the actual magic happens. Water-based stains behave differently than oil-based ones, and understanding this difference is crucial. Because they’re water-based, they dry faster, which means you need to work relatively quickly and methodically.
Start by pouring a manageable amount of stain into your paint tray or container. You don’t need the entire can in there—use only what you’ll apply within an hour or so. Once water-based stain is exposed to air in a thin layer, it can start to dry unevenly.
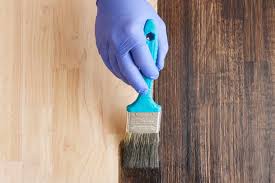
The Wet-Wipe Method: My Preferred Approach
I’ve found that the wet-wipe technique produces the most even results with water-based stains. Here’s how I do it:
First, I dampen my applicator pad or brush with clean water, then squeeze out the excess. This primes the applicator and prevents it from immediately absorbing all the stain, which would create uneven application.
Next, I dip my applicator into the stain and apply it generously but not excessively to the wood surface, working in the direction of the grain. I apply a liberal coat—think of it as painting rather than wiping.
Then comes the crucial step: while the stain is still wet, I take a clean, damp cloth and wipe the surface evenly. This creates uniform color and removes excess stain. The wiping motion should follow the grain, and I use consistent pressure throughout.
This technique gives me control over the stain intensity. A lighter wipe removes more stain, creating a lighter shade, while a minimal wipe leaves more color behind.
The Brush-Only Method
For detailed areas or if you prefer a different approach, you can simply brush the stain on and leave it. Apply the stain in the direction of the grain with smooth, confident strokes. Don’t overwork it—once you’ve covered an area, move on. Going back repeatedly will create darker and lighter patches.
Work in sections, starting from one end and progressing methodically. This prevents you from accidentally staining areas you’ve already finished while you’re working on other sections.
Foam Roller Application for Large Surfaces
When I’m staining large, flat surfaces like tabletops or cabinets, I often use a foam roller. Pour stain into a shallow pan, roll your applicator evenly to distribute the stain, then apply in smooth, overlapping strokes across the surface.
Foam rollers create very even coverage on flat surfaces, though they’re not ideal for edges or detailed work. I often use a roller for the main surface and a brush for edges and corners.
Drying and Curing: Patience Is Rewarded
Understanding Drying Time vs. Curing Time
Here’s something that confused me initially. Water-based stain dries quickly—usually 2-4 hours—but that doesn’t mean it’s fully cured. Drying is when the surface feels dry to the touch. Curing is when the stain has completely hardened and developed its full color strength.
Most water-based stains need 24 hours of curing before you apply a topcoat, and a full week before the wood is ready for normal use. Rushing this process can compromise your finish.
Creating the Right Environment for Drying
Temperature and humidity dramatically affect drying time. Ideal conditions are between 50-85 degrees Fahrenheit with 30-50 percent humidity. If it’s cold and humid, your stain will dry much slower than the manufacturer’s estimate.
Good air circulation helps, but avoid placing your project in direct drafts from fans or air conditioning units, which can cause uneven drying. I keep a gentle air flow with a window or door cracked open, allowing fresh air circulation without extreme drafts.
Multiple Coats: Building Your Desired Color
Should You Apply Multiple Coats?
The answer is usually yes. One coat of water-based stain rarely gives you the depth and richness most people desire. I typically apply 2-3 coats, depending on the desired intensity and the wood species.
Light woods like pine and birch might need 3 coats to achieve a darker shade, while denser woods like oak might only need 2 coats. The beauty of water-based stains is that you can assess the color after the first coat and decide if additional coats are needed.
Between-Coat Preparation
Before applying a second coat, I lightly sand the surface with 220-grit sandpaper. This seems counterintuitive—why sand after staining?—but this light sanding removes any raised grain (which water-based stains cause) and lightly roughens the surface so the next coat adheres better.
After sanding, I use my tack cloth again to remove all dust, then proceed with my second coat using the same technique as the first.
Common Mistakes to Avoid
Mistakes I’ve Made So You Don’t Have To
Let me share some missteps I’ve encountered that you can easily avoid:
Over-applying stain: Resist the urge to keep wiping and reapplying stain to the same area. This creates blotchy results and uneven color. Once you’ve applied and wiped, move on.
Skipping grain raising: Water raises wood grain, and ignoring this means your final finish will feel rough. Sand between coats.
Not testing first: I can’t emphasize this enough. Test on scrap wood or a hidden area every single time.
Applying in poor conditions: Don’t stain in direct sunlight, extreme cold, or high humidity. Wait for appropriate conditions.
Using the wrong applicator: Natural bristle brushes absorb water and become ineffective. Use synthetic bristles or foam applicators.
Rushing between coats: Waiting the full drying time between coats prevents adhesion problems and uneven color.
Topcoating Your Water-Based Stained Wood
Protecting Your Hard Work
After you’ve achieved your desired stain color, protecting it with a topcoat is essential. Water-based stain alone doesn’t provide protection from moisture, UV rays, or wear.
You have options: water-based polyurethane, water-based lacquer, or wax finishes. Water-based polyurethane is my go-to because it offers excellent protection while maintaining the natural wood appearance that water-based stain provides.
Applying Your Topcoat
Wait 24 hours after your final stain coat before applying topcoat. Lightly sand with 220-grit sandpaper, remove dust with your tack cloth, then apply the topcoat according to the manufacturer’s instructions.
Most water-based topcoats require multiple coats for adequate protection. Sand lightly between coats, and always follow the specific product instructions for best results.
Special Situations and Solutions
Staining Blotchy or Soft Woods
Pine, birch, and other soft woods are notorious for absorbing stain unevenly, creating blotchy results. The solution? Pre-stain wood conditioner. This product seals the wood partially, preventing over-absorption in some areas.
Apply wood conditioner according to package directions, wait the recommended time, then apply your stain. This extra step eliminates the blotchy problem entirely.
Fixing Uneven Stain Application
If you’ve already stained and discovered uneven color, don’t panic. You can sand back to raw wood and start over, or you can carefully apply additional coats of stain to darker areas while avoiding light areas. This is tricky but doable