How to Attach PUR Water Filter to Faucet: A Complete Step-by-Step Guide
Have you ever wondered why your tap water doesn’t taste quite right, or worried about what might be hiding in your drinking water? You’re not alone. Millions of people struggle with water quality issues every single day, and many are turning to simple solutions like faucet-mounted filters. One of the most popular choices is the PUR water filter, and honestly, installing one is way easier than you might think.
In this guide, I’m going to walk you through everything you need to know about attaching a PUR water filter to your faucet. Whether you’re a DIY beginner or someone who avoids anything remotely technical, don’t worry. By the end of this article, you’ll feel confident enough to install your filter in just a few minutes.
Why Choose a PUR Water Filter for Your Faucet?
Before we dive into the installation process, let me explain why PUR filters have become such a trusted name in households across the country. These filters are designed to reduce chlorine taste and odor, which is something most of us can relate to. Think of it like this: your tap water might be safe, but that doesn’t mean it tastes great. A PUR filter acts like a security guard for your water, letting the good stuff through while blocking out the unwanted elements.
The beauty of a faucet-mounted filter is its convenience. You don’t need to install plumbing modifications, you don’t need a professional, and you can switch it from one faucet to another if needed. It’s genuinely one of the most straightforward water quality improvements you can make.
What You’ll Need Before Starting Installation
Essential Tools and Materials
Let me be honest with you: installing a PUR water filter requires minimal preparation. You probably have everything you need already sitting around your house. Here’s what you should gather before you begin:
- Your new PUR water filter unit
- An adjustable wrench or your hands if you’re strong enough
- A small towel or cloth for cleaning
- The instruction manual that comes with your filter
- Optional: a bowl to catch any residual water
That’s seriously it. You don’t need specialized equipment, a Ph.D. in plumbing, or even much upper body strength. The folks at PUR designed these filters with everyday people in mind.
Checking Your Faucet Compatibility
Here’s something important that I wish someone had emphasized when I first started using PUR filters: not every faucet is compatible with every filter model. It sounds complicated, but it’s actually quite simple to check.
Look at your faucet. Does it have a threaded aerator on the tip? That’s the small cylindrical piece that screws off the very end of your faucet. If you can unscrew it by hand or with a wrench, you’re in good shape. Most standard faucets have this, but some modern faucets with special finishes or unusual designs might not work with a typical PUR filter.
The good news? PUR makes different models for different faucet types. If you’ve got a tricky faucet, there’s probably a PUR solution for you. Always check the product description or ask a customer service representative before purchasing.
Step-by-Step Installation Process
Step One: Prepare Your Work Area
This is where you set yourself up for success. First, make sure you have good lighting under your sink or wherever your faucet is located. There’s nothing worse than trying to work on plumbing in dim conditions. Grab that small towel I mentioned and place it under your faucet to catch any water that might drip during removal of the old aerator.
Next, turn off your water supply if you’re feeling cautious. Honestly, it’s not always necessary for faucet-mounted filters, but it prevents surprises and shows that you’re taking this seriously.
Step Two: Remove the Current Aerator
This is the crucial moment. Look at the very tip of your faucet and locate that small piece I mentioned earlier—the aerator. It typically looks like a small cylinder with a screen inside. Using your hands, try to turn it counterclockwise. Many aerators are designed to unscrew easily without tools.
If it doesn’t budge with your hands, that’s where your adjustable wrench comes in. Wrap the wrench around it gently and turn counterclockwise. Don’t use excessive force; you’re not trying to break it, just loosen it. Once it’s loose enough, your hands should take over.
As the aerator comes off, water might dribble out. This is completely normal. That’s why we have the towel ready.
Step Three: Clean the Threads
Once you’ve removed the aerator, you’ll see the threads on your faucet’s tip. These are the grooves that the aerator screwed onto. Take your cloth and gently wipe away any mineral deposits, debris, or buildup. This might seem like a small detail, but clean threads mean your new filter will attach securely and won’t leak.
If there’s stubborn buildup, you can use a soft brush or even an old toothbrush. The goal is to have a clean, smooth surface for your new filter to sit on.
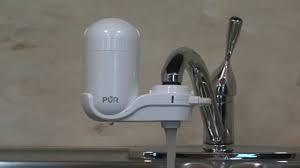
Step Four: Attach the Filter Housing
Now comes the exciting part—actually installing your PUR filter. Take the filter housing unit out of its packaging. You’ll notice there’s a threaded connector on one end. This is what screws onto your faucet.
Align the threads of your filter housing with the threads on your faucet tip. Start turning it clockwise by hand. Most PUR filters are designed so you can complete this entire process without tools. Hand-tightening is actually preferred because you’re less likely to over-tighten and damage something.
Turn it until it feels snug. You want it tight enough that water won’t leak around the connection, but not so tight that you’re using all your strength. It should feel like you’ve twisted a jar lid shut—firm but reasonable.
Step Five: Install the Filter Cartridge
Most PUR faucet filters come with a filter cartridge already installed, but some models require you to insert one yourself. Check your specific model’s instructions. If you need to install the cartridge, it usually just twists into the housing. Align the cartridge with the slots in the housing and turn it clockwise until it locks into place.
The cartridge should fit snugly. If it seems loose or wobbly, you likely haven’t twisted it far enough.
Step Six: Run Water and Check for Leaks
Here’s the test moment. Turn your water back on and let it run for a few seconds. Watch carefully where the filter connects to your faucet. Are there any drips or leaks coming from that connection point?
If the answer is no, congratulations! You’ve successfully installed your PUR filter. If you do see leaks, don’t panic. This usually means the connection needs to be tightened just a bit more. Turn off the water, use your hands to tighten the housing a quarter turn or so, then test again.
Switching Between Filter and Regular Water
One feature that makes PUR filters so practical is the built-in diverter. At the base of most PUR filter housings, you’ll find a small lever or switch. This is how you control whether water flows through the filter or bypasses it entirely.
When the lever points toward the filter, all your water goes through the filtration system. When you switch it the other way, water comes out without filtering. This is useful when you’re washing dishes or watering plants—times when you don’t necessarily need filtered water.
It might seem like a small thing, but this feature extends your filter’s lifespan by reducing unnecessary filtration when you don’t need it.
Understanding Your Filter’s Performance
What Does Your PUR Filter Actually Remove?
Now that your filter is installed, you’re probably wondering what you’ve actually accomplished. PUR faucet filters are certified to reduce chlorine taste and odor, which immediately affects how your water tastes. If your tap water has that chemical taste that’s been bothering you, you should notice a difference right away.
Additionally, these filters reduce sediment and particulates that might cloud your water or give it an off-appearance. They’re not designed to remove all contaminants, but they target the most common issues that affect taste and appearance.
Filter Lifespan and Replacement Schedule
Your PUR filter cartridge isn’t permanent. Depending on your water quality and usage, a typical cartridge lasts between two to three months. Some people get longer use, some less—it depends on how much water you’re filtering and how contaminated your source water is.
The good news? Replacing a filter is even easier than installing your first one. You simply twist out the old cartridge and twist in a new one. No tools required, no reinstalling the entire housing.
PUR makes it easy to remember when to replace your filter by including a date indicator on each cartridge. You write the installation date on the cartridge, and when that window ends, you know it’s time for a replacement.
Troubleshooting Common Installation Issues
Water Leaking from the Connection
If water is leaking where the filter connects to your faucet, you have a few options. First, try tightening the connection slightly more. Sometimes filters just need that extra quarter turn to seal completely. If tightening doesn’t work, remove the filter housing, clean the threads again more thoroughly, and reinstall.
Occasionally, mineral buildup can prevent a proper seal. A more aggressive cleaning with a soft brush or even a small amount of white vinegar can help dissolve stubborn deposits.
Filter Won’t Screw On Properly
If you’re having trouble getting the filter to attach, you might have a compatibility issue. Check that you’ve selected the right PUR model for your faucet type. Some faucets have unique threading that requires a specific filter design.
Alternatively, you might be trying to screw it on backwards. There’s only one direction it should go—clockwise. If you’re already turning that way and it won’t catch, you might be cross-threading. Unscrew completely, realign carefully, and start again.
Water Pressure Seems Lower
This is actually normal to some degree. Any filter reduces water pressure slightly because the water must pass through the filtering material. However, if the reduction seems extreme, your filter might be clogged and need replacement earlier than expected.
You can also try the diverter switch—if you’re running water through the filter unnecessarily, switch it to bypass mode for full pressure when you don’t need filtered water.
Maintenance Tips for Your PUR Filter
Regular Cleaning
While your PUR filter handles most of the heavy lifting internally, the exterior deserves attention too. Occasionally wipe down the filter housing with a damp cloth to remove dust and prevent mineral buildup on the surface. This doesn’t require much effort, just a quick swipe when you’re cleaning your sink area.
Proper Storage of Replacement Cartridges
When you purchase replacement cartridges, store them in a cool, dry place. You don’t need them refrigerated or anything fancy, just somewhere they won’t be exposed to extreme heat or humidity. Properly stored cartridges will maintain their effectiveness until you need them.
Comparing PUR to Other Faucet Filter Options
The water filter market is crowded, and you might wonder if PUR is really your best choice. From my perspective, PUR filters stand out because they’re genuinely easy to install, they perform well for the price, and replacement cartridges are widely available. You won’t have trouble finding them at grocery stores, home improvement centers, or online retailers.
Other brands exist, certainly. Some might promise more advanced filtration, while others are cheaper. But for someone who wants simplicity, reliability, and proven results, PUR consistently delivers.
Making the Most of Your Filtered Water
Now that you have filtered water on tap, here are some ways to maximize its benefits. Use filtered water for drinking and cooking—these are where taste matters most. For tea and coffee, filtered water makes a noticeable difference that many people immediately appreciate. When filling water bottles for the gym or work, filtered water tastes better throughout the day.
You might also consider getting a separate pitcher filter for your refrigerator if you need filtered water in large quantities, but your faucet filter handles most everyday needs.
Environmental and Economic Impact
Let’s talk about why this matters beyond just taste. By using a faucet filter instead of buying bottled water, you’re making an environmental choice. You’re reducing plastic waste and the carbon footprint associated with manufacturing and transporting bottled water.
Economically, a PUR filter costs just a few dollars per month compared to bottled water expenses, which add up quickly for families. The math is simple: filters win on both cost and environmental impact.
When to Replace Your Entire Filter Unit
While replacement cartridges are simple, your filter housing itself might eventually need replacing. If you notice cracks in the housing, if the diverter switch stops working properly, or if you’ve had it for many years, it might be time for a new unit.
The good news is that replacing the entire housing is the same process we covered in this guide. You simply remove the old one and install the new one using the exact same steps. Your experience with the first installation makes the second one even easier.
Conclusion
Installing a PUR water filter on your faucet is genuinely one of the simplest home improvement projects you can tackle. What might seem intimidating at first—screwing things onto your plumbing—is actually straightforward and requires no special skills or tools. Within just a few minutes, you can have cleaner, better-tasting water flowing from your tap.
The process is foolproof: remove the old aerator, clean the threads, screw on the filter housing, insert the cartridge if needed, and test for leaks. That’s it. You’re done. You’re now someone who has successfully installed a water filter, and you can do it again whenever you need to replace the housing.
The real benefit comes after installation, when you’re drinking water that tastes noticeably better. If you’ve been putting this off because you thought it would be complicated, I hope this guide has shown you there’s nothing to worry about. PUR filters are designed for regular people, not plumbers, and they prove that sometimes the simplest solutions are the best ones.
Frequently Asked Questions
Can I install a PUR water filter on any faucet?
Most standard kitchen and bathroom faucets with threaded aerators are compatible with PUR filters. However, some modern faucets, particularly those with special finishes or pull-down sprayers, may require a different PUR model. Before purchasing, check your faucet type and verify compatibility on the PUR website or product packaging. If your current faucet isn’t compatible, PUR makes alternative models designed specifically for different faucet configurations.
How often do I need to replace the filter cartridge?
Most PUR filter cartridges last between two to three months with regular use, though this varies based on your water quality and how much filtered water you use daily. Some people get longer life, while others with heavily contaminated water might need replacements more frequently. Each cartridge comes with a date indicator that helps you track when replacement is due. A simple rule of thumb is to monitor your water pressure—when it noticeably decreases, it’s probably time for a fresh cartridge.
<h3