How to Change a Gas Hot Water Heater: A Complete Safety Guide for Homeowners
Let me be honest with you—when your gas hot water heater starts acting up, it feels like a disaster waiting to happen. One day you’re enjoying a steaming shower, and the next day you’re standing under a stream of ice-cold water wondering what went wrong. If you’re reading this, chances are you’re facing that exact scenario, or maybe you’re simply trying to avoid it altogether.
The good news? Replacing a gas hot water heater isn’t some impossible task reserved only for licensed plumbers. However, it’s definitely not something to take lightly either. This is where safety meets practicality, and understanding the process can save you thousands of dollars while keeping your home and family safe.
Throughout this guide, I’m going to walk you through everything you need to know about changing a gas hot water heater. We’ll cover the safety precautions, the tools you’ll need, the step-by-step process, and when it’s absolutely time to call in the professionals. Think of this as your personal roadmap to success.
Outline: What We’ll Cover
- Understanding when your gas hot water heater needs replacement
- Essential safety precautions and preparations
- Tools and materials you’ll need
- Turning off the gas and water supply
- Draining your current water heater
- Disconnecting the old unit
- Installing the new gas hot water heater
- Connecting gas, water, and venting lines
- Testing and commissioning your new heater
- Common mistakes and how to avoid them
- When to call a professional plumber
- FAQs for additional clarity
Understanding When Your Gas Hot Water Heater Needs Replacement
Before you even think about grabbing a wrench, you need to know whether replacement is actually necessary. Sometimes what feels like a major problem is just a minor fix. However, there are definite signs that tell you it’s time for a new unit.
Age of Your Water Heater
Most gas water heaters have a lifespan of 8 to 12 years. If yours is hitting that mark or has already surpassed it, you’re living on borrowed time. Think of it like a car—sure, it might still run, but the risk of breakdowns increases exponentially with age. To find your heater’s age, check the serial number on the manufacturer’s label. The first letters typically indicate the year it was made.
Signs of Failure to Watch For
Rusty water coming from your taps is never a good sign. Neither is rumbling or popping sounds from the tank, which usually means sediment buildup is causing damage from the inside out. If you notice puddles around the base of your unit, that’s a leak—and leaks mean replacement time. Some people also report that their water isn’t getting as hot as it used to, or it takes forever to heat up. These are all red flags.
Essential Safety Precautions Before You Start
Now, let’s talk safety. I cannot stress this enough: working with gas lines and electricity is serious business. This isn’t the time to wing it or assume you know what you’re doing.
The Golden Rule: Know Your Limits
Here’s the truth many DIY enthusiasts don’t want to admit—some jobs are best left to professionals. If you’re uncomfortable with gas connections, electrical work, or venting systems, this is your sign to hire a licensed plumber. There’s absolutely no shame in that. A professional brings expertise, insurance, and the assurance that everything meets local building codes. Your safety is worth the investment.
Ventilation is Critical
Make sure your work area is well-ventilated. Even with the gas shut off, there can be residual gas in the lines. Open windows and doors to allow air circulation. If you smell gas at any point, stop what you’re doing and call your gas company immediately. They’ll send someone out to check for leaks at no charge.
Check Local Codes and Permits
Before you lift a finger, check with your local building department. Many areas require permits for water heater replacement, and some require that only licensed professionals perform the work. Installing a water heater without proper permits can lead to fines, insurance claim denials, and serious safety hazards.
Tools and Materials You’ll Need
Having the right tools makes the job infinitely easier. There’s nothing worse than getting halfway through a project only to realize you’re missing something crucial.
Essential Tools
- Adjustable wrench or pipe wrench (two of these is even better)
- Screwdrivers (both Phillips and flathead)
- Tape measure
- Flashlight or headlamp
- Garden hose (for draining)
- Bucket (to catch water and debris)
- Plumber’s tape (also called thread seal tape or Teflon tape)
- Pipe dope or joint compound (for gas connections)
- Safety glasses and work gloves
Materials for Installation
Depending on your specific setup, you may need water supply lines, gas supply lines, dielectric unions (to prevent corrosion between different metals), and possibly new venting materials. The safest approach is to purchase a water heater installation kit that comes with most of these items included.
Turning Off the Gas and Water Supply
This is where the actual work begins, and it’s absolutely fundamental. Skipping this step or doing it incorrectly could have serious consequences.
Locating and Shutting Off the Gas
Find the gas control knob on your water heater. Turn it to the “OFF” position. You should hear or feel it click into place. Next, locate your home’s main gas shut-off valve. This is typically found near where the gas line enters your home or near your gas meter. Turn it clockwise until it’s tight. If you’re uncertain about any of this, contact your gas company—they can walk you through it or do it for you.
Shutting Off the Water Supply
Find the cold water shut-off valve on top of your water heater. Turn it clockwise until it stops. If there’s no valve there, you may need to shut off your entire home’s water supply at the main valve. Once the water is off, open a hot water faucet somewhere in your house to relieve pressure in the tank.
Draining Your Current Water Heater
This step is messy, but necessary. You cannot remove a water heater filled with hot water—it’s dangerous and wasteful.
The Draining Process
Attach a garden hose to the drain valve at the bottom of your tank. Direct the other end toward a floor drain, sump pump, or outside. Open the drain valve slowly. Water will begin flowing out. This can take 30 minutes to an hour depending on your tank size. You can speed things up slightly by opening the cold water inlet valve at the top of the tank, which allows air to enter and helps water drain faster.
Be careful—that water is likely still warm or hot even with the heat turned off. Let it cool as it drains, and never rush this process. Patience here prevents burns and flooding.
Disconnecting the Old Unit
Once your tank is drained, it’s time to remove it from service. This involves disconnecting three main connections: water inlet and outlet, gas line, and venting.
Water Line Disconnection
Using your wrench, disconnect the cold water inlet line (usually on top, marked in blue) and the hot water outlet line (usually on top, marked in red). Some water may still drip out, so keep your bucket nearby. You might also disconnect or remove the temperature and pressure relief valve if you’re planning to reuse it.
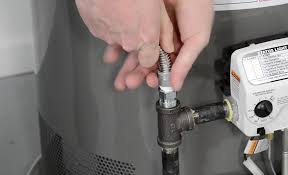
Gas Line Disconnection
This requires extra care. Use two wrenches if possible—one to hold the fitting in place and one to turn the connector. Turn counterclockwise slowly. If you’re not comfortable with this, seriously consider calling a professional. Once disconnected, you can cap the gas line with a brass cap to prevent dust from entering.
Venting Disconnection
Your water heater’s venting pipe connects to your chimney or exhaust system. Loosen or unbolt these connections. Depending on your setup, you might need to remove several sections of pipe. Be prepared for dust and debris to fall—that’s why the flashlight is useful for seeing what you’re doing.
Removing the Old Unit
Now comes the physical removal. A typical gas water heater weighs between 80 and 150 pounds. Never attempt this alone. Get a friend or family member to help, or hire someone for this specific step. Improper lifting causes back injuries and damage to surrounding areas.
Tip the heater slightly and carefully slide it out of its space. If it’s in a tight area, you might need to remove doors or work around obstacles. Take your time and maintain a firm grip.
Installing the New Gas Hot Water Heater
Positioning your new unit correctly is just as important as installation itself. Your new heater needs to be level, accessible for maintenance, and properly positioned relative to your venting system.
Positioning and Preparing Your New Unit
Slide your new water heater into the space where the old one was. Make sure it’s level using a level tool. This ensures proper operation and prevents unnecessary stress on the tank. Check that you have clearance for the access panels and that your new unit fits in the space without any issues.
Installing the Temperature and Pressure Relief Valve
If you removed this from the old unit and it’s still in good condition, you can reinstall it on the new heater. If it’s new, install it now. Apply plumber’s tape (also called Teflon tape) to the threads and screw it in clockwise. This valve is a critical safety component, so don’t skip it or install it incorrectly.
Connecting Gas, Water, and Venting Lines
These connections are what make your heater actually function. Precision matters here.
Water Connection Installation
Connect the cold water inlet line first. Apply plumber’s tape to all threaded connections before tightening. Use your adjustable wrench to tighten connections—hand tight is usually enough; you don’t need to crank down hard. Many people recommend using dielectric unions on the water lines to prevent corrosion between dissimilar metals. Connect the hot water outlet line next using the same method.
Gas Line Connection
This is where you need to be extra careful. Remove the brass cap from the gas line. Before connecting, apply pipe dope (a special compound for gas connections) to the male threads. Do not use plumber’s tape on gas connections—use only pipe dope. Connect the gas line using two wrenches, one to hold the fitting and one to turn the connector. Tighten until snug, but don’t over-tighten.
Venting Connection
Your new heater will have a vent collar on top. Connect your venting pipe to this collar using sheet metal screws or the appropriate fasteners. Make sure all connections are secure and that the pipe slopes slightly upward toward the chimney or vent. This helps prevent condensation from flowing back into the heater.
Testing for Gas Leaks
Before you turn the gas back on, you need to ensure there are no leaks at your gas connections. This is non-negotiable.
The Soap and Water Test
Mix dish soap with water in a spray bottle. Turn the gas back on at the main valve and at the water heater control. Spray the soap mixture on all gas connection points. If bubbles form, you have a leak. Immediately turn off the gas and tighten the connection slightly. Retest. If the leak persists, turn off the gas again and call a professional. Never ignore a gas leak.
Refilling and Testing Water Connection
Once you’ve confirmed no gas leaks, it’s time to fill the tank with water.
The Refilling Process
Turn on the cold water supply valve at the top of the water heater. Open a nearby hot water faucet to let air escape from the lines. You’ll see water start to flow from that faucet. When water flows steadily without sputtering, close the faucet. Check all water connections for leaks. A small drip at connection points can be tightened slightly, but if water is actively spraying, you may need to disconnect and reattach.
Lighting the Pilot Light and Setting Temperature
Your new water heater should come with instructions specific to your model. Follow these carefully.
Pilot Light Ignition
Most modern gas water heaters have electronic ignition, meaning there’s no pilot light to light manually. If yours does have a pilot light, follow the manufacturer’s instructions exactly. Some require you to hold a button while using a lighter to ignite the pilot. Others have a piezo igniter that clicks when you press a button. Read your manual—there’s no guessing here.
Temperature Setting
The recommended temperature for most households is 120 degrees Fahrenheit. This prevents scalding while providing adequate hot water for daily use. Higher temperatures waste energy and increase burn risks, especially for children and elderly people.
Common Mistakes and How to Avoid Them
Let me share some mistakes I’ve seen people make, so you don’t repeat them.
Forgetting to Turn Off the Gas Before Starting
This is incredibly dangerous. Carbon monoxide, fire hazards, and explosions are all real risks. Always turn off the gas first. Period.
Skipping the Leak Test
I cannot stress this enough. The soap and water test takes five minutes and could save your home and your life. Do it.
Using the Wrong Tape on Gas Connections
Plumber’s tape is fine for water connections but not for gas. Gas lines require pipe dope. Using the wrong product can lead to leaks.
Ignoring Local Code Requirements
Your local building code exists for your safety. Ignoring it might void your homeowner’s insurance or result in expensive repairs later.
Rushing the Job
This isn’t a race. Take your time, double-check everything, and verify connections before moving forward.
When to Call a Professional Plumber
Here’s when you should absolutely hire someone instead of doing it yourself:
- You’re uncomfortable working with gas lines at any point in the process
- Your local codes require licensed installation
- Your home has unusual venting requirements or code restrictions
- You notice any gas smell or suspect a leak
- Your water heater is in a tight space with limited access
- You don’t have help for heavy lifting
- You lack basic plumbing experience