

How to Change GE Window AC Filter Easily
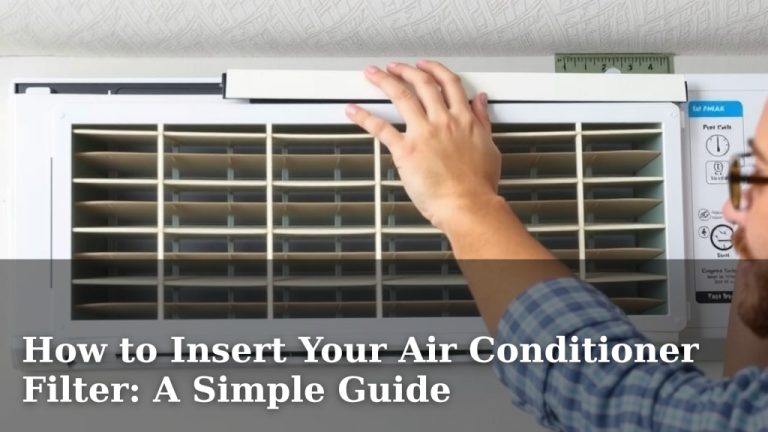
The easiest way to change the filter on your GE window air conditioner is to gently pull down on the front panel. This allows you to access and remove the old filter. Replacing it regularly keeps your AC running efficiently and improves your home’s air quality.
Your GE window AC filter traps dust and debris. A clogged filter makes your unit work harder. This can lead to higher energy bills and strain on your system. Regularly changing it is a simple maintenance step that makes a big difference.
- Pull down the front panel to find the filter.
- Carefully slide out the old filter.
- Slide in the new, clean filter.
- Snap the front panel back into place.
- Clean your filter every 1-3 months.
Let’s walk through exactly how to change your GE window air conditioner filter step by step.
Refreshing Your GE Window AC Filter: A Simple Guide
Changing your GE window air conditioner’s filter is one of the simplest ways to keep it running smoothly. It’s also a key step in ensuring the air you breathe inside your home is as clean as possible. You might be surprised how much dust and debris a small filter can capture.
When your filter gets clogged, your air conditioner has to work much harder. Think of it like trying to breathe through a thick scarf. This extra effort uses more energy, which can lead to higher electricity bills. It also puts unnecessary strain on your AC unit, potentially shortening its lifespan.
We’ve found that many people put off this simple task. But it truly only takes a few minutes! This guide will walk you through it, step by step. Let’s get your GE window AC filter swapped out and your air flowing freely again.
Your Step-by-Step Filter Replacement Process
Ready to tackle this maintenance task? It’s less complicated than you might think. The main goal is to carefully access the filter and then replace it with a clean one.
Locating and Removing the Old Filter
Most GE window air conditioners have their filters located behind the front grille. This is the large, usually white, panel on the very front of the unit. It’s designed to swing open or be removed easily.
First, make sure your air conditioner is unplugged. This is a vital safety step. You don’t want any unexpected surprises. After unplugging, you’ll need to gently pull down on the bottom edge of the front panel. Some models might have small clips or tabs. Feel around for them.
Once the panel is slightly ajar, you should see the filter. It usually slides out from the top or a specific slot. Gently grip the filter and pull it straight out. Be prepared – it might be quite dusty!
If the filter is extremely dirty or brittle, handle it carefully. You don’t want to scatter dust all over your room. Many people find it helpful to have a trash bag ready to slide the old filter directly into.
Preparing and Installing the New Filter
Before you insert the new filter, make sure you have the correct replacement. GE window AC filters come in various sizes, so double-check the model number of your unit. It’s usually on a sticker on the side or back.
Your new filter might come in protective plastic packaging. Remove this. Some filters have a marked “airflow” or “this side out” direction. Look for this arrow and ensure it points in the direction of the airflow. This is typically towards the inside of your unit.
Now, carefully slide the new filter into the slot where the old one came from. It should slide in smoothly. If you encounter resistance, don’t force it. It might be misaligned. Make sure it’s straight and fully seated in its position.
Once the new filter is in place, you can gently swing the front panel back into its original position. You might hear a soft click as it secures. Again, ensure it’s firmly attached.
Final Checks and Cleanup
After the panel is secured, you can plug your air conditioner back in. Turn it on and check if it’s operating normally. You should notice the air feeling fresher almost immediately.
Dispose of the old filter properly. If it was heavily soiled, sealing it in a plastic bag before tossing it can prevent dust from spreading.
Understanding Filter Types and Maintenance Schedules
Not all air conditioner filters are created equal. Knowing the type of filter your GE window unit uses can help you choose the best replacements. It also helps you understand how often you should be cleaning or replacing them.
Disposable vs. Washable Filters
Many GE window AC units come equipped with disposable filters. These are typically made of a mesh material, often fiberglass or synthetic fibers. Once they become dirty, you simply throw them away and replace them with a new one.
Some models might use washable or reusable filters. These are usually made of a more robust material, like a dense plastic mesh. If you have a washable filter, you won’t be replacing it; you’ll be cleaning it.
We found that instructions for washing vary slightly by manufacturer. Generally, you’ll remove the filter, rinse it thoroughly under cool water, and let it air dry completely before reinstalling. Never put a damp filter back into your AC unit.
How Often Should You Change or Clean?
The general recommendation for changing or cleaning your AC filter is every 1 to 3 months. However, several factors can influence this.
- Usage: If you run your AC constantly, especially during hot summer months, you’ll need to check and potentially change the filter more often.
- Home Environment: Homes with pets, smokers, or high levels of dust will clog filters faster. Allergens can also build up quickly.
- Seasonality: You might only use your window AC seasonally. Even so, it’s a good idea to check the filter before you first turn it on for the season and again before you store it away.
Many experts suggest checking your filter monthly, regardless of the recommended replacement interval. This quick visual inspection lets you see how quickly it’s getting dirty. It’s like peeking under the hood of your car – a little check can save bigger problems down the road.
Keeping a log or setting a reminder on your phone can be incredibly helpful. It ensures you don’t forget this important maintenance task.

Why This Simple Task Matters So Much
You might wonder why such a small part is so critical. The filter is your air conditioner’s first line of defense. It’s actively working to trap particles that would otherwise circulate through your home.
A clean filter directly impacts your AC’s performance. Research from the Department of Energy indicates that keeping your filters clean can improve your AC’s efficiency by 5% to 15%. That’s money back in your pocket!
Dirty filters can lead to other issues, too. They can cause your AC to freeze up. Ice can form on the evaporator coils, reducing cooling ability and potentially causing damage.
More importantly, your indoor air quality is at stake. A clogged filter can’t trap new dust and allergens. Existing dust within the unit can then get pushed out into your living space. This can be particularly hard on people with allergies or respiratory issues, like asthma. The Environmental Protection Agency (EPA) notes that improving indoor air quality is key for health.
So, next time you swap out that filter, remember you’re not just doing a chore. You’re actively contributing to a more comfortable, energy-efficient, and healthier home environment.
Quick Filter Change Checklist
- Unplug the AC unit. Safety first!
- Gently pull down the front panel. Locate the filter.
- Carefully slide out the old filter. Have a trash bag ready.
- Slide in the new, clean filter. Check airflow direction.
- Snap the front panel back into place. Ensure it’s secure.
- Plug the unit back in and test. Enjoy fresh air!
Conclusion
You’ve learned how simple it is to swap out your GE window air conditioner filter. This small task is your secret weapon for better air quality and a more efficient AC. Remember, a clean filter means your unit works less, saving you money on energy bills and extending its life. It’s truly one of the most impactful maintenance steps you can take for your home’s comfort and health. So, make it a habit to check your filter regularly. You’ve got this!
Frequently Asked Questions
How often should I really be changing my GE window AC filter?
We found that the general recommendation is every 1 to 3 months. However, this can change. If you have pets, allergies, or use your AC heavily, you’ll want to check and potentially change it more often, perhaps even monthly.
What happens if I don’t change my GE window AC filter?
Not changing your filter means your AC has to work much harder. This leads to higher energy bills and can put a strain on your unit, possibly causing it to break down sooner. It also means less clean air circulating in your home.
Can I use a different brand of filter for my GE air conditioner?
Yes, you can use filters from other brands, as long as they are the correct size for your specific GE window AC model. Always double-check the dimensions to ensure a proper fit.
My filter is very dusty, should I try to wash it?
It depends on your filter type. Disposable filters should always be replaced, not washed. If you have a washable filter, follow the manufacturer’s instructions for cleaning. Ensure it’s completely dry before putting it back.
Where can I find the correct replacement filter size for my GE window AC?
The best place to find the correct size is on the original filter itself or on a sticker on the side or back of your GE window air conditioner unit. This sticker usually lists the model number, which you can use to look up the filter specifications.
![7 Best Circuit Breaker For Air Conditioner [2026]](https://bathroomexplorer.com/wp-content/uploads/2026/06/7-best-circuit-breaker-for-air-conditioner-2026-featured-768x432.jpg)
![7 Best Coil Cleaner For Window Air Conditioner [2026]](https://bathroomexplorer.com/wp-content/uploads/2026/06/7-best-coil-cleaner-for-window-air-conditioner-2026-featured-768x432.jpg)
![7 Best Quiet Air Conditioner For Bedroom [2026]](https://bathroomexplorer.com/wp-content/uploads/2026/06/7-best-quiet-air-conditioner-for-bedroom-2026-featured-768x432.jpg)
![5 Best Air Conditioners for Van Life [In 2026]](https://bathroomexplorer.com/wp-content/uploads/2025/06/best-air-conditioner-for-van-life.jpg)