How to Change Water Filter in Frigidaire French Door Refrigerator: A Complete Step-by-Step Guide
Why Your Frigidaire Water Filter Needs Regular Replacement
Think of your water filter like the lungs of your refrigerator. Just as our lungs filter out impurities from the air we breathe, your refrigerator’s water filter works tirelessly to remove contaminants, sediment, and unwanted flavors from your drinking water and ice. Over time, this filter becomes clogged with all the particles it’s been catching. When that happens, the filter can’t do its job effectively anymore.
Neglecting to change your filter regularly can lead to several problems. You might notice that your water tastes funny, your ice smells strange, or the water dispenser takes longer to dispense water. In worst-case scenarios, you could be drinking water that isn’t properly filtered, which defeats the entire purpose of having a built-in filtration system in the first place. Most manufacturers recommend changing your water filter every six months, though this can vary depending on your water quality and usage.
Identifying Your Frigidaire Model and Filter Type
Not all Frigidaire French door refrigerators use the same water filter, so the first step is figuring out exactly which filter your model needs. This is important because buying the wrong filter will be frustrating and wasteful.
Where to Find Your Model Information
Your refrigerator’s model number is typically located inside the fridge, usually on the back wall near the top or on the side wall. You can also find it on the exterior of the fridge, often on the back or on the side. Once you have your model number, you can visit the Frigidaire website or check your user manual to determine which filter type your specific refrigerator uses.
Common Frigidaire Filter Types
Frigidaire manufactures several different water filter styles for their French door refrigerators. Some models use a filter housed in the upper right corner of the fridge, while others have filters located in the lower corners or even in the door itself. The most common filter for French door models is the push-button style filter that twists out, but some newer models feature pull-out cartridge filters. Identifying which type you have is crucial before you begin the replacement process.
Gathering Your Supplies Before Starting
One of the best ways to ensure a smooth filter replacement is to have everything you need ready before you begin. Here’s what you’ll want to gather:
- Your new Frigidaire replacement water filter (exact model for your refrigerator)
- A towel or old cloth to catch any water spillage
- A bucket or container to catch residual water
- Your refrigerator’s user manual for reference
- Optional: a flathead screwdriver if your filter requires one to remove
Having these items ready means you won’t need to search around in the middle of the process, which can be annoying and messy. Trust me, having a towel handy is especially important because there’s always a bit of water that comes out when you remove the old filter.
Locating the Water Filter in Your Frigidaire Refrigerator
The location of your water filter depends on your specific model, so let me break down the most common spots where Frigidaire hides these filters.
Upper Corner Filter Location
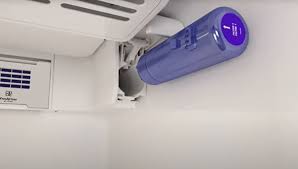
Many Frigidaire French door models have their water filter located in the upper right or upper left corner of the refrigerator compartment. If your filter is here, you’ll typically see a cylindrical housing that’s about the size of a soda can. This is the easiest location to access and probably the most common on newer models.
Lower Corner Filter Location
Some Frigidaire refrigerators place the water filter in the lower corner, usually beneath the vegetable drawers or crisper sections. If this is your model, you might need to remove some drawers to access it easily. Don’t worry though, most of these drawers slide out without any tools.
Door-Mounted Filter Location
A few Frigidaire French door models integrate the water filter into the door itself, typically in the upper door area. These are slightly different to access but follow the same general replacement principle.
Step-by-Step Process: Removing Your Old Water Filter
Now that you’ve located your filter and gathered your supplies, let’s walk through the removal process in detail. I’ll give you the most common method, which applies to the majority of Frigidaire French door refrigerators.
Step One: Prepare Your Workspace
First, lay down your towel in front of the filter location. Place your bucket nearby to catch any water that drips out. You want to work on a level surface where you won’t slip if a bit of water spills. Safety first, right?
Step Two: Turn Off Water Supply (Optional but Recommended)
While not always necessary for just removing the filter, some people prefer to turn off their refrigerator’s water supply before beginning. This valve is usually located under the sink or behind the refrigerator where the water line connects. If you do turn off the water supply, turn it off and then open your water dispenser briefly to release any pressure in the line. This makes the whole process cleaner.
Step Three: Locate the Filter Housing
Now, look carefully at your filter location. You should see a cylindrical filter cartridge, usually white or blue in color. There will be a housing or cap that either twists or pulls out. Most Frigidaire filters have a button or cap at the bottom or side that you need to turn counterclockwise to loosen.
Step Four: Turn and Remove the Old Filter
Gently grip the filter housing with your hand. If there’s a button or cap, press it while turning the entire filter counterclockwise. You might feel some resistance, which is normal. Keep turning slowly and steadily until the filter releases from its housing. As soon as it starts to come out, have your towel ready because there’s usually a little water that follows.
Step Five: Dispose of the Old Filter Properly
Once you’ve removed the old filter, let any excess water drip into your bucket. Then, dispose of it properly. Some people recycle them, while others throw them away. Check with your local waste management facility to see if they have a recycling program for water filters, as many do.
Installing Your New Frigidaire Water Filter
This is where the magic happens. Installing a new filter is equally straightforward and actually very satisfying.
Step One: Prepare Your New Filter
Remove your new Frigidaire filter from its packaging. Don’t remove any protective caps or seals just yet. It’s a good idea to read the instructions that come with the new filter, as some models have specific preparation steps.
Step Two: Remove Protective Caps or Seals
Now, remove any plastic caps, protective seals, or covers from the new filter. These are designed to keep the filter clean during transport and storage. Once these are off, your filter is ready to install. Be careful not to touch the filter media itself with your bare hands if possible, as some filters are sensitive to oils from skin contact.
Step Three: Insert the New Filter into the Housing
Align your new filter with the housing opening. You’ll want to hold it straight and push it in gently but firmly. Some filters have an orientation guide or arrows that show which way is up. Make sure you’re inserting it the right way around. Push until you feel it seat properly in the housing.
Step Four: Turn the Filter Clockwise to Secure It
Once the filter is inserted, turn it clockwise until it stops. Don’t force it or over-tighten it; you’re just securing it in place. Most Frigidaire filters will click or stop when they’re properly installed. You should feel a definitive stopping point. If you keep turning and it gets harder, you’ve probably tightened it enough. Some people do a quarter turn past the stopping point, but that’s optional.
Step Five: Verify the Seal
Give the filter a gentle tug to ensure it’s seated properly and won’t come loose. It should feel firm and stable. If it wiggles or feels loose, remove it and reinstall it again. A proper seal is important to prevent water from leaking around the filter rather than through it.
Flushing Your Water System After Filter Installation
Here’s a step many people skip, but it’s actually quite important. After installing a new filter, you should flush your water system before drinking the water or using it for ice.
Why You Need to Flush the System
When a new filter is installed, there’s often loose carbon dust or small particles from the manufacturing process inside the filter. These particles can make your water appear slightly cloudy or taste a bit odd. Flushing removes these particles and ensures your water is clear and tastes its best right from the start.
How to Properly Flush Your Filter
If you have water to the dispenser, simply dispense water into a pitcher for about two to three minutes. You should see the water go from slightly cloudy to clear. For ice makers, you might need to make and discard a few batches of ice before the system is fully flushed. This usually takes about thirty minutes to an hour. Some people recommend running water through the dispenser for the first gallon after filter installation just to be safe.
Reconnect the Water Supply
If you turned off the water supply earlier, turn it back on now. Give your water dispenser a test to ensure water flows smoothly and doesn’t leak around the filter. If water is leaking from the housing, the filter might not be seated properly. In that case, remove it, check the seal, and reinstall it.
Troubleshooting Common Issues During Filter Replacement
Sometimes, things don’t go as smoothly as planned. Here are some common issues you might encounter and how to handle them.
The Old Filter Won’t Turn or Budge
If your old filter seems stuck and won’t turn counterclockwise, don’t panic. Try wrapping a rubber band around the housing to improve your grip, or wear rubber gloves for better traction. You can also try tapping the housing gently with a rubber mallet or the handle of a screwdriver to loosen it. If it’s truly stuck, let it sit for a few minutes while you apply a bit of pressure without turning. Never force it so hard that you might crack the housing.
Water Leaks Around the Filter
If you notice water leaking from where the filter meets the housing, the filter probably isn’t seated properly. Turn off your water supply, remove the filter, inspect the sealing surfaces for dirt or damage, and reinstall it carefully. Make sure it’s turned all the way clockwise until it stops.
No Water Coming Out of the Dispenser
After changing your filter, you might have an air lock in the water line. Simply dispense water for a few minutes to push the air out. The water should start flowing normally. If it doesn’t, check that you haven’t turned off the main water supply and forgotten to turn it back on.
Your New Filter Feels Loose
This is actually pretty common with new filters. Simply remove it, reinstall it, and turn it a bit further clockwise. Make sure you hear or feel the click that indicates it’s properly secured.
Maintenance Tips to Extend Your Filter’s Life
While you can’t prevent a water filter from eventually needing replacement, you can take steps to keep yours working effectively for as long as possible.
Monitor Water Quality
Pay attention to your water. If it starts tasting odd or looks cloudy, it might be time for a filter change sooner than expected. This is especially true if you have particularly hard water or live in an area with high sediment content.
Keep Your Refrigerator Clean
Believe it or not, keeping the area around your filter housing clean can help. Dust and debris can get into the mechanism and cause issues. Wipe down the exterior of the filter housing occasionally with a damp cloth.
Maintain Consistent Temperature
Your refrigerator should be kept at the proper temperature, as extremely warm conditions can degrade your water filter more quickly. Keep your fridge between 35 and 38 degrees Fahrenheit for optimal performance.
When to Replace Your Frigidaire Water Filter
As I mentioned earlier, the general recommendation is every six months, but several factors can affect this timeline.
Signs Your Filter Needs Replacement
- Water tastes strange or off-flavor
- Water appears cloudy or discolored
- Ice tastes or smells odd
- Water dispenser slows down significantly
- Filter housing is difficult to turn
- You’ve reached the six-month mark since last replacement
Factors That Affect Filter Lifespan
Your water quality plays a huge role. If you live in an area with hard water or high sediment, you’ll probably need to change your filter more frequently, perhaps every three to four months. Conversely, if your water is relatively clean, you might be able to stretch it to eight or nine months. Your usage also matters, meaning a family that uses lots of filtered water and ice will go through filters faster than a household of one or two people.
Pro Tips for Making Filter Changes Easier
Over time, you’ll develop your own rhythm for this process. Here are some professional tips to make it even smoother.
Mark your calendar when you install a new filter. This helps you remember when the next change is due. Some people even put a sticky note on their fridge as a visual reminder.
Buy your replacement filters in advance so you always have one on hand. Nothing’s worse than realizing your filter needs changing when you don’t have a new one ready.
If you have multiple refrigerators or a fridge and freezer combo with separate filters, keep track of when each one needs changing. Create a simple spreadsheet or use a notes app on your phone to track this.