How to Change Water Filter on Kenmore Refrigerator: A Complete Step-by-Step Guide
If you own a Kenmore refrigerator, you probably already know how convenient it is to have fresh, filtered water right at your fingertips. But here’s the thing—that water filter doesn’t last forever. Eventually, it gets tired, saturated with impurities, and stops doing its job effectively. When that happens, you need to know how to change it. The good news? It’s not rocket science. In fact, I’d argue that changing your Kenmore refrigerator’s water filter is one of the easiest maintenance tasks you can do yourself, and it’ll save you money on service calls.
Why Changing Your Water Filter Matters More Than You Think
Let me paint a picture for you. Imagine your water filter as a bouncer at an exclusive club. Its job is to keep the bad stuff out—chlorine, sediment, bacteria, and other contaminants—while letting the good stuff through. Over time, your filter gets overworked and tired. It can only catch so much before it becomes ineffective. When you don’t change it regularly, you’re essentially letting that bouncer take a nap on the job.
The consequences? Your water might start tasting odd, your ice cubes could look cloudy, and worst of all, you’re not getting the purification you’re paying for. That’s why manufacturers recommend changing your Kenmore water filter every six months, or sooner if you use a lot of filtered water.
Understanding Your Kenmore Refrigerator’s Water Filter System
Before you dive into the replacement process, it helps to understand what you’re working with. Kenmore refrigerators come with different filter designs depending on the model. Some use cartridge filters located inside the fridge, while others have filters tucked away in the base or on the exterior. The most common setup you’ll encounter is the internal cartridge filter, usually found in the upper right corner of your refrigerator’s interior.
The Two Main Filter Locations You Should Know About
Kenmore’s water filtration system can be found in one of two primary locations. Understanding which one you have is your first step toward a successful replacement.
- Internal filters: Located inside the refrigerator, typically in the upper corners or along the back wall. These are the most straightforward to access and replace.
- External filters: Mounted underneath the fridge or in the base. These require you to work from below, but the process remains similarly simple.
The beauty of knowing this is that you can plan your replacement around your daily routine. Internal filters take just a few minutes, while external ones might require a bit more maneuvering.
What You’ll Need Before You Start
Here’s where preparation becomes your best friend. Having everything you need within arm’s reach means you won’t be running around your kitchen like a headless chicken halfway through the job.
Essential Tools and Materials
- A replacement water filter: This is the obvious one. Make sure you get the correct model for your specific Kenmore refrigerator. Check your model number if you’re unsure.
- A bowl or pitcher: Trust me on this—there will be some residual water trapped in the system.
- A towel: Water spills happen. Be ready for them.
- Your refrigerator’s manual: While I’m walking you through the general process, your specific model might have unique quirks worth knowing about.
That’s genuinely all you need. No special tools, no complicated equipment. This is a refreshingly simple maintenance task.
Finding the Exact Filter Location on Your Model
Think of this step as reconnaissance. You need to know exactly where your target is before you make your move.
How to Locate Your Water Filter Quickly
Open your refrigerator and look around. Most Kenmore filters are housed in a cylindrical cartridge that’s roughly the size of a large battery. They’re typically color-coded with blue or white plastic casings. In internal models, you’ll spot it in the upper right corner, tucked behind the shelves. Sometimes there’s a release button—sometimes not.
If you can’t find it inside, the filter is likely external. Check underneath your fridge, behind the toe kick panel at the bottom front. You’ll see a similar cartridge mounted horizontally. Some models also feature a filter canister that unscrews from the base.
Your model number is your best friend here. You can find it on a sticker inside your fridge, typically on the side wall. Write it down, look it up on the Kenmore website, and boom—you’ll know exactly where to look and what to expect.
Step-by-Step Instructions for Internal Water Filters
Let’s tackle the most common scenario: the internal filter. This is where the majority of Kenmore refrigerator owners will find their filter system.
Step One: Prepare Your Workspace
Before touching anything, lay your towel on the floor beneath the filter location. Place your bowl or pitcher nearby. You’re creating a safety zone that’ll catch any unexpected water drips. I’ve seen people skip this step, and I’ve seen people regret it immediately.
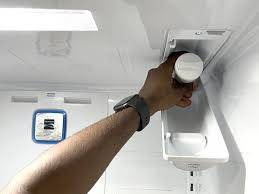
Step Two: Locate and Access the Filter
Open your refrigerator and navigate to the upper right corner, or wherever your model keeps its filter. You’ll see a cylindrical cartridge that might be surrounded by a plastic housing. Look for any obvious buttons or levers. Most Kenmore filters have a button on the side that releases the cartridge from its socket. Press it gently but firmly.
Here’s a pro tip: if there’s no obvious button, try rotating the cartridge counterclockwise. Some models use a twist-and-lock mechanism rather than a push-button release. Patience is key here—don’t force anything.
Step Three: Remove the Old Filter
Once you’ve released the cartridge, it should slide out toward you. This is where that bowl becomes invaluable. Water trapped inside will drip. Some people describe it as a mini waterfall. You’ve been warned. Pull slowly and deliberately, tilting the cartridge downward into your waiting bowl.
Once it’s completely free, place it aside. You’re done with this guy. He’s served his purpose, and now you’re moving on to greener, fresher pastures.
Step Four: Clean the Filter Housing
This step is often overlooked, but it’s genuinely important. Look at the slot where your filter just came out of. You’ll see a rubber seal or gasket. Use your towel to gently clean any debris, mineral buildup, or algae that might’ve accumulated. A damp cloth works wonders here. This ensures your new filter will seal properly and function at peak efficiency.
Step Five: Install Your New Filter
Now for the moment of truth. Remove your new Kenmore water filter from its packaging. Before inserting it, run it under some water for a few seconds. This saturates the carbon media and improves filtration from the get-go. Some people skip this, but I’ve noticed better water quality when you do it.
Slide the new filter into the housing, making sure it goes in smoothly and seats completely. You should hear a click when it’s properly installed. If your model uses a twist mechanism, rotate clockwise until it’s snug. Don’t overtighten—you want it secure, not cranked down like you’re closing a vice.
Step Six: Run Water Through Your System
Close the refrigerator door and locate your water dispenser. Run water for about 30 seconds. Yes, I know it seems wasteful, but this flushes out residual carbon particles and air that were trapped during installation. Your first few cups of water might taste slightly different or have a weird smell. This is normal and temporary. After that initial purge, you’re golden.
Step-by-Step Instructions for External Water Filters
If your Kenmore filter lives underneath your refrigerator, here’s what you need to know.
Initial Access and Preparation
Get down on the floor—yes, really. You’ll need to access the base of your refrigerator. Some models have a removable toe kick panel at the bottom front. Pop it off by pressing the release tabs, and you’ll have clear access to the filter canister or cartridge mounted below. Lay your towel here too. Water will drip.
Removing the External Filter
External filters typically use one of two release mechanisms. Some have a push-button similar to internal filters. Others have a large plastic collar that you unscrew counterclockwise. Whichever yours uses, apply steady pressure rather than sudden force. You’re releasing a water-filled component, so expect some spillage regardless of your technique.
Once released, let the cartridge drain completely into your bowl. Don’t rush this part. Some filters hold surprising amounts of water.
Installing the Replacement
Prepare your new filter the same way as you would with an internal model—a brief rinse under clean water works wonders. Slide or screw it into place until you feel firm resistance and hear that satisfying click. With external models, you’ll then replace the toe kick panel.
Testing Your System
Run water at the dispenser for 30 seconds, just like with internal filters. You’re clearing the system of impurities and air. Your first few cups might look slightly cloudy—this is carbon particles, not contamination, and it’ll clear up quickly.
Common Issues and Troubleshooting Tips
Sometimes things don’t go perfectly smoothly. Here’s what to do if you encounter problems.
The Filter Won’t Come Out
This happens more often than you’d think. Old filters can stick, mineral deposits can build up, or you might simply be applying pressure in the wrong direction. Try running warm water over the filter housing for a minute to loosen any deposits. Then try again with steady, gentle pressure. If it’s still stuck after a few attempts, consult your manual or contact Kenmore support.
Water Leaks After Installation
A leaking filter usually means it’s not sealed properly. Remove it and try again, making sure it slides all the way into the housing until you feel that click. Check that rubber gasket we talked about earlier—make sure it’s clean and properly positioned. Reinstall and test again.
Low Water Pressure
A new filter that’s too tight or not properly saturated can restrict water flow. Run water for a full minute. If pressure doesn’t improve, remove the filter and check that it’s the correct model for your refrigerator. A mismatched filter might not fit properly.
Maintenance Tips to Extend Filter Life
Your filter doesn’t have to be a consumable you replace blindly. Smart practices extend its effectiveness.
First, keep track of replacement dates. Whether you write it on the filter itself with a marker or set a phone reminder, knowing when you installed it helps you stay on schedule. Second, if you notice water tastes off or ice looks cloudy before six months have passed, replace it early. Your filter is telling you it’s tired.
Third, run a few seconds of water after extended periods away from home. If your fridge has been sitting unused for weeks, any stagnant water in the system should be purged. This simple habit keeps things fresh and prevents bacterial growth.
How Often Should You Really Change Your Filter
The manufacturer’s recommendation of every six months is a good baseline. However, your actual replacement frequency depends on several factors. High mineral content in your local water supply means more frequent changes. Heavy usage—large families with constant water and ice needs—also shortens filter life. If your water comes from a well rather than municipal supply, change it more frequently. The filter will tell you when it’s had enough through taste and clarity changes.
Understanding Filter Compatibility and Model Numbers
Here’s a mistake I see people make constantly: buying the wrong filter. Kenmore doesn’t use one-size-fits-all filters. Different models require different cartridges. Before you buy a replacement, find your refrigerator’s model number. It’s on a sticker inside the fridge, on the back wall, or sometimes on the side. Write it down exactly as written.
When shopping, search for that specific model number plus “water filter.” Most retailers organize filters by compatibility, so this ensures you get exactly what you need. Buying the wrong filter is a frustrating waste of money.
Conclusion
Changing your Kenmore refrigerator’s water filter is genuinely one of the most straightforward maintenance tasks you can tackle yourself. Whether your filter is tucked inside your fridge or hiding underneath, the process follows the same basic principles: locate it, remove it with minimal water spillage, clean the housing, install the new one, and flush the system. The entire job takes maybe fifteen minutes, requires no special skills, and saves you money while ensuring your water stays fresh and clean.
By understanding your specific model, gathering the right tools, and following these steps carefully, you’ll never need to call a service technician for a water filter change again. Your family will enjoy better-tasting water and clearer ice, and you’ll have the satisfaction of knowing you handled it yourself. That’s a win all around.
Frequently Asked Questions
How do I know which water filter model I need for my Kenmore refrigerator?
The most reliable way is to locate your refrigerator’s model number, which you’ll find on a sticker inside the fridge, typically on the side wall or back. Once you have this number, visit the Kenmore website or contact their customer service, and they’ll tell you exactly which filter you need. Alternatively, you can search your model number on major retailer websites like Amazon or Walmart, and they’ll show compatible filters. Never guess on filter models—buying the wrong one wastes money and won’t work properly.
Can I use third-party or generic water filters instead of genuine Kenmore filters?
While some third-party filters claim compatibility, I’d recommend sticking with genuine Kenmore filters or filters specifically certified for your model. Genuine filters ensure proper fit, sealing, and filtration performance. Cheaper generic alternatives might seem appealing, but they often don’t seal properly, leading to leaks or inadequate filtration. Your water quality is worth the investment in a proper filter.
What should I do if water leaks from my refrigerator after changing the filter?
A leak usually means the filter isn’t seated properly or the gasket is dirty. Turn off your water supply immediately. Remove the filter, clean the housing thoroughly with a damp cloth, ensure the rubber gasket is clean and properly positioned, and reinstall the filter, pushing until you hear it click. Run water for 30 seconds to test. If leaking persists, the filter might be cracked or the housing damaged—contact Kenmore support for further assistance.
Is it normal for water to taste strange right after installing a new filter?
Yes, this is completely normal and temporary. New carbon filters release fine carbon particles during the first use. These particles are harmless but affect taste and appearance. Run water for about 30 seconds to one minute after installation to flush these particles out. Your water should taste fresh and clean afterward. If off-taste persists beyond that initial purge, you might have the wrong filter model or a contaminated water source.
How much does a Kenmore water filter replacement cost, and where’s the best place to buy one?
Genuine Kenmore water filters typically range from $30 to $60 depending on the specific model. You can purchase them from major retailers like Lowe’s, Home Depot, Amazon, Walmart, and the official Kenmore website. Prices often vary