How to Close Water Valve: A Complete Guide for Homeowners
Have you ever faced a plumbing emergency and didn’t know where to start? One of the most critical skills every homeowner should master is knowing how to close a water valve. Whether you’re dealing with a burst pipe, a leaky faucet, or planning routine maintenance, understanding this simple yet vital task can save you thousands of dollars in water damage. Let me walk you through everything you need to know about closing water valves like a pro.
Understanding Water Valves: What Are They and Why They Matter
Think of your home’s water supply system as a network of roads. Water valves are like traffic signals that control the flow of water through these roads. Without them, you’d have no way to stop the water from flowing when you need repairs or emergency shutdowns.
Water valves come in different types and are installed at various points in your plumbing system. The main water valve, often called the main shut-off valve, is your home’s master control. Then you’ve got individual valves under sinks, behind toilets, and near major appliances. Each serves a specific purpose, and knowing how to operate them is essential knowledge for any homeowner.
Why You Need to Know This Skill
Imagine waking up to water gushing from a burst pipe. Panic sets in. But if you know how to close your water valve within seconds, you’ve just prevented potential flooding and water damage. This skill isn’t just about emergencies—it’s also practical for routine repairs, seasonal maintenance, or when you’re planning to be away from home for extended periods.
Types of Water Valves Found in Homes
Different valves work differently, and understanding these distinctions helps you operate them effectively. Let me break down the most common types you’ll encounter in residential settings.
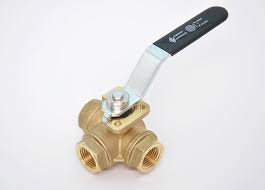
Ball Valves: The Modern Standard
Ball valves are the most common type found in modern homes. They feature a lever handle that’s perpendicular to the pipe when closed and parallel when open. Here’s the beauty of ball valves: they’re incredibly intuitive. When the handle is in line with the pipe, water flows freely. When it’s at a right angle, the valve is shut. It’s that simple. These valves are durable, reliable, and rarely cause problems if you don’t force them.
Gate Valves: The Old-School Choice
Older homes often have gate valves, which use a wedge-shaped gate to control water flow. You’ll identify them by their round wheel handle. These need several full rotations to open or close completely. While they work fine, they’re more prone to developing issues over time, especially if they haven’t been used regularly. Think of them as the vintage option that still gets the job done but requires a bit more effort.
Angle Valves: The Convenient Option
Found underneath sinks and behind toilets, angle valves provide localized control. They’re perfect for shutting off water to a specific fixture without affecting the rest of your home. These typically have a lever or oval handle and turn ninety degrees to operate.
Locating Your Main Water Shut-Off Valve
Before you can close a valve, you need to find it. The main shut-off valve location varies depending on your home’s layout and climate. Let me help you search systematically.
Common Locations for Your Main Valve
- Near the water meter, typically in the basement or crawlspace
- Along an exterior wall in cold climates (buried below the frost line)
- Inside a utility closet or under the kitchen sink
- In the garage, near the foundation wall
- Outside the home in a ground-level box marked with an “S” or water symbol
Start your search where the water enters your home. Look for where the main supply line comes through the foundation or basement wall. The valve should be relatively close to this entry point.
What to Look For
You’re looking for either a lever handle (ball valve) or a wheel handle (gate valve). The valve should be a few inches in diameter and made of brass or PVC material. Once you’ve found it, congratulations! You’ve completed the hardest part of the process.
Step-by-Step Instructions: Closing Your Water Valve
Now that you’ve located your valve, let’s get down to the actual process. The technique differs slightly depending on your valve type.
Closing a Ball Valve (Lever Handle)
This is the most straightforward type. Here’s exactly what you do:
- Locate the lever handle on your ball valve
- Grip the handle firmly with your hand
- Rotate it ninety degrees until it’s perpendicular to the pipe
- The valve is now closed—water should stop flowing immediately
- You shouldn’t need to apply excessive force; if it requires significant effort, don’t force it
The beauty of ball valves is they give you clear visual feedback. You can instantly see whether the valve is open or closed just by looking at the handle orientation.
Closing a Gate Valve (Wheel Handle)
Gate valves require a slightly different approach:
- Grip the wheel handle with your hand
- Turn it clockwise (righty-tighty) to close
- Continue rotating until you feel resistance, then stop
- Don’t force it past the point of resistance
- You’ll typically need four to eight full rotations to completely close the valve
A word of caution: if a gate valve hasn’t been used in years, it might be stubborn. Apply steady, gentle pressure rather than sudden force. If it won’t budge, you may need a pipe wrench for additional leverage, but this should be a last resort.
Closing Individual Fixture Valves
The valves under your sink or behind your toilet work similarly to main valves but on a smaller scale. Most are ball valves with lever handles:
- Reach under the sink or behind the toilet
- Locate the valve on the supply line
- Turn the lever perpendicular to the pipe
- Water supply to that fixture should stop immediately
Common Mistakes People Make When Closing Water Valves
I’ve seen homeowners cause damage by making these common errors. Let’s avoid them altogether.
Applying Too Much Force
Your water valve isn’t arm-wrestling competition. Excessive force can damage the valve’s internal mechanisms. A steady, controlled motion is all you need. If you encounter significant resistance, stop and assess the situation rather than muscling through it.
Confusing Open and Closed Positions
This happens more often than you’d think, especially in stressful situations. Remember: lever handle parallel to the pipe means open; perpendicular means closed. Take a moment to verify the position before assuming the valve is closed.
Neglecting Maintenance Checks
Many homeowners locate their main valve once and then forget about it. Test your valve every six months. Turn it off and back on to ensure it’s functioning properly. A valve that hasn’t been used in years might refuse to close when you desperately need it to.
Not Knowing Where the Valve Is Located
This is perhaps the biggest mistake. In an emergency, you won’t have time to search your entire home. Take action today—locate your main shut-off valve, mark it clearly, and tell every family member where it is.
What Happens After You Close the Water Valve
Closing your valve is just the beginning. Understanding what comes next helps you handle the situation effectively.
Checking That Water Has Stopped Flowing
After closing the valve, turn on a faucet and verify that no water comes out. This confirms the valve actually closed properly. If water continues flowing, you may need to close it more completely or investigate whether the valve is defective.
Addressing Your Original Problem
Whether you’re fixing a leak, replacing a fixture, or making repairs, now you can work safely. The water pressure has been relieved, making the work safer and easier.
Reopening the Valve
When you’re finished, turn the valve back on by rotating it back to the open position. For ball valves, that means the lever is parallel to the pipe. Check your faucets to confirm water flow has returned to normal.
Troubleshooting: When Your Valve Won’t Close
Sometimes valves misbehave. Here’s how to handle common problems.
Stuck or Corroded Valves
If your valve refuses to turn, applying penetrating oil can help. Spray the area where the handle connects to the valve and let it sit for thirty minutes. Then gently attempt to turn it again. Patience is key—forcing a stuck valve can break it completely.
Water Still Flowing After Closing
This suggests the valve isn’t sealing properly. First, ensure you’ve turned it as far as it will go. If water continues flowing, the valve likely has internal damage and needs replacement. This isn’t a repair you should attempt yourself—call a professional plumber.
Leaking From the Valve Handle Area
A small leak around the handle doesn’t necessarily mean the valve won’t shut off water. However, it indicates the valve is deteriorating and should be replaced soon. In the meantime, it will still function for emergencies.
Preventive Maintenance for Your Water Valves
An ounce of prevention truly is worth a pound of cure when it comes to water valves.
Regular Testing Schedule
Mark your calendar for twice-yearly valve testing. This simple maintenance check ensures your valve operates smoothly when needed. Turn it off, count the rotations or note the handle movement, and turn it back on. This keeps internal components moving and prevents corrosion.
Keeping Your Valve Accessible
Don’t store boxes or equipment in front of your main valve. Keep the area clear and clean. In emergencies, seconds matter, and having easy access could mean the difference between a manageable problem and catastrophic damage.
Labeling and Documentation
Install a bright label near your main valve. Some people even take photos and print them on a home emergency reference sheet posted on the refrigerator. This ensures everyone in your household knows where to find the valve and what it looks like.
When to Call a Professional Plumber
While closing a water valve is straightforward, some situations warrant professional help.
Situations Requiring Professional Assistance
- Your main valve is located underground and you can’t access it
- The valve won’t turn and won’t respond to penetrating oil treatment
- Water continues flowing even after closing the valve
- You smell gas near the water valve area
- The valve is leaking significantly from any connection point
- You’ve identified a problem but lack confidence in your ability to handle it
Plumbers are trained, insured, and equipped to handle complex situations. There’s no shame in calling for backup when something exceeds your comfort level or knowledge.
Different Water Valve Scenarios and How to Handle Them
Let me walk you through specific situations you might encounter.
Emergency Burst Pipe Scenario
You hear a loud crack and water starts spraying from behind a wall. Here’s your action plan: immediately locate and close your main shut-off valve. Don’t panic—move quickly and deliberately. Once closed, turn on faucets to relieve pressure in the system. Then call a plumber and begin documenting the damage for insurance purposes.
Planning Planned Maintenance
Before replacing fixtures or performing repairs, closing the relevant valve is your first step. Test the valve beforehand to ensure it works. Then close it, allow the system to depressurize, and proceed with your work. This approach keeps the work area dry and safe.
Extended Home Vacancy
Planning an extended vacation? Closing your main valve while away reduces the risk of water damage from sudden leaks. Many homeowners do this automatically before leaving for more than a week or two. It’s a simple preventive measure with significant peace-of-mind benefits.
Understanding Your Home’s Water Pressure System
Knowing how water valves fit into your overall system helps you appreciate their importance.
How Water Enters Your Home
Municipal water supply or a well pump delivers water under pressure through your main line. The main shut-off valve controls this incoming water before it branches into the various systems throughout your home. Without this control point, you’d have no way to stop water flow to your entire house.
Pressure Relief and System Depressurization
When you close a valve, water pressure builds up in the pipe section beyond the valve. This is why turning on a faucet after closing the main valve is important—it relieves this pressure and prevents damage to connected components.
Conclusion
Knowing how to close a water valve is one of those essential homeowner skills that sits somewhere between changing a tire and CPR in terms of importance. It’s relatively simple to learn, incredibly valuable to know, and could save your home from thousands of dollars in water damage.
The process itself is straightforward: locate your main valve, turn the lever perpendicular to the pipe or rotate the wheel clockwise, and verify that water has stopped flowing. Test your valve every six months to ensure it’s functioning properly. Keep the area around your valve clear and accessible, and never hesitate to call a professional if you encounter problems.
Take action today. Find your main water shut-off valve, test it to ensure it works, and share this information with everyone in your household. That’s all it takes to be prepared for whatever plumbing emergencies come your way. Your future self will thank you when you can respond calmly and effectively to a water-related crisis instead of panicking in the moment.
Frequently Asked Questions
How do I know if my water valve is open or closed?
For ball valves with lever handles, the handle position tells you everything. When the lever is parallel to the pipe (pointing in the same direction as the pipe), water is flowing and the valve is open. When the lever is perpendicular to the pipe (pointing at a right angle), the valve is closed and water is blocked. For gate valves with wheel handles, you must turn the wheel clockwise to close it, and you’ll feel resistance when fully closed. If you’re unsure, turn on a nearby faucet to test whether water flows or stops.
Can I leave my water valve closed for extended periods?
Yes, you can safely leave your main water valve closed for extended periods during vacations or seasonal closures. However, this can sometimes cause air to enter the lines. When you reopen the valve, you might experience sputtering from faucets for a few minutes as air is displaced. This is completely normal and nothing to worry about. Just run your faucets for a minute or two until water flows smoothly again.