How to Draw Realistic Water: A Complete Guide for Beginners
Have you ever looked at a painting and wondered how artists manage to make water look so incredibly lifelike? You know, that mesmerizing quality where you can almost feel the splash or sense the movement of waves? Well, I’m here to tell you that drawing realistic water isn’t some mystical talent reserved for the naturally gifted. It’s actually a skill you can develop with practice, patience, and the right guidance.
Water is one of those subjects that trips up a lot of beginner artists. It seems simple enough on the surface, but once you start trying to capture its fluidity, transparency, and reflective properties, things get complicated pretty quickly. The good news? I’m going to walk you through this entire process step by step, and by the time you finish reading, you’ll have a solid understanding of how to approach water in your drawings.
Understanding Water’s Basic Properties
Before you even pick up a pencil, you need to understand what makes water behave the way it does. Think of water as a transparent medium that’s constantly interacting with light and the objects around it. This is the foundation of everything you’ll learn.
Transparency and Light Refraction
Water isn’t opaque like a brick wall. It’s transparent, which means light passes through it. But here’s where it gets interesting—light doesn’t travel straight through water. It bends and refracts, which is why objects underwater appear distorted or shifted from their actual position. When you’re drawing water, you need to show this refraction to make it look authentic. Without it, your water will look flat and lifeless.
Reflection and Surface Interaction
The surface of water acts like a mirror, but not a perfect one. It reflects objects from the surrounding environment, but the reflection is often broken up by ripples and waves. The rougher the water’s surface, the more fragmented and distorted these reflections become. Calm water shows clear reflections, while turbulent water shows chaotic, broken-up reflections.
Color and Value Variation
Here’s something that surprises a lot of beginners: water isn’t just blue. The color of water depends on what’s beneath it, what’s around it, and what the sky looks like. Deep ocean water might be dark blue or even greenish, while shallow water over sand appears lighter and more turquoise. River water can be brown, gray, or green. The key is observing the actual water you’re trying to draw rather than assuming it’s a certain color.
Gathering Your Materials and Setting Up
You don’t need fancy expensive supplies to draw realistic water. Let me break down what actually works.
Essential Drawing Supplies
- A range of pencils (HB, 2B, 4B, 6B, and 8B for darker values)
- High-quality paper (preferably something with a bit of tooth, like drawing paper)
- Kneaded eraser for lifting highlights
- Blending stumps or tortillons for smooth transitions
- Graphite powder or willow charcoal for large areas
- White colored pencils or gouache for highlights
- Ruler or straightedge for perspective lines
Optional but Helpful Tools
If you want to experiment beyond pencil, consider keeping colored pencils, watercolors, or pastels on hand. Many artists find that water is actually easier to render in certain mediums like watercolor or acrylic, but pencil is a great starting point because it forces you to understand tonal values.
Observing Water in Real Life
This might sound obvious, but it’s surprisingly overlooked. Before you draw water from imagination or photos, spend time actually looking at water. Go to the beach, a lake, a river, or even just watch water in a glass or a puddle. Notice how light interacts with it. Take photographs. Sketch quick studies. This observation phase is absolutely crucial.
What to Look For When Observing
Pay attention to where the lightest values are on the water’s surface. Usually, these appear where light is hitting the water directly. Watch how ripples create patterns and shadows. Notice where reflections are clearest and where they break up. See how the water’s edge transitions from transparent to opaque depending on the angle you’re viewing it from. All of these observations will inform your drawings.
Mastering the Basics: Still Water
Let’s start simple. Still water, like a lake on a calm day or a pond, is the perfect place to begin your water-drawing journey.
Step One: Establish Your Composition
Lightly sketch the basic composition of your scene. Where is the water? Where is the horizon line? What objects are reflected in the water? Keep these lines very light because you’ll be covering them up with shading later. Remember that the horizon line should be straight and level unless you’re going for a tilted perspective for artistic effect.
Step Two: Block in Values and Shadows
Now you’re going to identify where your light source is coming from and block in the main value groups. Water is rarely one uniform color or tone—it has areas that are lighter and areas that are darker. Use your medium pencil (2B or 4B) to block in these basic shadow areas. This is where you establish the fundamental structure of your water drawing.
Step Three: Develop Reflections
Reflections in still water follow a specific rule: they appear directly below the object being reflected, and they’re often slightly darker and less distinct than the object itself. If you’re drawing a tree reflected in a pond, the tree’s reflection should appear as a vertical line downward from the tree. The key is making the reflection look convincingly underwater while maintaining some transparency.
Step Four: Add Subtle Ripples and Movement
Even “still” water isn’t completely motionless. Add very subtle, gentle ripples using thin curved lines. These ripples create shadows that help convey the texture of the water’s surface. Don’t overdo it—the calmer the water, the fewer and more subtle these ripples should be. Use a light touch with your pencil.
Step Five: Strengthen Highlights and Darken Shadows
This is where your drawing comes to life. Using your darkest pencils (6B or 8B), darken the shadow areas significantly. Then, use your eraser or white pencil to punch in the brightest highlights. The contrast between these light and dark areas is what creates the illusion of water’s reflective, transparent quality. Don’t be timid with this step.
Moving Forward: Drawing Waves and Moving Water
Once you’re comfortable with still water, it’s time to tackle the more dynamic challenge of moving water with waves.
Understanding Wave Structure
Waves aren’t random. They have a predictable structure: a lighter face on the side facing light, a darker shadowed area, a crest at the top, and a base where the wave meets the water’s surface. When you understand this structure, you can draw waves that look convincing rather than cartoonish.
Perspective and Waves
Here’s something critical: waves in the distance appear smaller and closer together, while waves closer to you appear larger and more spread out. This is perspective, and it applies to water just like it does to any other subject. Using this perspective principle makes your water drawings look three-dimensional and convincing.
Capturing Water Dynamics
When water is moving, you see motion lines, splashes, and turbulence. The direction of these elements should follow the direction of the water’s movement. If a wave is crashing from left to right, your spray and motion should follow that same direction. This consistency makes your water drawing read as moving in a particular direction rather than just looking chaotic.
The Art of Creating Transparency
This is where many beginners struggle, and it’s completely understandable. How do you show that water is transparent when you’re drawing with an opaque medium like pencil?
Using Value and Contrast
The key is working with values. Where water is shallow or thin, you can see through it to the sand, rocks, or ground beneath. Show this by allowing some of the details underneath to remain visible but slightly obscured. Use lighter values to suggest transparency rather than completely covering up what’s underneath.
Subtle Color and Tone Shifts
Even in grayscale, you can suggest transparency through subtle shifts in tone. The edges of transparent water areas might be slightly lighter or have softer transitions than opaque areas. These subtle differences cue the viewer’s brain to interpret the area as see-through rather than solid.
Strategic Use of Highlights
Highlights aren’t just pretty additions—they’re essential for showing transparency. Light reflecting off and through water creates bright spots and streaks. These highlights help the viewer understand that light is passing through the water rather than bouncing off a solid surface.
Special Techniques for Different Water Scenarios
Drawing Ocean Waves
Ocean waves are dramatic and complex. They have white foam at the crest, dark shadow areas in the curl, and transparent sections where light passes through the water. Start by understanding the basic wave shape, then add the foam using your eraser and white pencil. The foam isn’t pure white—it usually has shadows within it, so don’t make it completely white and flat.
Rendering Waterfalls
Waterfalls present a unique challenge because you need to show both the flowing water and the power of that flow. Use directional strokes following the water’s movement. Show the mist created by water hitting rocks below. Use strong contrast between the white water and the dark rocks surrounding it. The key is making the water look like it’s in constant motion rather than frozen in place.
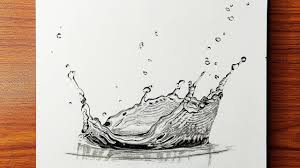
Creating Rain and Splashes
Rain and splashes require a different approach. Short, directional marks suggest falling rain. Splashes are best drawn with radiating lines and curved shapes that suggest outward movement. The edges of splashes are usually darker and more defined, while the centers are lighter and more transparent. Use this contrast to make splashes look dynamic and energetic.
Drawing Underwater Scenes
When drawing underwater, everything is filtered through water. This means colors are muted, edges are softer, and there’s a overall atmospheric quality to the scene. Objects in the distance appear hazier than objects in the foreground. Light rays might be visible filtering down from above. Show refraction by slightly distorting the shapes of objects viewed through the water.
Common Mistakes to Avoid
Making Water Too Uniform in Color or Value
This is probably the most common mistake. Water is never one flat tone. Always vary your values and include a range from very light to quite dark. This variation is what makes water look realistic.
Forgetting About Reflections
Reflections are your friend. They anchor water in its environment and make it look convincing. Don’t skip this element, even if the reflections are subtle.
Overworking Highlights
It’s tempting to add lots of bright highlights everywhere, but this actually makes water look fake and cartoonish. Be selective about where you place your brightest highlights. Usually, they appear where light directly hits the water’s surface.
Ignoring Perspective
Remember that water follows the same perspective rules as anything else. Water in the distance looks different from water in the foreground. Don’t forget this fundamental principle.
Practice Exercises to Improve Your Skills
Exercise One: Value Studies
Create five small drawings (maybe 3×3 inches each) focusing solely on value variation in water. One still, one with gentle ripples, one with waves, one with a reflection, and one with splashing water. Don’t worry about perfect detail—focus on getting the values right.
Exercise Two: Texture Studies
Draw water using different mark-making techniques. Try using only dots for one drawing, only lines for another, only smudges for another. This helps you understand different ways to suggest water’s texture and movement.
Exercise Three: Photo Studies
Find photographs of water in various conditions and draw them. Start with calm water, then progress to rougher waters. This forces you to observe and render what’s actually in front of you rather than relying on imagination or habit.
Exercise Four: Speed Sketches
Set a timer for 5-10 minute sketches of water. Work quickly and focus on capturing the essence of the water rather than getting bogged down in detail. These quick studies are invaluable for developing your ability to see and render water quickly.
Advanced Tips for Experienced Artists
Once you’ve mastered the basics, here are some advanced approaches to take your water drawings to the next level.
Combining Multiple Mediums
Try combining pencil with white gouache, colored pencil, or even ink. Layering different mediums allows you to achieve effects that are difficult with pencil alone. White gouache, for instance, can create crisp highlights and foam that look particularly convincing.
Working Large Scale
Challenge yourself to draw water at a much larger scale than you’re comfortable with. Large drawings force you to be more intentional about your marks and more subtle about your technique. They also allow you to show more detail and texture.
Experimenting with Unconventional Subjects
Draw water in unusual lighting conditions: underwater at night, water illuminated by sunset, water in a storm, or water in an otherworldly environment. These challenges push you to think creatively about how to render water under non-standard conditions.
Conclusion
Drawing realistic water is absolutely within your reach, regardless of where you’re starting from. It requires understanding water’s fundamental properties—its transparency, reflectivity, and dynamic nature. It demands patient observation of real water in the world around you. And it asks you to practice consistently, learning from mistakes and building on successes.
The most important thing to remember is that water isn’t a single technique or trick. It’s a combination of many skills working together: understanding light and shadow, creating convincing reflections, varying your values, suggesting movement, and capturing transparency. Develop each of these skills independently through focused practice, and you’ll find that drawing realistic water becomes increasingly natural and intuitive.
Start with still water and simple scenes. Master the fundamentals. Then gradually challenge yourself with more complex water scenarios. Keep observing real water, keep practicing, and keep pushing yourself to improve. Before long, you’ll be creating water drawings that truly capture the magic of this fluid, reflective, transparent substance. Your patience and persistence will absolutely pay off.
Frequently Asked Questions
What’s the best pencil for drawing water?
There’s no single “best” pencil, but I recommend having a range from HB to 8B. For establishing light values and initial sketching, start with HB or 2B. For mid-tones and developing form, use 4B or 6B. For your darkest shadows and final details, use 8B. Having this range gives you maximum control over your values, which is critical for convincing water drawings.
How do I make water look transparent without it looking washed out?
Transparency comes from the interplay between light and dark values. Make sure you’re including very dark shadows alongside lighter values. This contrast