How to Empty Black Water Tank Into Portable Tank: A Complete Guide
Understanding Your Black Water Tank: The Basics
Let’s start with the fundamentals. Your black water tank is essentially the septic system of your recreational vehicle or portable toilet setup. It collects all the waste from your toilet—yes, everything that goes down there—and stores it until you can properly dispose of it. Think of it as a holding cell for human waste that needs careful management and regular emptying to prevent odors, backups, and unpleasant surprises.
Why Regular Emptying Is Non-Negotiable
Here’s the truth: neglecting your black water tank is like ignoring an overflowing trash can in summer heat. The longer waste sits in that tank, the more it breaks down, creating gases and odors that can permeate your entire RV or camping area. Beyond the smell factor, a full tank can lead to system failures, expensive repairs, and health hazards. Regular emptying isn’t just about comfort—it’s about maintaining your investment and protecting your health.
Signs Your Tank Needs Emptying
You don’t need to guess when it’s time to empty your black water tank. Your RV should have a tank level indicator on your dashboard. Most experienced campers recommend emptying when the tank reaches about three-quarters full, rather than waiting until it’s completely full. This approach prevents buildup and keeps your system running smoothly.
Essential Equipment You’ll Need
Before you attempt this task, let’s talk gear. You’ll need the right equipment to do this safely and effectively. Skipping on proper tools is like trying to paint your house without brushes—you’re just making things harder for yourself.
The Portable Tank: Choosing the Right One
Not all portable tanks are created equal. You’ll want a dedicated waste tank with a capacity of at least 20 gallons, though 30-40 gallon tanks are more practical for most situations. Look for tanks with sturdy wheels, a secure lid, and clear capacity markings. The tank should have a properly sized inlet that matches your RV’s black water outlet. A good portable tank will have a comfortable handle for maneuvering and a drain valve positioned for easy access when you reach a disposal facility.
Tank Material and Durability
Quality matters here. Polyethylene plastic tanks are lightweight and affordable, making them popular choices for most RV owners. They resist corrosion and are easy to clean. However, ensure the tank is specifically designed for sewage waste, as regular water tanks aren’t built to withstand the chemical and biological nature of black water.
The Connection Hose: Your Critical Link
The hose connecting your RV to the portable tank is your critical lifeline in this operation. You’ll need a waste hose specifically rated for sewage, typically 3 inches in diameter. These aren’t ordinary garden hoses—they’re reinforced to handle the weight and nature of black water without collapsing or leaking. Most quality waste hoses come with bayonet fittings that create a tight seal, preventing spills and odors.
Hose Length and Storage
Choose a hose length between 15 and 25 feet. This gives you flexibility in positioning your portable tank while keeping the hose manageable. Longer hoses can sag or kink, while shorter ones limit your setup options. After use, always store your hose properly—never coil it while it’s still damp with residue, as this promotes bacterial growth and odors.
Additional Gear You’ll Want on Hand
- Heavy-duty work gloves rated for sewage handling
- Protective eyewear to prevent splashing
- Rubber-soled boots with good grip
- A bucket of water for rinsing connections
- Paper towels or cleaning rags
- Biodegradable disinfectant or specialized tank cleaner
- A level to ensure proper tank positioning
- Backup gloves in case one pair tears
Pre-Emptying Preparation: Get Ready the Right Way
Jumping into this task without preparation is a recipe for disaster. Let me share what seasoned RV owners always do before they begin.
Choosing Your Emptying Location
Location is everything. You want to empty your black water tank at a proper dump station—not in random locations where it’s illegal and environmentally irresponsible. Most RV parks, campgrounds, and public facilities have designated dump stations. Call ahead if you’re unsure, as some require permits or have specific hours. Never, ever dump black water on the ground or into regular drainage systems. It’s illegal, harmful to the environment, and disrespectful to others using the facility.
Positioning Your Equipment
Position your portable tank on level ground near the dump station’s connection point. Use that level to ensure the tank sits evenly. This might seem trivial, but an uneven tank can cause improper drainage and spills. Place the tank’s drain valve facing away from where you’ll be standing or working. Position it so you can access the valve comfortably when you need to empty the portable tank into the station’s system.
Inspecting Your Equipment Before Starting
This is your safety checkpoint. Examine your waste hose for cracks, punctures, or weak spots. Check that all fittings are secure and undamaged. Test the bayonet connection to ensure it clicks firmly into place. If anything looks questionable, don’t use it. A faulty hose or loose fitting can create a messy, unsanitary situation that ruins your day and endangers public health.
Step-by-Step Instructions: The Complete Process
Now for the main event. Follow these steps carefully, and you’ll handle this like a pro.
Step One: Connecting Your Hose to the Black Water Tank
Approach your RV and locate the black water tank outlet. It’s typically a recessed fitting on the exterior wall, often beneath the RV. Hold the bayonet fitting firmly and insert it into the black water outlet with a slight twisting motion. You should feel a satisfying click as it locks into place. Pull gently to confirm it’s secure—if it slides out easily, it’s not properly connected. A secure connection is non-negotiable; a loose fitting during emptying creates a nightmare scenario.
Avoiding Common Connection Mistakes
Don’t force the fitting. If it doesn’t slide in smoothly, you might be misaligned. Reposition and try again with a gentle touch. Some fittings have alignment dots—line these up before inserting. If you hear a crack or feel resistance, stop immediately and inspect the fitting for damage.
Step Two: Attaching the Hose to Your Portable Tank
Now connect the opposite end of the hose to your portable tank’s inlet fitting. Again, use the same click-and-twist method. Ensure this connection is equally secure. Many people make the mistake of being more careful with the RV connection while neglecting the portable tank connection. Both are equally important—a leak at either end creates the same unpleasant result.
Step Three: Positioning Everything for Success
Before you begin the flow, ensure your portable tank’s drain valve is securely closed. I cannot stress this enough—an open drain valve while the tank is filling is like leaving the water running while trying to fill a bathtub. The portable tank should be positioned so the hose runs downward from the RV to the tank, allowing gravity to assist the flow. If the portable tank must be higher than the RV outlet, you may need to use a pump, which we’ll discuss later.
Step Four: Initiating the Flow
Most RVs have a valve handle near the black water outlet. Turn this valve slowly and steadily. You’ll hear the waste beginning to flow through the hose into the portable tank. Don’t rush this step. Opening the valve gradually allows air to escape from the tank and hose, preventing backups and overflow. It’s the difference between a controlled flow and a geyser of unpleasantness.
Step Five: Monitoring the Process
Stay with your equipment during emptying. Watch the hose for any signs of leaks or disconnections. Listen for changes in the flow sound—a sudden silence might indicate a blockage. Keep an eye on your portable tank’s level indicator if it has one. Most importantly, don’t wander off. This isn’t a task where you start the flow and go grab a coffee. Responsible monitoring prevents disasters.
Step Six: Knowing When You’re Done
The flow will eventually slow to a trickle and then stop. You’ll hear a change in sound—the distinct absence of liquid flowing. Don’t assume you’re finished just because flow has stopped. Let it sit for a minute or two, then give the hose a gentle tap or squeeze near the RV connection. Sometimes a final bit of waste will trickle out. Once nothing else comes through after several seconds, you’re ready to move forward.
Step Seven: Rinsing Your Black Water Tank
Here’s where many people cut corners, and it’s a mistake. After the initial emptying, use a hose with a spray nozzle to rinse water through the black water tank. This flushes remaining waste and residue from the tank’s interior walls. Most RVs have a black tank flush inlet specifically for this purpose. Attach your freshwater hose, turn it on gently, and let water flow through the tank and down through the same outlet you just used. Repeat this process until the water running through the hose runs clear. This step prevents odors and buildup that would otherwise persist.
Step Eight: Disconnecting Everything Safely
Close the black water valve handle firmly. Slowly disconnect the hose from the RV outlet first, holding a bucket underneath to catch any drips. Then disconnect the other end from the portable tank. Have paper towels ready to wipe any residue from the fittings. Never leave black water connections uncovered or unwiped—always replace the protective caps that should accompany your equipment.
Handling the Portable Tank: The Final Stage
Transporting Your Portable Tank to the Dump Station
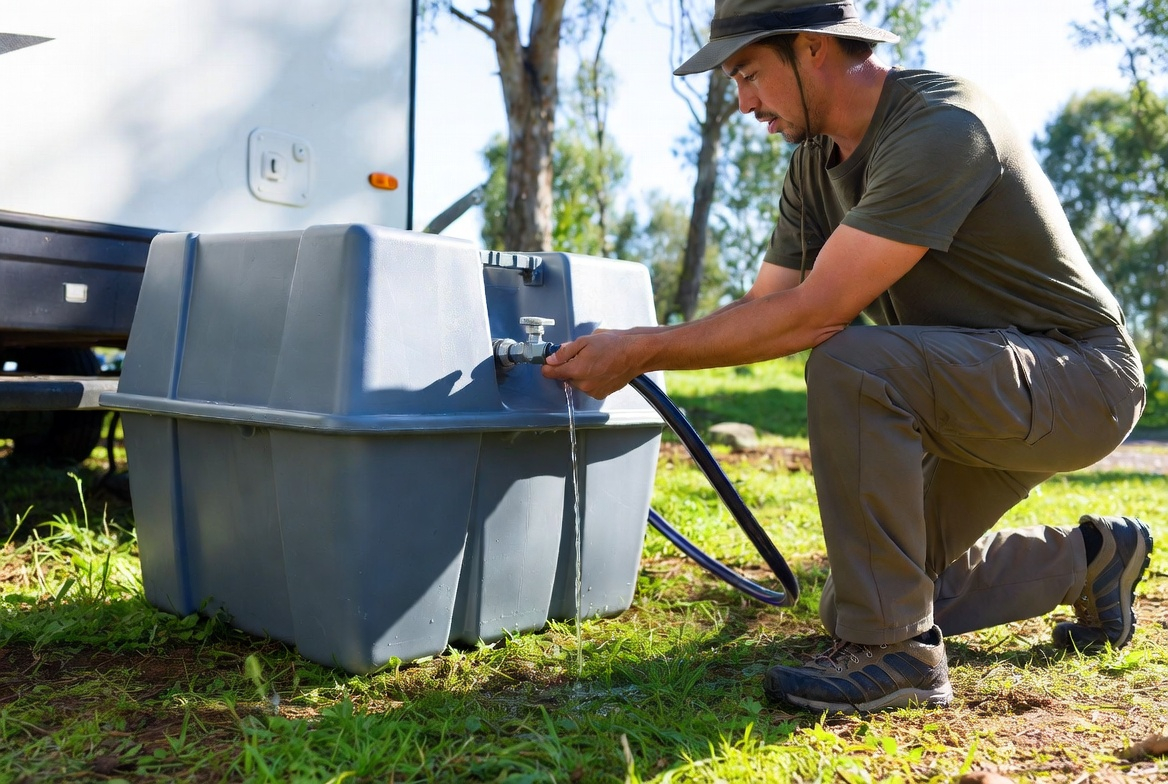
Once your portable tank is full, you’ll need to transport it to a proper dump station. If your tank has wheels, simply push it—don’t pull it backward, as this can shift the weight dangerously. If your tank lacks wheels, you might need equipment like a dolly or hand truck. Never overload yourself trying to carry a full tank manually. A 30-gallon tank of waste weighs roughly 250 pounds. That’s serious weight that demands respect and proper equipment.
Emptying Your Portable Tank Properly
At the dump station, locate the tank inlet fitting. Position your portable tank’s outlet valve over the station’s opening. Open the valve slowly, allowing waste to flow into the station’s system. Just like with the initial emptying, avoid rushing this step. Let gravity do the work. Once the tank is empty—confirmed by no more waste flowing—close the valve firmly.
Cleaning Your Portable Tank After Dumping
Many dump stations offer freshwater spray systems specifically for rinsing portable tanks. Use this to rinse your tank’s interior thoroughly. If your station doesn’t have a spray system, purchase some tank cleaning solution designed for black water tanks and follow the product instructions. A clean portable tank is a long-lasting portable tank—neglecting this step leads to bacterial growth, odors, and corrosion.
Safety Considerations You Cannot Ignore
Understanding the Health Hazards
Black water contains serious pathogens including E. coli, hepatitis A virus, and various other harmful bacteria. This isn’t something to take lightly. Always wear gloves, never touch your face during the process, and wash your hands thoroughly afterward. If you have cuts or open wounds on your hands, cover them completely or avoid this task altogether.
Preventing Spills and Splashing
Wear protective eyewear. Splashing might seem unlikely until it happens to you. A sudden blockage clearing or an unexpected connection failure can send waste spraying in unexpected directions. Eye protection takes seconds to put on and can prevent serious infections or injuries.
Proper Ventilation
Work in well-ventilated areas. If you’re emptying in an enclosed space like a basement or garage, open all available windows and doors. The methane gases produced by decomposing waste can accumulate and pose health risks. Fresh air circulation is non-negotiable.
Common Mistakes to Avoid
Rushing the Process
Patience is your best friend here. Rushing leads to spills, improper connections, and unsafe situations. Give yourself adequate time and work methodically.
Skipping the Rinsing Step
I mentioned this earlier, but it bears repeating. Skipping the tank rinse is false economy. You’ll pay for it with odors and problems later.
Using Substandard Equipment
Cheap hoses fail. Budget fittings crack. Poor-quality portable tanks leak. Your black water system is worth protecting with quality equipment.
Ignoring Level Ground
An uneven portable tank causes drainage problems and makes you work harder. Always use a level.
Leaving Connections Exposed
Always cap unused black water outlets and hose ends. This prevents odor escape and pest entry.
Troubleshooting Common Problems
The Hose Won’t Connect
If your hose fitting won’t connect to the tank outlet, stop immediately. Forcing it risks damaging the fitting. Check that you’re using the correct size hose. Inspect both the hose fitting and the tank outlet for debris or damage. Clean both thoroughly with a damp cloth and try again with gentle, steady pressure.
Water Isn’t Flowing
A blockage might be preventing flow. First, check that the black water valve is fully open. Next, confirm that the hose isn’t kinked or crimped. If the hose appears straight and the valve is open, you may have a toilet paper or waste blockage in the tank outlet or hose. Try gently squeezing the hose from the RV toward the portable tank. If this doesn’t work, you may need professional help to clear the blockage.
Slow or Incomplete Draining
This usually indicates partial blockage or improper tank positioning. Recheck your level—even slight tilts affect drainage. Try slightly opening and closing the black water valve repeatedly, which can dislodge partial blockages. Ensure the portable tank’s inlet is positioned to receive the flow directly.
Leaking Connections
Small leaks at the fitting are often resolved by tightening the bayonet connection with a slight twist. If tightening doesn’t help, disconnect, wipe clean, and reconnect. Persistent leaks suggest a damaged fitting requiring replacement. Never ignore a leak—it only gets worse.