How to Empty Gray Water Tank: The Complete Guide to Hassle-Free Maintenance
Let me be honest with you—dealing with your RV’s gray water tank isn’t exactly the most glamorous part of vehicle ownership. But here’s the thing: it’s absolutely essential if you want to keep your rig running smoothly and avoid some seriously unpleasant situations down the road. Whether you’re a seasoned road warrior or just getting started with your first RV adventure, knowing how to properly empty your gray water tank can save you money, prevent plumbing disasters, and keep your living space fresh and hygienic.
In this comprehensive guide, I’m going to walk you through everything you need to know about managing your gray water tank. Think of this as your personal RV maintenance manual—by the end of it, you’ll understand not just the how, but also the why behind each step.
Understanding Your Gray Water Tank: What You Really Need to Know
What Exactly Is Gray Water?
Gray water is the wastewater that comes from your sinks, showers, and washing machines. It’s different from black water, which comes from your toilet. The distinction matters because gray water is relatively clean compared to black water, though it still contains soap residue, food particles, and other organic matter that can create odors and encourage bacterial growth if left sitting too long.
Picture your gray water tank as a temporary holding area—it’s not meant to be a storage solution for weeks on end. It’s more like a buffer that collects water until you find an appropriate place to dispose of it properly.
Why Regular Emptying Is Crucial
Neglecting to empty your gray water tank regularly is like ignoring an oil change on your car. Sure, you might get away with it for a while, but eventually, you’ll face expensive repairs and nasty situations. Regular emptying prevents:
- Foul odors that permeate your entire RV
- Bacterial and mold growth inside the tank
- Backups into your sink or shower
- Tank damage from excessive weight and pressure
- Pest infestations attracted to stagnant water
Essential Tools and Supplies You’ll Need
Gathering Your Equipment Before You Start
Before you even think about opening that tank valve, make sure you have everything you need. There’s nothing worse than being halfway through the process and realizing you forgot something important. Here’s what I recommend keeping on hand:
- A dedicated gray water hose (never use the same hose for multiple purposes)
- Heavy-duty gloves—and I mean seriously tough gloves
- Safety glasses to protect your eyes
- A bucket or waste receptacle for disposal
- Cleaning supplies for afterward
- Paper towels or rags
- A flashlight or headlamp for visibility
- Optional: gray water tank treatments or enzymes
Choosing the Right Hose
I can’t stress this enough—use a dedicated gray water hose. Don’t be tempted to use your freshwater hose or to borrow a neighbor’s garden hose. Contamination is a real risk, and trust me, you don’t want to spend hours trying to flush out unwanted bacteria from your freshwater system. Get a hose that’s clearly marked for gray water only, and store it separately from your other equipment.
Location Matters: Where to Empty Your Gray Water Tank
Finding Legal and Appropriate Dumping Sites
One of the biggest mistakes I see RV owners make is dumping gray water anywhere they please. Not only is this illegal in most places, but it’s also environmentally irresponsible. You need to find proper disposal locations. Here are your best options:
RV Campgrounds and Parks
Most established RV parks have designated dump stations. These facilities are equipped to handle gray water properly, and using them is usually included in your campground fees. Always ask the staff where the dump station is located and whether there are any specific procedures you should follow.
Public Dump Stations
Many municipalities and public lands maintain free or low-cost dump stations specifically for RVs. A quick online search or a call to your local tourism office can help you locate these facilities. They’re incredibly convenient and often available 24/7.
Roadside Facilities
Some truck stops, rest areas, and travel centers offer RV dumping services. These can be lifesavers when you’re traveling and need to empty your tank between campground stays.
What You Should Avoid
Let me be very clear about what not to do. Never dump gray water:
- On public land without authorization
- In lakes, rivers, or any natural water source
- Down storm drains
- On someone else’s property without permission
- In areas where it will contaminate groundwater
Step-by-Step Guide to Emptying Your Gray Water Tank
Pre-Emptying Preparation
Before you start the actual process, take a few minutes to prepare. Drive or position your RV at the dump station so that you can easily access your gray water tank outlet. Ensure you’re on level ground—this makes the emptying process faster and more complete. If your RV has a slight slope, position it so the tank outlet is at the lowest point.
Locating Your Gray Water Tank Access Point
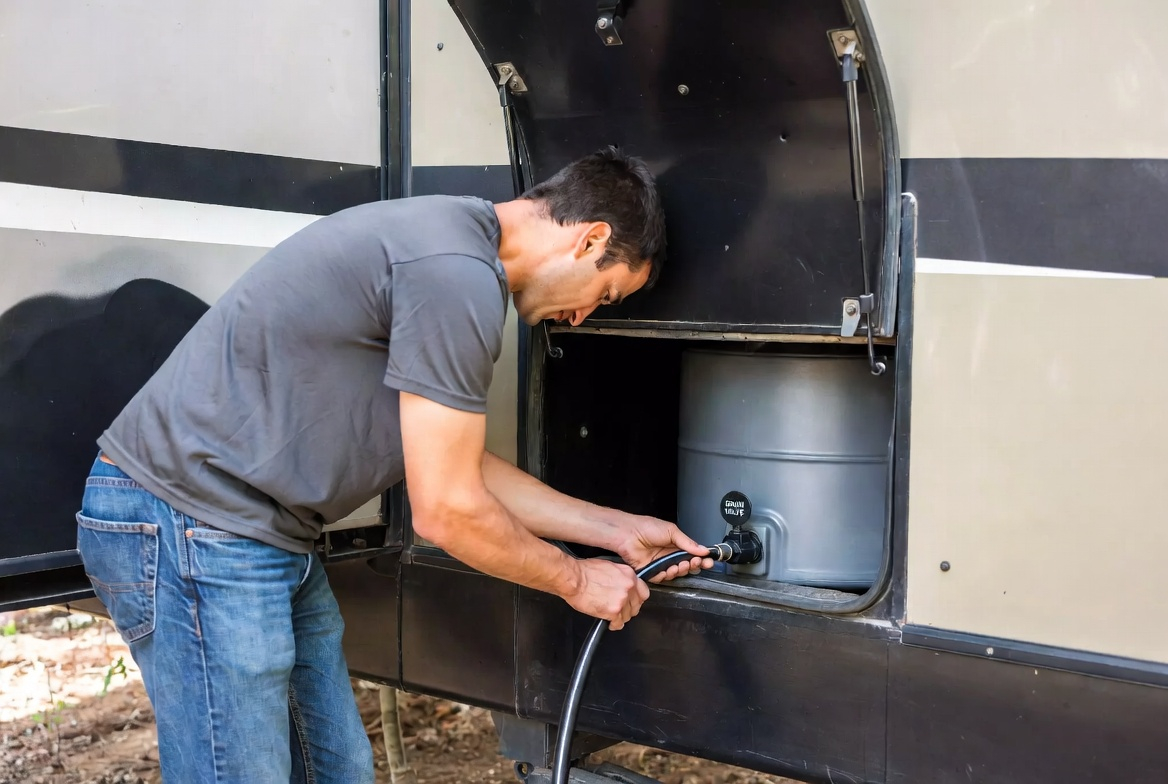
Every RV is different, but your gray water tank outlet is usually located on the exterior of your vehicle, typically beneath a plastic access panel or cover. Check your owner’s manual if you’re unsure. The valve handle is usually a simple lever that you can pull or turn. Some newer models might have a remote-controlled valve, which is admittedly much more convenient.
Opening the Tank Access Panel
If your tank access is behind a panel, you might need a screwdriver or your bare hands to open it. Remove this carefully and set it aside somewhere safe where you won’t accidentally step on it or lose it. Now you’ll see the valve itself.
Connecting Your Hose
This is where precision matters. Take your gray water hose and connect it firmly to the tank outlet valve. You want a tight connection to prevent any unfortunate splashing or leaks. Hand-tighten it first, then use a slight turn to ensure it’s secure. Double-check that the connection is solid before opening the valve.
The other end of your hose needs to empty into an appropriate receptacle. At a dump station, there’s usually a ground-level drain where you direct the hose. If you’re using a portable tank or bucket, make sure it’s positioned directly beneath the hose end.
The Main Event: Opening the Valve
Now comes the actual emptying. Slowly open the tank valve by pulling or turning the handle. You’ll immediately hear the rush of water as gravity does its work. This is completely normal—it should sound like a waterfall from inside your tank. Let it flow freely without interruption.
Here’s a pro tip: if your tank empties very slowly or barely drains, check if your tank vent is working properly. The vent allows air into the tank as water leaves, creating a vacuum situation if it’s blocked. Many people overlook this detail, and it can make the emptying process frustratingly slow.
Knowing When You’re Done
The water flow will gradually decrease until it becomes a trickle and eventually stops. Once the flow stops completely, wait a few more seconds and gently shake the hose to encourage any remaining water to flow out. You might be surprised at how much extra water comes out when you do this.
Closing and Disconnecting
Carefully close the tank valve by reversing the motion you used to open it. Make sure it’s fully closed—you don’t want any leaks. Now disconnect your hose from the tank outlet by turning the connection counterclockwise. Some residual water will probably drip, which is why having your gloves and paper towels handy is important.
Post-Emptying Cleaning
Once you’ve disconnected the hose, flush it out at the dump station’s water source if available. This removes any remaining gray water and prevents odor buildup in the hose itself. Some people rinse their hose with a bleach solution for extra sanitization, which is a great practice if you want to be extra thorough.
Maintaining Your Gray Water Tank Between Emptying
Preventative Maintenance Strategies
Emptying your tank is only part of the equation. What you do between emptying cycles matters just as much. Think of it like maintaining your vehicle’s engine—regular small maintenance prevents big problems.
Use Tank Treatments
Gray water tank treatments and enzymes break down organic matter and reduce odors. I personally use these every time I empty my tank. They’re inexpensive and incredibly effective at keeping your tank fresh. Simply pour the appropriate amount down your drain, and let the enzymes do their work over time.
Monitor Your Tank Levels
Most RVs have a tank level indicator, and you should check it regularly. Never let your gray water tank get completely full—it can cause backup issues. Ideally, empty it when it reaches about three-quarters capacity.
Be Mindful of What Goes Down Your Drain
This might sound obvious, but what you wash down your sink directly impacts your tank. Avoid dumping:
- Grease or cooking oils
- Fibrous foods that don’t break down easily
- Non-biodegradable soaps or cleaners
- Hair in large quantities
- Medications or chemicals
Use drain strainers in your sinks to catch food particles and hair before they enter the system. This simple step can prevent clogs and extend the life of your tank significantly.
Common Mistakes People Make and How to Avoid Them
The Frozen Tank Disaster
If you’re RVing in cold weather, gray water can freeze inside your tank, making it impossible to empty. Prevent this by keeping your tank heated with an insulated skirt or tank heater. If freezing happens, you’ll need to thaw the tank before you can empty it—a frustrating and time-consuming situation that’s easily avoided with proper preparation.
Forgetting About the Vent
I mentioned this earlier, but it’s worth repeating: your tank’s vent is crucial. If it gets blocked by ice, debris, or an overzealous insect, your tank won’t drain properly. Check your vent regularly and keep it clear.
Using the Wrong Cleaning Products
Not all cleaning products are safe for your gray water system. Avoid bleach-heavy cleaners that can damage the tank or disrupt the beneficial bacteria that help break down waste. Stick with RV-specific cleaning products designed to be septic-safe.
Neglecting Regular Emptying
This is the biggest mistake I see. People think, “Oh, I’ll empty it next week,” and then next week turns into next month. This leads to odors, clogs, and damage. Set a regular schedule and stick to it. Your nose—and your wallet—will thank you.
Advanced Tips for Gray Water Tank Management
Installing a Remote Control Valve
If you frequently empty your tank, upgrading to a remote-controlled or electrically-operated valve can be a worthwhile investment. No more crawling under your RV or struggling with manual valves. It’s a convenience upgrade that makes maintenance easier.
Using Gray Water for Non-Potable Purposes
Some RV owners use collected gray water for watering plants or cleaning external surfaces. While this can help conserve water, always check local regulations first. Some areas prohibit this practice due to soap and chemical content concerns.
Monitoring Tank Temperature
In extremely hot climates, your gray water can develop severe odor issues quickly as bacteria multiply rapidly. Consider adding more frequent treatments or investing in a tank heating system that can also cool the tank in emergencies.
Seasonal Considerations for Gray Water Tank Care
Summer Gray Water Tank Management
Summer heat accelerates bacterial growth and odor development. Empty your tank more frequently during hot months, and consider using stronger tank treatments. Running your sink and shower fans more often helps ventilate odors out of the system.
Winter Preparation
Before winter arrives, drain your gray water tank completely and consider leaving it partially or fully empty throughout the cold season if you’re not using your RV regularly. If you’re full-timing in winter, invest in tank heating and insulation to prevent freezing issues.
Troubleshooting Gray Water Tank Problems
Tank Won’t Drain
If your tank won’t empty, first check if it’s actually full. Then verify that the tank valve is fully open. Look for blockages in the hose or outlet. If nothing seems obviously wrong, check your tank vent for blockages. Sometimes the culprit is as simple as a kinked hose preventing proper flow.
Persistent Odors
Odors usually indicate bacterial overgrowth or stagnant water. Use a strong tank treatment, ensure you’re emptying regularly, and check that your tank isn’t damaged or leaking. A persistent odor despite frequent emptying and treatments might indicate a deeper problem requiring professional inspection.
Leaking Tanks or Connections
A small leak at the valve connection might just need tightening. A leak from the tank itself typically means the tank is damaged and may need replacement. Address leaks promptly to prevent water damage to your RV’s exterior or undercarriage.
Conclusion
Emptying your gray water tank isn’t the most exciting part of RV ownership, but it’s undeniably important. By understanding your system, following proper procedures, and maintaining your tank between uses, you can avoid most common problems and keep your RV in excellent condition for years to come. Remember that consistency is key—regular maintenance prevents disasters. Take the time to do it right, invest in quality equipment, and always dispose of your gray water responsibly. Your RV, your neighbors, and the environment will all benefit from your diligence. Whether you’re a weekend warrior or a full-time traveler, these practices will serve you well on every journey.
Frequently Asked Questions
How often should I empty my gray water tank?
This depends on your usage patterns and tank size, but generally, you should empty your gray water tank when it reaches about three-quarters capacity or every one to two weeks during normal use. If you’re using your shower and kitchen frequently, you might need to empty it more often. Heavy users sometimes empty multiple times per week. The key is not to let it overflow or sit stagnant for extended periods.
Can I dump gray water at a regular campground if they don’t have a dedicated dump station?
Absolutely not. Gray water should only be disposed of at authorized dump stations or appropriate facilities. Even though gray water is cleaner than black