How to Change Water Heater Drain Valve: A Complete DIY Guide
When was the last time you thought about your water heater? If you’re like most homeowners, probably never—until something goes wrong. The drain valve on your water heater is one of those components that quietly does its job, and then one day you realize it’s leaking, stuck, or simply not functioning as it should. The good news? You don’t necessarily need to call a plumber and drop a couple of hundred dollars on a simple repair. With the right tools, a little patience, and this comprehensive guide, you can change your water heater drain valve yourself.
Understanding Your Water Heater Drain Valve
Before we dive into the nitty-gritty of replacement, let’s talk about what this little component actually does. Your water heater drain valve is essentially the faucet at the bottom of your tank. Think of it like the drain plug in your car’s oil pan—it exists to let you empty out sediment and water when needed. Over time, minerals and debris accumulate at the bottom of your tank, and you’re supposed to drain a few gallons periodically to flush these out. Without this valve, your water heater would be like a coffee maker that never gets cleaned—it just keeps getting more gunked up inside.
Why Drain Valves Fail
So what causes these valves to go bad? There are several culprits. Hard water is probably the biggest enemy. If you live in an area with mineral-rich water, calcium and other minerals can accumulate inside the valve, causing it to stick or leak. Some people never use their drain valve, which means it sits dormant for years. When you finally try to open it, the internal mechanism has essentially frozen in place. Other times, the valve simply wears out from normal use and temperature cycling. The constant expansion and contraction of metal components eventually takes its toll.
What You’ll Need Before Starting
Let me be straight with you—this isn’t a project where you can wing it and hope for the best. You’ll need specific tools and materials to do this safely and effectively. Gathering everything before you begin is half the battle, and it means you won’t be standing there frustrated, halfway through the job, wishing you had something.
Essential Tools and Materials
- New drain valve (make sure it matches your tank’s thread size)
- Adjustable wrench or socket set
- Bucket (a big one—your tank holds 40 to 80 gallons)
- Garden hose
- Teflon tape or plumber’s thread sealant
- Pipe dope or thread compound
- Flashlight
- Towels or old rags
- Safety glasses
- Work gloves
The exact wrench size will depend on your valve, but most are either three-quarter inch or half-inch. If you’re unsure, bring a photo of your current valve to the hardware store, and they’ll point you toward the right size replacement.
Safety First: Turn Off Your Water Heater
This step is non-negotiable. If you mess this up, you’re going to have a very bad day. The water inside your tank is extremely hot—we’re talking 120 to 140 degrees Fahrenheit in most cases. If you release that pressure and heat without preparation, you’re looking at serious burns. So let’s do this right.
Shutting Down Your Water Heater Properly
Your first move is to turn off the power supply. If you have a gas water heater, turn the gas supply valve to the pilot position. If it’s electric, flip the breaker switch to off. Wait for at least thirty minutes. Yes, thirty minutes. This isn’t me being overly cautious—this time allows the water temperature inside the tank to drop to a safer level. Even if the thermostat says the water should be cooler, there’s usually hot water near the bottom where the drain valve is located.
Next, locate the cold water inlet valve at the top of your tank and turn it off. You should turn it clockwise until it stops. Don’t force it—if it’s stuck, you might need to work it back and forth gently with a wrench. Once that’s off, open a nearby hot water faucet in your home and let it run for a minute. This releases pressure from the system and allows air into the pipes, which makes draining much easier.
Preparing Your Work Area
Here’s something people often overlook: water heaters are usually installed in basements, attics, or utility closets. These spaces aren’t typically designed for DIY plumbing work. You’re going to need adequate lighting, space to work, and somewhere for all that water to go.
Setting Up for Success
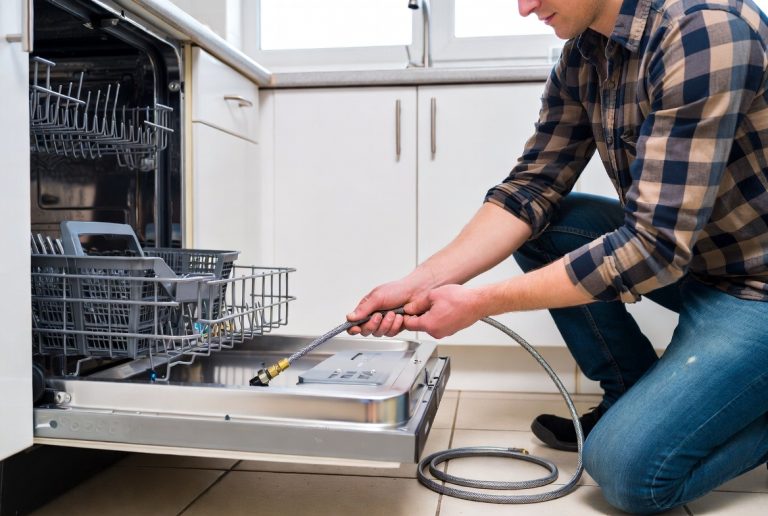
First, position your bucket or a large container directly under the drain valve. Attach your garden hose to the valve’s threaded outlet if possible. This allows the water to flow away from your heater and into your bucket or toward a floor drain. Even if you think you’re just going to “catch” the water in a bucket, trust me on this—have the hose ready anyway. Water has a funny way of shooting out at angles you didn’t anticipate.
Put on your safety glasses. I know they seem unnecessary for a plumbing project, but you’re dealing with hot water here, and your eyes are too valuable to risk. Lay down towels around the area to catch any splashes or drips. You’re not just protecting your floor—you’re creating a safer work environment where you won’t slip on wet spots while you’re working.
Draining Your Water Heater Tank
Now comes the messy part. You need to empty enough water from your tank to safely work on the drain valve. Some people try to do this without fully draining the tank, but it’s really not worth the risk and the mess.
The Draining Process
Open the drain valve slowly. I mean really slowly. You’re not trying to drain a pool here—you’re trying to control the flow. A quarter turn is usually enough to get water flowing without it becoming a torrent. Let the water run into your bucket and hose setup. Depending on how much water you need to drain, this could take ten to thirty minutes. If you’re replacing the entire valve, you might want to drain at least a few gallons. If you’re just flushing sediment, you might only need a couple of buckets.
Why take so long? Because this is when you can actually check what’s coming out of your tank. If you see brown water or lots of sediment, your tank’s definitely in need of this maintenance. Some people actually catch this water to let the sediment settle and see how much buildup their tank has accumulated. It’s honestly kind of fascinating—and gross.
How Much Water to Drain
If you’re just replacing the valve, you don’t necessarily need to drain the entire tank. Getting the water level below the drain valve is really all you need. However, if your tank is particularly old or you notice a lot of sediment coming out, draining more of it won’t hurt and might actually help you assess the tank’s overall condition.
Removing the Old Drain Valve
Once the pressure is released and you’ve drained enough water, you’re ready to remove the old valve. This is where things can get tricky if the valve is stuck, which happens more often than you might think.
Unthreading the Old Valve
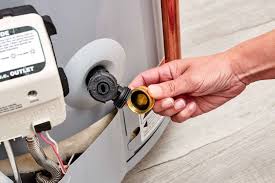
Position your wrench on the valve nut—this is the part you’ll be turning. If the valve is a standard threaded model, you’ll turn it counterclockwise. Start slowly and gently. If it turns freely, great—keep going until it’s completely unthreaded and comes out. If it’s stuck, don’t force it. Seriously. You could strip the threads on your tank, which is a much bigger problem than a stuck valve.
When a valve is stuck, try soaking it with a penetrating oil like WD-40 or PB Blaster for fifteen to twenty minutes, then try again. Sometimes working it back and forth—turning it counterclockwise slightly, then clockwise, then counterclockwise again—helps break the corrosion’s grip. Another trick is to carefully apply heat with a heat gun for a minute or two. This can expand the metal just enough to free up the valve.
Cleaning the Threads
Once you’ve removed the old valve, take a moment to inspect the threads where it came out. You’ll likely see some sediment or corrosion buildup. Use a clean rag to wipe out the threads as much as you can. You’re aiming for relatively clean threads because you’re about to install a new valve with thread sealant, and debris could interfere with getting a watertight seal.
Installing the New Drain Valve
Now for the installation. This is actually the easier part compared to removing the old valve. The key here is getting the seal right so you don’t create a new leak.
Applying Thread Sealant
You have two main options here: Teflon tape or pipe dope (also called thread compound). Both work, but let me explain the difference. Teflon tape is like a thin, white tape that you wrap around the male threads. You wrap it clockwise, overlapping slightly as you go around. Pipe dope is a paste that you apply to the same threads. Some people prefer pipe dope for durability, while others like the simplicity of tape. For a drain valve replacement, honestly, either works fine. I’m partial to pipe dope because it’s forgiving and tends to create a more reliable seal, but use whichever you’re more comfortable with.
If you’re using tape, wrap it around the threads on the new valve’s male end at least three times, making sure each wrap overlaps the previous one slightly. If you’re using pipe dope, just apply a thin, even coat around all the threads. Don’t overdo it—you’re not trying to create a plumber’s caulk gun situation here.
Threading in the New Valve
Insert the new valve into the hole where the old one came out. Start threading it by hand to make sure you’re not cross-threading it. Cross-threading is when the threads don’t line up properly and you end up stripping them. You’ll feel if this is happening—the valve will turn roughly or feel stuck even though you’ve barely turned it. If that happens, back it out immediately and realign it.
Once you’re confident it’s threaded correctly, tighten it with your wrench. You want it snug—definitely tight enough that water won’t leak out—but you don’t want to crank on it with all your might. It’s kind of like tightening the lug nuts on a car wheel: firm and confident, but not gorilla-strength. If you overtighten, you could crack the valve body or strip the threads.
Testing for Leaks
You’ve installed the new valve, but your work isn’t done yet. You need to make sure you haven’t created a new leak, which would defeat the entire purpose of this project.
Restoring Power and Water
First, close the drain valve completely by turning the handle or knob clockwise until it stops. Then turn the cold water inlet valve back on at the top of your tank. Open it by turning counterclockwise until water starts flowing into the tank. You might see air bubbling out through the hot water faucet you opened earlier—that’s normal. Let it run until water comes out steadily, which means the tank is filling.
Once the tank is full, restore power to the heater. If you have a gas heater, turn the gas valve back from the pilot position to the normal position. If it’s electric, flip the breaker back on. Now wait. Yes, more waiting. Give the system about thirty to forty-five minutes to heat up and stabilize. The water needs to heat, which creates pressure in the tank. This pressure will reveal any leaks.
Checking the Drain Valve
After the waiting period, go back to your water heater and carefully inspect the drain valve. Feel around the base and the connection point with your hand. You shouldn’t feel any water dripping or spray. If you do, you have a leak. Turn off the water and gas or power again, let the tank cool, and revisit the installation. Usually, leaks at this stage mean the sealant didn’t seat properly. You might need to tighten the valve a bit more, or you might need to drain again, remove the valve, reapply sealant, and reinstall it.
Flushing Sediment From Your Tank
Now that you’ve successfully replaced the drain valve and verified it’s not leaking, this is the perfect time to do some routine maintenance. After all, you have the valve open and the system ready to go.
The Sediment Flush Process
Attach your garden hose to the drain valve again and position it so the water flows to a floor drain or outside. Open the drain valve slowly and let water flow for a few minutes. Watch the water coming out. Initially, it might be discolored or contain sediment particles. Keep draining until the water runs clear. This tells you that you’ve flushed out the major sediment buildup from your tank’s bottom.
This sediment flush is actually one of the most important maintenance tasks you can do for your water heater. That buildup reduces efficiency, damages the tank from the inside, and can eventually cause the heater to fail prematurely. By flushing it out annually or even twice a year, you’re extending your water heater’s lifespan significantly. It takes maybe thirty minutes of your time, and it costs you nothing but a little water.
Common Problems and Solutions
Even with the best intentions and careful planning, sometimes things don’t go smoothly. Let’s talk about what to do if you run into problems.
The Valve Is Completely Stuck
If your old valve absolutely refuses to budge, penetrating oil and gentle heat are your friends. Apply them generously and wait. Patience here saves you from expensive mistakes. If it’s still stuck after two or three attempts spread over a couple of days, you might need to call a professional. A stuck valve might indicate deeper problems with your tank, and a plumber with better tools might be able to handle it without damage.
Water Won’t Stop Leaking From the Valve
A persistent leak usually means the sealant didn’t create a watertight seal. This could be because you had debris in the threads, didn’t apply enough sealant, or didn’t tighten the valve sufficiently. The fix is to repeat the process: drain the tank, remove the valve, thoroughly clean the threads, apply fresh sealant, and reinstall with firm pressure.
The Handle Won’t Turn
If your new valve’s handle is stuck or extremely difficult to turn, don’t force it. The internal mechanism might be defective. Return the valve and get a replacement. It’s not worth breaking the handle when you’re just trying to open or close a drain valve.
Maintenance Tips for Your New Drain Valve
You’ve now got a shiny new valve installed. How do you keep it in good working order?
Regular Usage and Care
Use your drain valve regularly. At least once or twice a year, drain a few gallons of water to flush out sediment. This usage keeps the valve mechanism from getting stuck and helps you catch any issues early. When you’re draining the water, listen for any changes in the flow rate. If it slows down or becomes sluggish, you know sediment is starting to build up again.
If you live in a particularly hard water area, you might want to consider flushing more frequently—maybe every couple of months. The payoff is a water heater that runs more efficiently and lasts longer. And really, what’s a few minutes of maintenance compared to the cost and hassle of replacing a whole water heater?