How to Build Water Rockets That Really Fly: A Complete Guide
Have you ever wanted to launch something into the sky using nothing but water and air pressure? Water rockets are one of the most exciting and educational DIY projects you can tackle at home. They’re affordable, safe when built correctly, and they’ll teach you real physics principles while providing hours of entertainment. Whether you’re a curious parent looking for a weekend project or a student exploring STEM concepts, this guide will walk you through everything you need to know about building water rockets that actually soar.
Understanding Water Rocket Basics
Before we dive into construction, let’s talk about what makes a water rocket work. A water rocket operates on Newton’s third law of motion—for every action, there’s an equal and opposite reaction. When you pressurize a bottle filled partially with water and air, the water is forced downward through a nozzle, propelling the rocket upward. Think of it like an inverted garden hose spraying water straight down to make something jump up. It’s simple physics, but the results can be pretty spectacular.
Why Water Rockets Are Awesome
What makes water rockets so fantastic? First, they’re incredibly cheap. You probably have most of the materials lying around your house right now. Second, they’re relatively safe compared to other rocket projects. Third, they’re educational and genuinely fun. You’ll learn about pressure, trajectory, aerodynamics, and structural engineering. Plus, there’s something deeply satisfying about watching something you built with your own hands shoot hundreds of feet into the air.
Gathering Your Materials
The beauty of water rocket construction is that you don’t need fancy or expensive equipment. Let me break down exactly what you’ll need to get started.
Essential Components You’ll Need
- Two plastic 2-liter soda bottles (clean and dry)
- Duct tape or stronger waterproof tape
- A cork or rubber stopper that fits your bottle opening
- A bicycle valve or tire valve stem
- A hand pump or air compressor
- A nose cone material (foam, cardboard, or modeling clay)
- Lightweight cardboard or plastic for fins
- Waterproof sealant or silicone caulk
- A launch pad (PVC pipe and wooden base)
- Safety glasses for everyone nearby
Optional but Helpful Tools
While not strictly necessary, having some of these tools will make your building process smoother. A hot glue gun is incredibly useful for attaching fins without waiting for adhesive to dry. A utility knife helps you cut materials precisely. Sandpaper smooths rough edges. A drill with small bits helps create holes for the valve. A measuring tape ensures your rocket is balanced. These tools aren’t required, but they’ll make the experience much more enjoyable.
Designing Your Water Rocket
Good design is crucial for a successful flight. Your rocket needs balance, stability, and proper weight distribution to fly straight and true.
Understanding the Importance of Center of Gravity
Imagine balancing a pencil on your finger—there’s one perfect spot where it stays balanced. Your rocket needs the same thing. The center of gravity should be located toward the front of your rocket. This ensures it stays nose-heavy, which keeps it stable during flight. If your rocket is tail-heavy, it’ll tumble and flip. A good rule of thumb is to place your heaviest components toward the nose and keep fins toward the rear.
Fin Design and Placement
Fins are your rocket’s stabilizers. They work like a dart’s feathers, keeping your rocket flying straight. Most water rockets use three or four fins. Place them at the bottom rear section of your rocket, evenly spaced around the circumference. Your fins should extend outward at a slight angle. Make them too small, and your rocket will wobble. Make them too large, and you’ll create unnecessary drag. A good size is roughly four to six inches long and two to three inches wide.
Building the Main Body
The rocket’s body provides the pressure chamber where the magic happens. This section requires careful assembly to ensure everything is airtight.
Preparing Your Bottles
Start by thoroughly cleaning and drying your two 2-liter plastic bottles. Any moisture inside can lead to corrosion of your valve system. Remove any labels and residual adhesive. You want them perfectly clean and dry before you begin assembly. The bottles will be joined together, with one serving as the main pressure chamber and the other potentially used for the tail section.
Cutting and Preparing the Nozzle
The nozzle is where water exits your rocket. Take your cork or rubber stopper and carefully drill a hole through its center. The hole should be large enough for your tire valve stem to fit snugly through. Insert the valve stem into the cork so it sits securely. This creates your nozzle mechanism. The smaller the nozzle opening, the faster the water exits, which generally means higher launches. Experiment with different sized nozzles to find what works best for your design.
Installing the Valve System
Insert your cork and valve assembly into the bottom of your first bottle. You may need to use waterproof sealant around the edges to ensure an airtight fit. Apply a bead of silicone caulk around where the cork enters the bottle, and let it cure completely before proceeding. This is where water will exit your rocket, so it absolutely must be watertight and airtight. Double-check for any leaks before moving forward.
Creating the Nose Cone
The nose cone reduces air resistance and gives your rocket that distinctive rocket-like appearance. It also adds weight to the front, helping with balance.
Simple Cone Construction Methods
The simplest approach is to use foam. Cut a piece of foam into a conical shape that fits snugly on top of your bottle. Alternatively, roll up some cardboard into a cone and tape it securely. Another option is to mold clay around the bottle opening and then smooth it into a pointed shape. The key is making sure it’s secure and won’t detach during flight. Attach it with strong adhesive or duct tape wrapped around the bottle neck.
Attaching Fins to Your Rocket
Fins are what transform your simple bottle into an actual rocket. This step requires precision and patience.
Fin Material Selection
You can make fins from various materials. Foam board is lightweight and easy to cut. Plastic sheets work well but are harder to work with. Even cardboard can work in a pinch. Whatever you choose, make sure it’s lightweight yet rigid enough to hold its shape during flight. Draw your fin pattern on the material first, then carefully cut them out. You want smooth edges without rough areas that could catch air in unpredictable ways.
Securing Fins Permanently
Mark where your fins will go on the rocket body. You want them evenly spaced, so if you’re using four fins, place them ninety degrees apart. Use hot glue or strong adhesive to attach them. Press each fin firmly in place and hold it there while the glue sets. Once all fins are attached and dry, reinforce the connections with duct tape. The seams where fins meet the bottle should be completely sealed to maintain aerodynamics and structural integrity.
Building Your Launch Pad
You’ll need a stable launching platform to safely pressurize and launch your rocket.
Basic Launch Pad Design
Create a simple launch pad using PVC pipe and a wooden base. Drill a hole through a wooden board and insert a vertical PVC pipe about two feet tall. Your rocket will sit on top of this pipe with the valve stem exposed. Build a guide rail along the pipe using smaller PVC pieces to keep the rocket aligned as it launches. This ensures your rocket goes straight up instead of launching at an angle.
Safety Considerations for Your Launch Setup
Your launch pad should be sturdy and stable. It shouldn’t tip over under the thrust of your rocket. Place it in an open area away from people, buildings, and power lines. Have a clear launch field with good visibility. Never launch indoors or in enclosed spaces. The pressure in these rockets can reach forty to sixty psi, so always respect the equipment and maintain a safe distance. Everyone should wear safety glasses during launches.
Pressurization and Testing
This is where your rocket actually comes to life. Proper pressurization technique is crucial for success and safety.
Filling Your Rocket Correctly
Fill your rocket roughly one-third to one-half full with water. Don’t overfill it—you need air space to create pressure. The water provides the mass that gets expelled downward to propel the rocket upward. Too much water makes it too heavy and slow. Too little water means less thrust. Start around forty percent water fill and adjust based on your results. More water equals more weight but also more propellant. Less water means lighter but less powerful launches.
Pumping Air Into Your Rocket
Attach your pump to the valve stem and begin pumping air into the bottle. You’ll feel resistance as pressure builds. Pump steadily and evenly. Most rockets reach their peak performance between thirty and fifty psi. You can monitor pressure using a gauge attached to your pump, or you can simply pump until you feel significant resistance. The bottle will become very firm to the touch—this is a good sign that you’ve built up adequate pressure.
Safety During Pressurization
Never leave a pressurized rocket unattended. Never point the nozzle at people or pets. Always stand behind the rocket during pressurization. If you hear hissing, stop immediately and investigate. If something feels wrong, it probably is. Trust your instincts. Start with lower pressures until you’re confident in your build quality. Always wear safety glasses. These precautions might seem excessive, but pressurized vessels demand respect.
Launch Time: Making It Fly
You’ve built your rocket, prepared your launch pad, and pressurized your vessel. Now comes the moment you’ve been waiting for.
Pre-Launch Checklist
- Verify the launch pad is stable and upright
- Confirm the rocket is properly seated on the launch pad
- Check that all spectators are at least thirty feet away
- Ensure everyone nearby is wearing safety glasses
- Double-check that the nozzle is clear and unobstructed
- Verify pressure readings are within safe operating range
The Launch Sequence
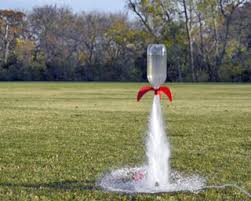
Position yourself behind the launch pad with a clear view of the rocket. When everyone is ready and safely positioned, activate your launch mechanism. With many designs, you simply pull the rocket upward off the launch pad pin, which allows water to spray from the nozzle and propel the rocket skyward. The rocket should accelerate smoothly and climb steadily. Watch it rise into the air and follow its trajectory. Most water rockets reach heights between one hundred and three hundred feet depending on design and pressurization.
Recovery and Landing
Your rocket will eventually reach its peak altitude and begin falling back to earth. Gravity always wins. Make sure you have a clear field for landing. Watch where your rocket comes down and retrieve it carefully. Check for damage and inspect all joints and seams. Small cracks can be repaired with waterproof tape or sealant. Bent fins should be straightened or replaced. Your rocket is reusable, so proper recovery and inspection extends its lifespan significantly.
Improving Your Rocket Design
Once you’ve successfully launched your first rocket, you’ll want to optimize and improve. That’s where the real fun begins.
Experimentation and Iteration
Try adjusting your water fill percentage. Launch with thirty percent, then fifty percent, then seventy percent. See which produces the highest flight. Experiment with different nozzle sizes. Try modifying fin shapes and sizes. Add or remove fins. Adjust your cone design. Keep a simple log of what you try and what results you get. You’re essentially running scientific experiments, and that’s exactly what engineering is all about.
Advanced Modifications
Once you’ve mastered the basic design, consider building multi-stage rockets where one bottle ignites upward while the second deploys at altitude. Create parachute recovery systems so your rocket descends safely. Build rockets with different shapes—wider bodies, longer slender designs, curved profiles. Add decorative painting to make your rocket visually distinctive. Each modification teaches you something new about physics and engineering.
Common Problems and Solutions
Even experienced builders encounter issues. Here’s how to handle the most common problems.
Your Rocket Veers Off to One Side
This indicates an imbalance. Check that your fins are properly aligned and evenly spaced. Verify your center of gravity hasn’t shifted. Make sure the rocket sits straight on the launch pad. Sometimes simply adjusting how the rocket sits on the pad makes a huge difference. Asymmetrical fin damage can also cause this—inspect your fins carefully.
Your Rocket Doesn’t Launch Very High
Low altitude launches suggest insufficient thrust. Check your water-to-air ratio. Add a bit more water or increase pressure slightly. Make sure your nozzle isn’t partially clogged. Inspect for air leaks around seams and joints. Check that your fins aren’t creating excessive drag. Sometimes simply tightening your valve system and resealing joints resolves this issue completely.
Water Leaks From Your Rocket
This is a serious issue that prevents proper pressurization. Inspect every seam and connection. Apply additional waterproof sealant where needed. Check your cork or stopper for proper fit—it should be snug with no gaps. If leaking persists, replace the cork with a new one. Sometimes adding a rubber washer under the valve stem creates a better seal. Never launch a leaking rocket—it won’t fly properly and could damage your equipment.
Conclusion
Building and launching water rockets is an incredibly rewarding experience that combines creativity, scientific thinking, and hands-on engineering. You’ve learned that creating something that actually works requires planning, careful construction, and thoughtful testing. Your first rocket might not be perfect, but every launch teaches you something valuable. The skills you develop—problem-solving, iterative design, pressure management, and safety awareness—apply far beyond rocket building. Start simple, learn from each flight, and gradually push your designs further. Who knows? Your water rocket might become a lifelong passion that eventually leads to careers in aerospace engineering, physics, or mechanical engineering. For now, enjoy the pure satisfaction of watching something you built with your own hands defy gravity and soar into the sky. That’s genuine STEM education in its most entertaining form.
Frequently Asked Questions
What age is appropriate for building water rockets?
Water rockets can be enjoyed by children as young as eight or nine years old, though adult supervision is essential. Teenagers can build and launch independently with proper safety instruction. The complexity of your design determines the minimum age—simple one-bottle designs work for younger kids, while advanced multi-stage rockets suit teenagers and adults. Always emphasize safety regardless of age.
How high can a water rocket typically fly?
Most basic water rockets reach heights between one hundred and three hundred feet. Advanced designs with optimal pressure, weight distribution, and fin design can exceed four hundred feet. Record-breaking water rockets have reached over six hundred feet, but these require careful engineering and precise construction. Your first rocket will likely fly between one hundred and two hundred feet, which is still incredibly impressive.