How to Change a Hot Water Tank: A Complete DIY Guide for Homeowners
So your hot water tank has finally given up the ghost, and you’re staring at an empty shower with nothing but cold water coming out. Been there, done that. The good news? You don’t necessarily need to call a plumber and drop a thousand dollars on a service call. With the right knowledge and a bit of elbow grease, changing a hot water tank is something many homeowners can tackle themselves. Let me walk you through the entire process so you can restore hot showers to your home without breaking the bank.
Understanding Your Hot Water Tank Before You Start
Before you jump into the replacement process, it’s crucial to understand what you’re actually dealing with. Your hot water tank sits quietly in your basement, garage, or utility closet, working hard to keep your showers warm and your dishes clean. Think of it as the unsung hero of your home’s comfort system.
What Is a Hot Water Tank and How Does It Work?
A hot water tank is essentially a large insulated container that stores heated water for your household use. When you turn on a hot water tap, water flows from this tank to your fixtures. The tank uses either natural gas, electricity, or sometimes both to heat water and maintain it at your desired temperature. Most tanks operate continuously, keeping water ready whenever you need it.
Signs That Your Hot Water Tank Needs Replacement
How do you know it’s really time to replace your tank rather than repair it? Here are the telltale signs that you’re looking at a replacement situation:
- The tank is leaking water around the base or sides
- You’re not getting enough hot water for basic household needs
- The water coming out is rusty or discolored
- Your tank is making strange banging or rumbling sounds
- The unit is over ten to fifteen years old
- Repair costs exceed fifty percent of a new tank’s price
If you’re experiencing several of these issues, replacement is likely your best bet. A failing tank is like a tire with too many patches—you can fix it temporarily, but eventually you need something new.
Gathering Your Tools and Materials
Success in any home improvement project starts with proper preparation. You’ll need the right tools and materials on hand before you begin draining that tank.
Essential Tools You’ll Need
- Adjustable wrench or pipe wrench (two recommended)
- Screwdriver set (both Phillips and flathead)
- Flashlight or headlamp
- Garden hose that fits your drain valve
- Bucket (for catching small amounts of water)
- Teflon tape for sealing pipe threads
- Pipe dope or plumber’s grease
- Level
- Safety glasses
- Work gloves
- Shop towels or rags
Materials to Purchase
Beyond tools, you’ll need specific materials for the job. Obviously, you need your replacement tank, but there are other components to consider:
- The new hot water tank itself
- Flexible water supply lines (if needed)
- New shut-off valve (if the old one is stuck or corroded)
- Pressure relief valve (often comes with the new tank)
- Expansion tank (for closed plumbing systems)
- Gas line connector and valve (for gas models)
- Dielectric unions (to prevent corrosion between different metals)
Safety Considerations Before You Begin
Shutting Off Power and Gas Supply
This is absolutely critical and non-negotiable. Electricity and natural gas are not forgiving if you make a mistake. Turn off the power supply at your electrical panel if you have an electric water heater. For gas models, turn off the gas supply at the main valve—look for a lever handle and rotate it perpendicular to the pipe. You should hear or feel a distinct click.
Dealing with Hot Water and Steam
Remember, the water in your tank is extremely hot. We’re talking 120 to 140 degrees Fahrenheit typically. When you open valves, steam can escape and cause serious burns. Wear protective gloves and let the system cool slightly if you’re not in a rush. Never put your hands or face near drain valves while water is flowing.
Checking Your Plumbing Configuration
Before draining anything, take time to understand how your current tank connects to your plumbing system. Is your home a closed system with an expansion tank? Are there dielectric unions already installed? Photograph the current setup with your phone—these pictures will be invaluable when you’re reconnecting everything.
Step-by-Step Process for Draining Your Old Tank
Turning Off the Water Supply
Locate the water shut-off valve connected to your hot water tank’s inlet. You’ll typically find it on top or near the top of the tank. Turn this valve clockwise until it stops. You should feel resistance—don’t force it beyond a comfortable point or you might damage the valve.
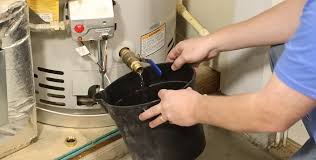
Attaching the Drain Hose
At the bottom of your hot water tank, you’ll find a drain valve that looks similar to a garden faucet. This is where all the water is going to come out. Attach your garden hose to this valve. Direct the other end of the hose toward a floor drain, or outside if that’s your only option. The water will be hot, so don’t position it where it could scald anyone walking by.
Opening Vents and Drain Valves
Before water will drain effectively, you need to break the vacuum. Open a hot water tap somewhere in your home—a bathroom sink or kitchen faucet works well. This allows air to enter the system and lets water flow out. Now open the drain valve at the bottom of the tank by turning the handle counterclockwise. Water should begin flowing through your hose.
Waiting for Complete Drainage
This is the boring part of the process. Depending on tank size, complete drainage can take 30 minutes to an hour. Don’t rush this step. Sediment at the bottom of the tank means you might see the water slow or stop flowing temporarily—you can bump the drain valve gently or open it slightly more to get things moving again.
Disconnecting Your Old Tank from Plumbing
Unscrewing Water Supply Lines
Once the tank is completely drained, use your adjustable wrench to loosen the nuts connecting the hot and cold water lines to your tank. The cold water inlet is typically on top, while the hot water outlet is also on top but may be slightly higher. Turn counterclockwise until the connections are loose, then finish unscrewing by hand.
Removing Gas or Electric Connections
For gas tanks, you’ll need to disconnect the gas line. If your gas line uses a flexible connector with a fitting nut, use a wrench to loosen it. For electric tanks, you’ll need to disconnect the electrical wiring. If you’re not comfortable doing this, this is where a professional electrician becomes valuable. Take photos of the wire connections before disconnecting anything.
Disconnecting the Pressure Relief Valve
The pressure relief valve, usually mounted on the side near the top, also needs disconnection. Use a wrench to remove the copper discharge pipe and the valve itself. Some valves are screwed directly into the tank, while others use threaded connections.
Moving the Old Tank Out
Hot water tanks are heavy—typically between 100 to 150 pounds depending on capacity. Get help for this part. Drain any remaining water by tilting the tank slightly into your bucket. Then carefully move it to a location where you can work with the new tank.
Installing Your New Hot Water Tank
Positioning the New Tank
Place your new tank in the exact location where your old one sat. Use your level to ensure it’s perfectly vertical—this is important for proper operation and longevity. The tank should sit on a flat, level surface. If your old concrete base is cracked or uneven, consider installing a new base or using shims to level everything out.
Installing the Pressure Relief Valve
Your new tank may come with a pressure relief valve already installed, or you may need to install one. If installation is needed, wrap the male threads with Teflon tape going clockwise several times. Screw the valve into the tank’s opening on the side, turning clockwise until hand-tight, then use a wrench to tighten it about a quarter turn more. Don’t over-tighten—you’re just creating a seal, not arm-wrestling the valve.
Reconnecting Cold Water Supply
The cold water inlet is typically labeled on the tank and found on top. Wrap the male threads of the inlet connection with Teflon tape, again going clockwise several times. This tape prevents leaks by creating a tight seal. Connect your cold water line, turning the fitting clockwise by hand first, then using a wrench for the final snug fit. Don’t overtighten—just firm enough that it won’t leak.
Reconnecting Hot Water Outlet
The hot water outlet, also typically on top, gets the same treatment. Wrap the threads with Teflon tape and connect your hot water line. This is where hot water exits the tank to travel throughout your home. Again, hand-tight first, then wrench-tight for that final quarter turn.
Reconnecting Gas or Electrical Supply
Gas Line Connections
If you have a gas water heater, reconnect the gas line by screwing the flexible connector’s fitting nut back onto the gas inlet. Use two wrenches—one to hold the fitting steady while you turn the nut with the other. Once connected, check for leaks by brushing soapy water on all connections. Bubbles mean you have a leak and need to tighten further.
Electrical Connections
For electric models, reconnect the electrical wires according to the photos you took earlier. If you’re uncomfortable with this step, call a licensed electrician. Electricity demands respect and proper installation.
Filling and Testing Your New Tank
Opening Supply Valves Gradually
Open the cold water shut-off valve slowly. You’ll hear water flowing into the tank. As the tank fills, you’ll hear air escaping from the hot water tap you opened earlier. This is normal. Let air bubble out for a minute, then turn off that hot water tap.
Checking for Leaks
As the tank fills, carefully inspect all the connections you just made. Look for any water dripping from the inlet connections, outlet connections, or relief valve. Small drips at the very base of connections might disappear as you tighten slightly, but persistent leaks mean you need to reopen that connection, add more Teflon tape, and reconnect.
Restoring Power and Gas
Once the tank is completely full and all connections are leak-free, turn the power back on at your electrical panel or light the pilot light on your gas tank according to the manufacturer’s instructions. The tank should begin heating water within minutes.
Common Mistakes to Avoid When Changing Your Tank
Skipping the Teflon Tape Step
This is the number one cause of leaking connections. Teflon tape is cheap, and it works. Don’t skip it. Wrap it clockwise at least three times around male threads.
Over-Tightening Connections
You’re not trying to snap the fitting off. Hand-tight plus a quarter turn with a wrench is usually sufficient. Over-tightening can strip threads and cause leaks.
Forgetting to Bleed Air from the System
Air in your hot water lines can cause sputtering and reduced pressure. Always open hot water taps throughout your home for a minute or two after filling the tank to release trapped air.
Not Checking for Leaks Before Finishing
Walk away to let everything settle for 15 minutes, then return and inspect again. Small leaks that appear after initial pressure is applied will get worse over time.
When to Call a Professional Instead
Let’s be honest—not everyone should attempt this project themselves. You should call a professional plumber if you’re dealing with solder connections that you’re unfamiliar with, if you have any doubt about gas line safety, if you’re uncomfortable working with electricity, or if your home has unusual plumbing configurations. There’s no shame in getting expert help. Sometimes the cost of a professional is cheaper than fixing mistakes.
Maintenance Tips for Your New Tank
Annual Inspection Routine
Once a year, inspect the area around your tank for any signs of leaking. Check the pressure relief valve discharge pipe to ensure it’s still clear. Listen to your tank—unusual noises usually mean sediment buildup.
Draining Sediment Periodically
Every six months to a year, drain a few gallons from the bottom of your tank to remove sediment. This extends your tank’s life significantly. A sediment-free tank operates more efficiently and lasts longer.
Setting the Temperature Correctly
Most tanks have a thermostat dial. Set it to 120 degrees Fahrenheit for the best balance between comfort and energy efficiency. Higher temperatures increase energy costs and increase scalding risk.
Conclusion
Changing a hot water tank is genuinely achievable for most homeowners willing to take their time and follow procedures carefully. Yes, it’s a project that requires some physical effort and attention to detail, but it’s also an excellent way to save money while taking pride in maintaining your own home. You’ve now learned how to drain your old tank, disconnect it properly, position a new one, reconnect all the plumbing and utilities, and get everything running safely. The key throughout this entire process is patience, safety awareness, and not rushing any step. If at any point you feel unsure about what you’re doing—particularly with gas or electrical connections—stop and call a professional. It’s not a failure; it’s wisdom. Your restored hot showers await on the other side of this project, and you’ll know exactly who fixed it—you did.
Frequently Asked Questions
How long does it typically take to change a hot water tank?
For someone doing this for the first time, plan on spending three to five hours total. This includes draining the old tank (30 minutes to an hour), disconnecting it (30 to 45 minutes), positioning the new one (15 to 20 minutes), making all connections (45 minutes to an hour), and testing everything (20 to 30 minutes). If you’re experienced, you might do it in two to three hours. Don’t rush—taking your time prevents mistakes.
What size hot water tank should I buy as a replacement?
The right size depends on your household needs and usage patterns. A family of two or three typically needs a 40 to 50-gallon tank. A family of four or more usually benefits from a