How to Change Toilet Water Valve: A Complete DIY Guide
Let me be honest with you—discovering that your toilet water valve needs replacing can feel like a punch in the gut. You’re staring at a leaking valve, wondering if you need to call an expensive plumber, and suddenly you’re imagining hefty repair bills draining your bank account. But here’s the thing: changing a toilet water valve is actually something most homeowners can tackle themselves with the right guidance. I’m going to walk you through this process step by step, and by the end, you’ll feel confident enough to handle it on your own.
Why You Might Need to Replace Your Toilet Water Valve
Before we jump into the how-to, let’s talk about the why. Your toilet water valve (also called the fill valve or ballcock) is essentially the gatekeeper of your toilet’s water supply. It controls how much water enters the tank when you flush. When this valve starts failing, you’ll notice some telltale signs that demand your attention.
Common Signs of a Failing Toilet Water Valve
Think of your toilet water valve like the heart of your toilet system. When it’s not working properly, the entire system suffers. Here are the most common warning signs you shouldn’t ignore:
- Water continuously trickling into the bowl even when you haven’t flushed
- The toilet tank taking an unusually long time to refill after flushing
- A hissing sound emanating from the tank area
- Water leaking around the base of the tank or underneath the toilet
- The fill valve running constantly without stopping
- Difficulty adjusting water level in the tank
If you’re experiencing any of these issues, your water valve is likely crying out for help. The longer you wait, the more water you’ll waste, and your utility bills will start climbing faster than you can say “toilet trouble.”
Understanding Your Toilet Water Valve Components
Knowledge is power, and understanding what you’re dealing with makes the job infinitely easier. Let me break down the anatomy of a toilet water valve system so you’re not fumbling around in the dark.
What Exactly Is a Toilet Water Valve?
The water valve is a mechanical device located inside your toilet tank. Its primary job is to regulate water flow from the supply line into the tank. Think of it as a traffic controller for water—when the tank is empty, it opens the floodgates; when the tank is full, it shuts down operations. Pretty neat, right?
The Main Components You Should Know About
- Fill valve: The central mechanism that opens and closes the water flow
- Float arm: The device that rises and falls with water level, triggering the valve
- Inlet tube: The small tube that directs water into the tank
- Refill tube: Ensures water enters the bowl during the refill cycle
- Supply line: The connection bringing water from your home’s main line
Tools and Materials You’ll Need
Here’s where preparation meets success. Gather these items before you start, and you’ll breeze through the project without unnecessary trips to the hardware store.
Essential Tools for the Job
- Adjustable wrench (10-inch is ideal)
- Flathead screwdriver
- Phillips head screwdriver
- Bucket (for catching water spillage)
- Towels or rags (water will happen, trust me)
- Old newspaper or cardboard (to protect your floor)
Materials to Have on Hand
- New toilet water valve (make sure it’s compatible with your toilet model)
- Replacement gaskets or seals
- Teflon tape (for threaded connections)
- Plumber’s putty (optional, but helpful)
Preparing Your Workspace and Turning Off the Water
Safety and preparation are the foundation of any successful DIY project. This is where you set yourself up for success before touching a single bolt.
Step One: Shut Off the Water Supply
This is absolutely non-negotiable. You need to stop the water flow to your toilet before you do anything else. Look behind or beside your toilet for a small valve on the supply line. Turn it clockwise until it stops. Test it by flushing—if water doesn’t enter the tank, you’ve successfully shut it off. If water still flows, keep turning until the flow stops completely.
Can’t Find the Shut-Off Valve?
If your toilet doesn’t have an individual shut-off valve, you’ll need to shut off the main water supply to your house. This valve is typically located near your water meter or where the water line enters your home. In emergencies, you can turn off water at the main meter, but having individual shut-off valves installed is a smart home improvement investment.
Step Two: Empty the Tank Completely
Flush the toilet once after shutting off the water. This drains most of the water from the tank. For any remaining water, turn the valve on the supply line back on for just a second—this will give you a final flush. Now turn it back off. Grab your bucket and sponge out any lingering water from the tank bottom.
Step Three: Set Up Your Work Area
Lay down newspaper or cardboard around the toilet base. Position your bucket underneath the supply line connection. Have your towels nearby. It’s much easier to prevent a mess than to clean one up later.
Removing the Old Toilet Water Valve
Now we’re getting into the actual work. This section is where most people feel nervous, but I promise it’s more straightforward than you think.
Disconnecting the Supply Line
Locate where the supply line connects to the bottom of the tank. You’ll see a nut holding it in place. Use your adjustable wrench to hold the nut while you turn the connection counterclockwise by hand if possible. If it’s stuck, use your other wrench to turn it. Water might still drip—that’s why you positioned the bucket there. Let any remaining water drain out completely.
Removing the Fill Valve from Inside the Tank
Reach into the tank and locate the locknut that holds the fill valve in place from underneath. This nut is typically at the bottom of the tank, where the valve connects. Using your adjustable wrench, hold the nut while you reach inside the tank with your other hand and turn the valve clockwise. It should loosen and eventually come free. This might require some muscle, especially if the valve has been in place for years.
Pro Tip for Stubborn Valves
If the valve is really stuck and won’t budge, try applying a penetrating oil and waiting fifteen minutes before trying again. Sometimes the mineral deposits that build up over time need a little chemical persuasion to let go.
Cleaning the Opening
Once the old valve is out, you’ll have a hole in the bottom of your tank. This is your moment to be thorough. Use a clean rag to wipe away any mineral deposits, rust, or debris. A clean surface ensures your new valve will seal properly and last longer. Think of it like preparing a canvas before painting—poor preparation leads to poor results.
Installing Your New Toilet Water Valve
This is where the magic happens. Installing the new valve is actually the reverse of removal, but there are important details to get right.
Preparing the New Valve
Before installation, examine your new valve closely. Check that all components are present and nothing appears damaged. Some valves come with pre-installed gaskets, while others require you to install them yourself. Read the manufacturer’s instructions—different valve designs vary slightly.
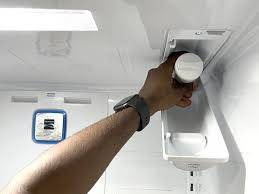
Inserting the New Valve Into the Tank
Position the new fill valve through the hole in the bottom of the tank. You’ll need to feed it from the inside of the tank. Make sure the gasket sits properly in the opening—it should create a watertight seal. From underneath the tank, thread the locknut back on by hand first, then tighten it with your wrench. You want it snug but not overly tight. Cranking too hard can crack the tank, and we definitely don’t want that.
Finding the Sweet Spot for Tightness
Tighten the locknut until you feel significant resistance, then turn it just a quarter turn more. You’re looking for secure, not strangled. This is one of those things that improves with practice—after your first valve replacement, you’ll have a feel for it.
Reconnecting the Supply Line
Now reconnect your supply line to the bottom of the fill valve. Hand-tighten the connection first, then use your wrench to snug it up. This connection should be tight enough that no water leaks, but again, don’t overtighten. The goal is creating a seal, not demonstrating your strength.
Testing Your New Valve Installation
We’re approaching the finish line. Testing ensures everything works before you pat yourself on the back and call it done.
The Initial Water Supply Test
Slowly turn the supply line shut-off valve counterclockwise to let water flow back into the tank. Watch the connections you just tightened for any signs of leaking. A small drip is normal initially, but water should stop after a few seconds. If water streams out, you likely need to tighten that connection a bit more.
Observing the Fill Cycle
Let the tank fill completely. Listen for any unusual sounds. A gentle hissing as the tank fills is normal—most fill valves make this sound. Once the tank reaches full capacity, the water flow should stop automatically. If water continues trickling in after the tank is full, the float arm might need adjustment.
Adjusting the Float Arm
The float arm controls when the valve shuts off. If your water level seems wrong, you can adjust it. Most modern fill valves have an adjustable clip or clip screw. Locate this on your valve and adjust it slightly. Raise the clip to increase water level, lower it to decrease water level. Make small adjustments and test between each one.
The Flush Test
Flush the toilet and observe the entire cycle. The tank should empty, refill, and then stop when full. The water in the bowl should be clear and normal. If everything looks good, congratulations—you’ve successfully replaced your toilet water valve!
Troubleshooting Common Issues
Sometimes even with perfect installation, minor issues can pop up. Here’s how to handle the most common scenarios.
Water Continues Running After Tank Is Full
This usually means your float arm isn’t positioned correctly. Check that it moves freely and isn’t hitting any obstacles. Adjust the float clip upward slightly to see if this stops the water flow. If the water still runs, the new valve itself might be defective, and you’ll need to replace it again.
Leaking at the Tank Base
This indicates the gasket isn’t sealing properly. Turn off the water, empty the tank again, and tighten the locknut underneath the tank a bit more. If tightening doesn’t help, you’ll need to remove the valve again and check that the gasket is positioned correctly. Sometimes debris under the gasket causes leaks.
Water Pressure Seems Low During Refill
Check that you’ve fully opened the shut-off valve. Sometimes people forget this step and wonder why their toilet refills slowly. Ensure the valve handle is completely perpendicular to the supply line. Also check for any debris in the supply line that might be restricting flow.
When to Call a Professional Plumber
While this project is DIY-friendly, some situations warrant professional help. If you encounter a cracked tank, stripped threads that won’t hold the valve, or if water continues leaking despite your best efforts, it’s time to call in the experts. Your time and frustration are valuable, and sometimes professional help saves both.
Maintenance Tips to Extend Valve Life
Your new valve will serve you well for many years with minimal maintenance. Here are simple habits that keep it running smoothly.
Regular Visual Inspections
Once a month, take a quick peek at your toilet tank. Look for any signs of leaking water or unusual sounds. Early detection prevents small problems from becoming expensive ones.
Preventing Mineral Buildup
Hard water deposits are the enemy of fill valves. If you have hard water, consider installing a water softener system in your home. In the meantime, pour white vinegar around the fill valve once every few months to dissolve mineral deposits.
Keep the Area Dry
Ensure the area around your toilet base stays dry. Standing water can cause rust and corrosion of metal components.
Conclusion
Replacing a toilet water valve might seem intimidating at first, but it’s truly a manageable DIY project that saves you hundreds of dollars compared to hiring a plumber. With the right tools, a bit of patience, and this guide in your corner, you can confidently tackle this repair and feel genuinely proud of your accomplishment. The process breaks down into simple steps: shutting off water, removing the old valve, installing the new one, and testing your work. Most people complete this entire project in under an hour once they get started. The next time your toilet acts up, you’ll know exactly what to do—and you’ll have the satisfaction of fixing it yourself. Not only does this save money, but it also gives you valuable knowledge that makes you a more capable homeowner. So grab those tools, follow these steps carefully, and join the ranks of people who’ve conquered their bathroom repairs with confidence.
Frequently Asked Questions
How much does a toilet water valve replacement cost?
A new fill valve typically costs between fifteen and fifty dollars, depending on the model and brand. Professional plumber installation usually adds another hundred to three hundred dollars in labor. By doing it yourself, you’re essentially saving the labor portion. Even if you buy a premium valve, you’re looking at a fraction of professional service costs.
How long does a toilet water valve typically last?
Most fill valves last between five and seven years, though some can last longer with proper maintenance. The lifespan depends heavily on your water quality and usage patterns. Hard water areas tend to experience shorter valve life due to mineral buildup. If you’re replacing a valve that only lasted two years, you might consider addressing water quality issues to extend the new valve’s life.
Can I replace just the fill valve without replacing the entire toilet?
Absolutely, yes. The fill valve is a replaceable component designed to be serviced independently. You don’t need to replace the entire toilet unless the tank itself is cracked or damaged. This is what makes valve replacement such a cost-effective repair option.
What’s the difference between a ballcock and a fill valve?
These terms are often used interchangeably in plumbing, though technically they refer to slightly different mechanisms. A ballcock is an older style with a brass ball float, while modern fill valves