How to Change Water Valve Under Sink: A Complete DIY Guide
Have you ever noticed that annoying drip under your sink, or maybe the water pressure just isn’t what it used to be? The culprit might be a faulty water valve that’s seen better days. The good news is that replacing it isn’t as intimidating as it sounds. I’m going to walk you through this process step by step, and by the end, you’ll be wondering why you ever worried about calling a plumber in the first place.
Understanding Your Under-Sink Water Valve System
Before you grab your tools and crawl under the sink, let’s talk about what you’re actually dealing with. Your under-sink water valve is like the gatekeeper of your plumbing system. It controls the flow of water to your fixture, whether that’s your kitchen sink, bathroom vanity, or washing machine. When this valve starts to fail, it’s usually because mineral deposits have built up inside, or the internal seals have simply worn out from years of use.
What Does a Water Valve Actually Do?
Think of a water valve as a tiny faucet all by itself. When you turn the handle, it opens and closes an internal passage that either allows water to flow or stops it completely. Over time, these internal mechanisms can get stuck, corroded, or damaged. This is why you might experience low water pressure, constant dripping, or water that won’t shut off properly.
Types of Valves You Might Find
There are several types of valves you could encounter under your sink. The most common are ball valves, gate valves, and compression valves. Ball valves have a round handle and are generally more reliable. Gate valves have a handle that looks like a wheel and are older but still functional. Compression valves are the most traditional type and require tightening a packing nut. Knowing which type you have will help you understand the replacement process better.
Tools and Materials You’ll Need
Here’s where we get practical. You don’t need to invest in an expensive toolbox to complete this project. Most of what you need is probably already in your home.
- Adjustable wrench or crescent wrench
- Bucket or towels to catch water
- Flashlight or headlamp
- New replacement valve (same size as your current one)
- Plumber’s tape (also called PTFE tape or Teflon tape)
- Potentially a pipe wrench for stubborn connections
- A rag or old cloth for cleanup
That’s really all you need to get started. If you want to be extra prepared, grab some plumber’s putty or silicone caulk, though it’s not always necessary for valve replacement.
Preparing for the Job: Safety First
Before you start unscrewing anything, let’s make sure you don’t create a bigger mess than you’re trying to fix.
Turn Off the Water Supply
This is absolutely non-negotiable. Look for the main water shut-off valve in your home. It’s usually located near your water meter or where the main water line enters your house. Turn it clockwise until it stops. If you can only find a valve specific to that sink, that works too, though shutting off the main line gives you more protection. Once you’ve turned it off, go ahead and turn on the faucet to release any remaining water pressure in the lines.
Clear Out the Space
Get everything out from under your sink. Cleaning supplies, sponges, containers—they all need to go. This gives you room to work and keeps your stuff dry. Place your bucket or towels on the floor to catch any water that’s still in the pipes.
Let There Be Light
You’re going to be working in a dark, cramped space. A headlamp or flashlight is honestly one of the best investments you can make for this job. Being able to see what you’re doing makes everything faster and safer.
Locating and Identifying Your Current Valve
Now that you’re prepared, let’s find what we’re looking for. If you have a sink with one fixture, there might be just one valve. If you have a double sink, you could have two valves—one for each side. Sometimes there’s also a single valve that controls both sides.
Tracing the Water Lines
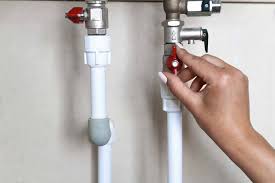
Look at the pipes coming up from under your sink. These typically come from the wall or floor. Follow them upward, and you’ll see where they connect to the valve. The valve will be below where the flexible hoses or copper tubing connect to your faucet. It should have a handle you can turn on and off.
Checking for Shut-Off Valves
While you’re down there, check if your sink already has individual shut-off valves. You’ll know them by the small handles (usually round or lever-shaped) on the pipes coming up from the wall. If your valve has these, great—you’re ready to start the replacement. If not, you might want to consider installing them when you replace your valve, as they’ll make future maintenance much easier.
Step-by-Step Valve Replacement Process
Now we get to the actual work. I’m going to break this down into manageable steps so you can tackle each one confidently.
Step One: Disconnect the Flexible Hoses
Look at the connection points where the flexible hoses (the rubber or braided lines) connect to your valve. You’ll see a nut holding each one in place. Using your adjustable wrench, hold the valve body with one wrench while turning the nut counterclockwise with another wrench. This prevents the valve from spinning and damaging the pipe connections. Work slowly and steadily. If the nut is stuck, apply some penetrating oil and wait a few minutes before trying again.
Once the nuts are loose, unscrew them by hand and carefully pull the hoses away. A little water will likely spill out—that’s completely normal and expected. This is where your bucket or towels come in handy.
Step Two: Disconnect the Valve from the Supply Line
This is where it gets a bit trickier, depending on your setup. If your valve is connected to copper tubing or a rigid line, you’ll need to unscrew the nut that holds the valve to that line. Again, use two wrenches—one to hold the valve steady and one to turn the nut. If the connection is really stuck, you might need to apply some heat with a hair dryer or let penetrating oil sit overnight.
Some valves are soldered directly to copper pipes. If that’s your situation, you’ll need a different approach. You can either use a pipe cutter to cut the pipe just above the valve and install a new valve with compression fittings, or you can try to carefully heat and unsolder the connection. I’d recommend the cutting method if you’re not experienced with soldering.
Step Three: Remove the Old Valve
Once all connections are loosened, simply pull the valve out of its position. If it’s stuck, try gently rocking it back and forth. Clean up any remaining water with your cloth.
Step Four: Prepare the New Valve
Before installing your new valve, inspect the threads on both ends. Wrap plumber’s tape around the male threads (the parts that screw into other pieces). Do this by wrapping the tape clockwise around the threads three to four times. This creates a watertight seal and prevents leaks. The tape is inexpensive and this step is crucial, so don’t skip it.
Step Five: Install the New Valve
Position your new valve exactly where the old one was. If the threads look the same, screw it in by hand first to get it started straight. Then use your wrench to tighten it. Don’t over-tighten—you want it snug but not so tight that you strip the threads or damage the valve. A good rule of thumb is to tighten until you feel resistance, then give it another quarter turn.
Step Six: Reconnect the Flexible Hoses
Now it’s time to attach those hoses back. Again, use two wrenches—one to hold the valve body and one to tighten the nut on each hose connection. Hand tighten first, then use the wrench to snug it up. Make sure the connections feel secure but avoid over-tightening, which can damage the rubber hose connections.
Checking for Leaks and Testing Your Work
This is the moment of truth. Now that everything is connected, let’s make sure you did it right.
Turn the Water Back On
Go back to your main shut-off valve and turn it counterclockwise to restore water pressure to your home. If you had a local valve, turn that on as well. Move slowly and deliberately—there’s no need to rush.
Inspect All Connections
Look carefully at every connection point you just worked on. Watch for any water dripping or spraying. Sometimes it takes a moment for water to start dripping if there’s a leak, so wait a few seconds and observe. Grab your bucket or towels and keep them nearby just in case.
Test the Valve Function
Turn the handle on your new valve off and on a few times. It should feel smooth and responsive. If it’s stiff or hard to move, you might have installed it backward or with too much tension. If you notice any leaking during this test, don’t panic. It’s usually an easy fix.
Troubleshooting Common Issues
Not everything always goes perfectly on the first try, and that’s okay. Let me walk you through some common problems and how to fix them.
The Valve is Leaking at the Connection Points
If water is dripping from where the valve connects to the hoses or supply line, the connection probably just needs to be tightened. Use your wrench to give each nut another quarter turn. Check again, and repeat if necessary. Sometimes it takes a couple of tries to get the perfect tightness.
Water is Leaking from the Valve Handle Area
This suggests that the packing nut (the nut right where the handle meets the valve body) might need tightening. Use your wrench to carefully tighten this nut clockwise. If this doesn’t work, you might have a defective valve, and you’ll need to replace it again. This is rare but does happen occasionally.
The Valve Handle is Hard to Turn
If you just installed it and it’s already difficult to operate, you might have made the connections too tight. Loosen the connection nuts slightly and test the handle again. The handle should move smoothly with gentle pressure but shouldn’t be loose enough to wiggle.
Water Pressure is Low After Replacement
Check if the valve is fully open. The handle should be parallel to the pipe when the valve is open. Also, debris from the old valve might be lodged in the line. Turn the water off again, disconnect the hoses, and run water briefly into a bucket to flush out any debris. Reconnect and test again.
Maintenance Tips to Extend Valve Life
Now that you’ve successfully replaced your valve, let’s talk about keeping your new one in good shape for years to come.
Turn Your Valves Regularly
Every few months, turn your water valves on and off a couple of times. This prevents them from getting stuck due to mineral buildup. It’s a simple habit that can add years to your valve’s life.
Watch for Signs of Problems
Keep an eye out for dripping, reduced water pressure, or handles that are getting harder to turn. These are all warning signs that might indicate your valve is starting to fail. Catching these early can save you from a bigger mess down the road.
Consider Installing a Whole-House Water Filter
If you have hard water in your area, mineral deposits can accumulate quickly inside your valves. A whole-house water filter can extend the life of all your plumbing fixtures, including these valves. It’s an investment that pays dividends over time.
When to Call a Professional
I want to empower you to do this yourself, but I also want to be realistic about when professional help is worth the money.
Soldered Connections You Can’t Handle
If your valve is soldered to copper pipes and you’re not comfortable with soldering, or if you don’t have access to the right tools, this is a good time to call in a plumber. Soldering requires practice and special equipment.
Stuck Valves That Won’t Budge
If you’ve applied penetrating oil and waited, applied heat, and used two wrenches but the valve still won’t budge, it might be time to admit defeat. A professional has specialized tools and techniques for dealing with these stubborn situations.
Multiple Valve Problems
If you’re having issues with multiple valves throughout your home, or if you need to replace a valve in a complex plumbing setup, a professional can assess the bigger picture and provide comprehensive solutions.
Cost Comparison: DIY versus Professional Replacement
Let’s talk about money. A replacement valve typically costs between fifteen and fifty dollars, depending on the type and quality. Plumber’s tape costs just a couple of dollars. Your total material cost will probably be under a hundred dollars.
A professional plumber, on the other hand, will charge you a service call fee (usually fifty to one hundred dollars) plus labor costs (typically one hundred to three hundred dollars for this job), bringing your total to anywhere from two hundred to four hundred dollars. By doing it yourself, you’re potentially saving a couple hundred dollars, which is nothing to sneeze at.
Conclusion
Changing a water valve under your sink is one of those home repair projects that seems scarier than it actually is. I’ve walked you through the entire process, from preparation to testing, and even addressed common problems you might encounter. The truth is, if you can follow instructions and work carefully with basic hand tools, you can handle this job. You don’t need years of plumbing experience or expensive equipment. What you need is patience, a little bit of time, and the willingness to take on a challenge. Once you’ve successfully replaced one valve, you’ll feel more confident tackling other minor plumbing issues around your home. Not to mention, you’ll save yourself a nice chunk of money that could go toward other home improvements. So grab your tools, clear out that space under your sink, and get started. Your future self will thank you for learning this valuable skill.
Frequently Asked Questions
How do I know if my water valve needs to be replaced?
There are several telltale signs that your valve is failing. If you notice constant dripping from your faucet even when the valve is turned off, that’s a classic indicator. Reduced water pressure that’s isolated to one fixture might also suggest a faulty valve. Additionally, if your valve handle is becoming increasingly difficult to turn, or if you notice water leaking from the connection points around the valve, it’s time to replace it. Some people also notice hissing sounds coming from the valve when it’s closed, which indicates internal damage. Trust your instincts—if something doesn’t seem right with your water flow or the valve’s operation, it’s worth investigating.
Can I replace a water valve if I’ve never done plumbing work before?
Absolutely, you can. This is one of the most beg