How to Change Whirlpool Fridge Water Filter: A Complete Step-by-Step Guide
Why Your Whirlpool Refrigerator Water Filter Matters
Think of your water filter as the guardian of your drinking water. It’s sitting there quietly, day after day, removing sediment, chlorine, and other contaminants that you definitely don’t want in your glass of water or ice cubes. Over time, these filters get saturated with all the stuff they’ve trapped, and they lose their effectiveness. That’s why manufacturers recommend changing them every six months or when you notice a change in water taste or flow.
Here’s the thing though—many people ignore this maintenance task until something goes wrong. I’ve seen people complain about cloudy ice cubes or strange-tasting water, when all they really needed was a fresh filter. The good news? This is a problem you can solve in less than ten minutes.
Identifying Your Whirlpool Water Filter Type
Whirlpool makes several different refrigerator models, and not all of them have the same filter design. Before you rush out to buy a replacement, you need to know exactly what you’re looking for.
Common Whirlpool Filter Locations
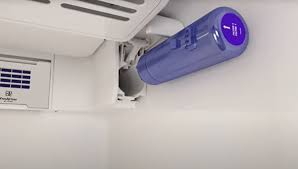
The water filter in your Whirlpool fridge is typically located in one of three places. Some models have it in the upper right corner of the refrigerator compartment, hidden behind a panel. Others have it tucked underneath the fridge in the base grille area. And then there are the side-by-side models that keep theirs in the lower right corner. The best way to figure out where yours is? Check your user manual or look for a small cylindrical component that looks like it belongs inside a coffee maker.
Understanding Filter Model Numbers
When you locate your filter, you’ll see a model number printed on it. This is your golden ticket to finding the right replacement. Common Whirlpool filter models include the 4396508, 4396510, 4396841, and 8171413. Write this number down because you’ll need it when shopping for a replacement.
What You’ll Need Before You Start
Here’s the beautiful part—this isn’t a complicated repair that requires a toolbox full of equipment. In fact, you probably already have everything you need sitting in your kitchen right now.
- A replacement water filter that matches your model
- A small towel or cloth to catch any water spillage
- A bowl or container if water drips
- Your refrigerator’s user manual (optional but helpful)
- A flashlight if your filter location is dark
That’s genuinely it. You don’t need wrenches, screwdrivers, or any special tools. This is a job designed to be done by regular folks like you and me.
Locating Your Water Filter: The Detective Work
Now let’s find your filter. This step is crucial because you can’t replace something you can’t find, right?
Upper Compartment Filters
If your Whirlpool refrigerator is a French door or standard top-freezer model, your filter might be hiding in the upper right corner. Open your fridge and look toward the back top area. You might see a small plastic panel or a cylindrical component sticking out. Some filters have a red knob or a pull handle, making them easier to spot. If you see a small door or panel, gently push or slide it to reveal the filter housing.
Undersink and Base Location Filters
For other models, you’ll need to get down on the floor and look underneath your refrigerator. There’s usually a grille panel at the base that you can remove by pushing up on the clips or unscrewing a couple of fasteners. Once you’ve removed that panel, you should see the filter cartridge mounted horizontally inside.
Using Your Manual as Your Guide
If you’re having trouble locating the filter, don’t hesitate to pull up your model’s manual online or call Whirlpool customer service. They’re usually pretty helpful, and it only takes a few minutes to get confirmation of your filter’s location.
The Step-by-Step Filter Replacement Process
Alright, this is where the actual magic happens. Let me walk you through each step in detail.
Step One: Prepare Your Workspace
Before you touch anything, lay your towel or cloth on the floor or shelf near the filter location. Trust me on this one—there’s almost always a little water that drips out when you remove the old filter. Having a cloth ready prevents a small puddle situation from becoming a bigger mess.
Step Two: Locate and Access the Filter Housing
Now that you’ve found where your filter lives, it’s time to access it. If there’s a panel or door, gently open it. Some panels just slide to the side, while others might need a gentle twist. Don’t force anything—Whirlpool designs these to be user-friendly, so if something feels stuck, you might be applying pressure in the wrong direction.
Step Three: Remove the Old Filter
Here comes the critical part. Look at how the old filter is oriented. Most Whirlpool filters have a simple push-and-twist mechanism or a straight pull design. If your filter has a red button or knob at the end, press or turn it counterclockwise, then pull the cartridge straight out. If it’s a pull-type, just grab the end and pull firmly toward you. Don’t be shy—these are built to handle being removed, so a good, steady pull won’t hurt anything.
Remember that cloth you laid down? You might want to have it ready now, as a bit of water often comes out when you remove the old filter.
Step Four: Inspect the Filter Housing
Before you install the new filter, take a quick look inside the housing. You might see some sediment or discoloration—that’s completely normal and proves your old filter was doing its job. If there’s any visible debris, you can gently wipe it out with a clean cloth. This step isn’t absolutely necessary, but it’s a nice touch that ensures your new filter operates optimally.
Step Five: Prepare Your New Filter
Unbox your new Whirlpool water filter and examine it carefully. Some filters come with protective caps or seals that you need to remove before installation. Look for any plastic pieces, rubber caps, or paper wrapping that shouldn’t be there when the filter is installed. Remove these carefully and set them aside for recycling.
Many people skip this step and install the filter with the protective covering still on—don’t be that person. It drastically reduces the filter’s effectiveness.
Step Six: Install the New Filter
This is where it gets satisfying. Hold your new filter and align it with the housing. If it’s a push-and-twist filter, gently push the filter into the housing and twist it clockwise until you feel it seat properly. If it’s a straight-pull style, simply insert it into the housing with steady, even pressure until it clicks or seats firmly. You should hear or feel a subtle click when it’s fully installed—this is your confirmation that everything is properly positioned.
Step Seven: Close the Filter Housing
Once your new filter is securely installed, close any panels or doors you opened earlier. Make sure everything aligns properly and closes smoothly. If something doesn’t close easily, the filter might not be installed correctly, so take a moment to double-check.
Resetting Your Filter Indicator Light
Here’s a step that often gets missed, but it’s actually pretty important. Most Whirlpool refrigerators have a filter indicator light that reminds you when it’s time for a change. Now that you’ve installed a new filter, you need to reset this light so it accurately tracks your new filter’s lifespan.
Finding the Reset Button
The reset button is typically located on the front of the refrigerator, usually on the dispenser panel or on the water filter housing itself. Some models have it built into the control panel. Look for a button labeled “Filter Reset,” “Reset,” or sometimes just an icon that looks like a water filter. Your user manual will show you exactly where it is for your model.
Performing the Reset
To reset the light, simply press and hold the reset button for about three to five seconds. You should see the light turn off or change color, indicating that the filter counter has been reset to zero. Some models require you to do this through the refrigerator’s digital display, but the process is similarly straightforward.
If you forget to reset the light, it’s not the end of the world—it just means you’ll get a reminder sooner than necessary. But resetting it ensures you’ll get an accurate indicator of when your next change is due.
Common Mistakes People Make When Changing Whirlpool Water Filters
I’ve heard plenty of stories about what goes wrong during this process. Let me help you avoid these pitfalls.
Installing the Filter Backwards
Believe it or not, this happens more often than you’d think. Water filters have a direction they’re meant to flow through. Installing it backwards won’t damage anything, but your water won’t be filtered properly. Always check the arrows or directional indicators on the filter itself. They clearly show which end should face the incoming water.
Not Removing Protective Covers
I mentioned this earlier, but it bears repeating. Leaving plastic caps or protective wrapping on your new filter is one of the fastest ways to end up with poor water quality and weak dispenser flow. It only takes an extra thirty seconds to remove these, so don’t skip this step.
Forgetting to Reset the Filter Light
Your fridge will keep nagging you about the filter even though you just installed a brand new one. It’s annoying, but it’s also a quick fix. Don’t live with that blinking light—just reset it.
Using an Incorrect Replacement Filter
This is probably the most important mistake to avoid. Always, and I mean always, verify the model number before purchasing a replacement. Using the wrong filter type might fit, but it won’t work properly. Take that model number you wrote down earlier and cross-reference it carefully.
Not Disposing of the Old Filter Responsibly
Your old filter contains all kinds of contaminants and isn’t suitable for regular trash. Many retailers that sell water filters will take old ones for recycling. Some water treatment companies even have mail-back programs. Doing this right is good for the environment and shows you care about your community.
Maintaining Your New Water Filter for Longevity
Now that you’ve got a fresh filter installed, let’s talk about getting the most out of it.
Understanding Filter Lifespan
Most Whirlpool water filters are rated for about six months of use or up to 300 gallons of water, whichever comes first. If your household uses a lot of water or has particularly poor water quality, you might hit that limit sooner. Pay attention to changes in taste, smell, or dispenser flow speed—these are good indicators that your filter needs changing.
Tracking Your Filter Changes
Here’s a simple tip that actually works: write the date on your new filter with a permanent marker. When you see that date, you’ll immediately know when you installed it. This prevents the “wait, did I already change this?” confusion that happens six months later.
Flushing Your System
After installing a new filter, run water through the dispenser for about five minutes. This flushes out any loose carbon or material that might have come loose during installation. Don’t drink this water or use it for ice—just let it run down the sink. You’ll notice the water might be slightly discolored at first, which is completely normal and harmless.
Troubleshooting Common Water Filter Issues
Even with proper installation, you might encounter some issues. Let’s walk through the most common ones.
Weak Water Pressure After Replacement
If your water dispenser suddenly has a weak trickle, first check that you actually removed any protective coverings from your new filter. If you did, the issue might be that air got trapped in the line during installation. Run water through the dispenser continuously for a few minutes—this usually clears the air pocket and restores normal pressure.
Discolored Water or Ice
Slight discoloration after a filter change is normal and nothing to worry about. It’s usually just loose carbon particles. If the discoloration persists after flushing, you might have installed the filter backwards. Go back and check the directional arrows.
Water Still Tastes Off
If your water doesn’t taste significantly better with the new filter, a few things could be wrong. First, verify you bought the correct model. Second, make sure your old filter really needed changing—if it was changed very recently, the improvement might be subtle. If the problem persists, your water supply might need professional testing to identify other contaminants.
Filter Won’t Come Out
If your old filter seems stuck, don’t force it. Applying excessive pressure might damage the housing. Instead, try twisting it slightly in the opposite direction first, or consult your manual for specific removal instructions. In rare cases, you might need to contact Whirlpool support for guidance.
When to Call a Professional
Let’s be real—ninety-nine percent of the time, you won’t need professional help with a water filter change. But there are a few situations where you should call someone. If you can’t locate your filter despite trying, if the filter housing seems damaged or cracked, or if replacing the filter doesn’t solve water quality issues, it’s time to reach out to Whirlpool customer service or a qualified appliance technician.
Conclusion
There you have it—everything you need to know about changing your Whirlpool refrigerator water filter. What once seemed like a complicated task is actually straightforward when you break it down into manageable steps. You’ve learned where your filter lives, how to remove the old one, how to install the new one, and how to maintain it for optimal performance. Most importantly, you now understand why this simple maintenance task matters for your family’s health and your appliance’s longevity.
The next time that filter needs changing—and