How to Clean 5 Gallon Water Dispenser: A Complete Guide to Crystal Clear Water
When was the last time you actually thought about what’s lurking inside your water dispenser? Most of us fill it up, grab our cups, and never give it another thought. But here’s the thing—your 5-gallon water dispenser is basically a home appliance that’s been working overtime to keep your family hydrated, and it deserves some serious TLC. In this guide, I’m going to walk you through everything you need to know about keeping your water dispenser sparkling clean and functioning at its best.
Why Cleaning Your Water Dispenser Matters More Than You Think
Think of your water dispenser like a filter for your car engine. If you never change the filter, eventually, the whole system suffers. The same principle applies here. Your water dispenser can accumulate bacteria, mineral deposits, and algae over time, especially if you’re not maintaining it regularly. These nasty things don’t just affect the taste of your water—they can potentially impact your health too.
The reality is that most people overlook this crucial maintenance task. We spend money on bottled water quality, but then we neglect the very machine that’s supposed to dispense it. It’s like buying premium groceries and storing them in a filthy refrigerator. The effort just doesn’t match the investment.
Understanding Your 5-Gallon Water Dispenser Better
What Components Make Up Your Dispenser?
Before we dive into the cleaning process, let’s break down what we’re actually working with. A typical 5-gallon water dispenser has several key parts: the water bottle at the top, the internal water reservoir, the cooling and heating system, the dispensing tap, and various tubes and valves that keep everything flowing smoothly. Each of these components plays a vital role in delivering clean, refreshing water to your glass.
How Does Buildup Actually Happen?
Here’s something most people don’t realize—just because you’re using filtered water doesn’t mean your dispenser stays clean. Minerals in the water can crystallize on interior surfaces. Dust and bacteria can sneak in during bottle changes. Even the smallest amount of moisture can create an environment where mold and algae thrive, especially in the darker parts of the machine. It’s a perfect storm for contamination if you’re not careful.
Getting Your Supplies Ready: What You’ll Need
Before you start this project, gather the right tools and materials. Having everything at hand will make the process smoother and more efficient. Don’t try to shortcut this step—using the wrong supplies could damage your dispenser or leave it less than perfectly clean.
- White vinegar (the cleaning superstar)
- Baking soda (nature’s gentle abrasive)
- Distilled water (for rinsing)
- A long, soft-bristled brush or bottle brush
- Clean cloths or paper towels
- Rubber gloves to protect your hands
- A bucket or large basin
- A funnel (optional but helpful)
- Isopropyl alcohol (for sanitizing)
The Step-by-Step Cleaning Process
Step One: Preparing Your Dispenser for Cleaning
First things first—safety comes before anything else. Unplug your water dispenser from the electrical outlet. This is non-negotiable. You don’t want to be working with electrical components and water at the same time. That’s just asking for trouble.
Next, remove the water bottle from the top of the dispenser. If it’s not empty, this is a good time to use that water for plants or cleaning other areas of your home. There’s no sense wasting it. Once the bottle is removed, you’ve got easy access to the dispenser’s interior, which is exactly where you need to focus your efforts.
Step Two: Flushing Out the System
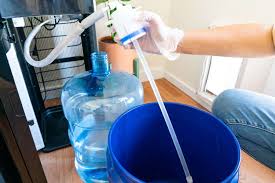
Now here’s where the white vinegar comes into play. Pour about two quarts of white vinegar directly into the dispenser’s water reservoir. This is your first line of attack against stubborn mineral deposits and bacterial growth. The acidity of vinegar is like a natural cleaning agent that breaks down buildup without using harsh chemicals.
Let the vinegar sit inside the reservoir for about 10 to 15 minutes. During this time, it’s working its magic, dissolving mineral deposits and killing bacteria. Think of it as giving your dispenser a spa treatment. While you’re waiting, use this downtime to gather your other supplies and mentally prepare for the next steps.
Step Three: Deep Cleaning the Interior Surfaces
After the vinegar has had time to work, it’s time to get physical. Using your long-handled brush, scrub the interior walls of the water reservoir thoroughly. Pay special attention to corners and crevices where bacteria and algae like to hide. You’ll be surprised at how much gunk comes loose once you start scrubbing.
Work the brush in circular motions, applying moderate pressure. You want to be thorough but not aggressive—the goal is to clean, not damage the dispenser’s interior coating. If you notice any stubborn spots, create a paste using baking soda and a little water, and apply it directly to those areas. Let it sit for a few minutes before scrubbing again.
Step Four: Rinsing Everything Thoroughly
Now comes the rinsing phase, and trust me, this step is just as important as the cleaning itself. Use distilled water—not tap water—to rinse out all the vinegar and baking soda residue. Pour it into the reservoir and use your brush to help flush out any remaining particles. Do this several times until the water runs completely clear and you don’t smell any vinegar.
For an extra thorough job, dispense water from the tap at the front of the machine while you’re rinsing. This helps push out any cleaning solution that might be stuck in the tubes and dispensing mechanism. It’s like giving your dispenser’s circulatory system a complete flush.
Step Five: Cleaning the External Surfaces
Don’t forget about the outside. While the interior might be what matters most for water quality, the exterior still accumulates dust and fingerprints. Use a damp cloth with a little diluted vinegar solution to wipe down the outside of the dispenser. This keeps it looking fresh and prevents dust from getting into the machine when you change bottles.
Step Six: Sanitizing the Dispensing Tap
The tap is one of the most frequently touched parts of your dispenser, which means it’s also one of the places where bacteria love to hang out. Remove the tap cover if possible, and soak it in a solution of equal parts white vinegar and distilled water for about 15 minutes. Then scrub it gently with your brush and rinse thoroughly.
For the tap itself, use a cloth dampened with isopropyl alcohol to wipe the spout and handle. This disinfection step is especially important if you have young children or anyone with a compromised immune system using the dispenser.
Dealing with Specific Cleaning Challenges
What If You Have Hard Water Deposits?
Hard water is like the enemy of clean dispensers. Those white, crusty deposits that form are mineral buildup, primarily calcium and magnesium. If your regular vinegar cleaning isn’t cutting it, try using a stronger solution. Mix equal parts white vinegar and distilled water, then let it sit in the reservoir for 30 minutes instead of 15. For really stubborn deposits, you might need to do this twice.
If that still doesn’t work, a commercial descaling solution made specifically for water dispensers might be necessary. Just follow the manufacturer’s instructions carefully and rinse extensively afterward.
Dealing with Mold or Algae Growth
If you notice green or black spots inside your dispenser, that’s mold or algae. This typically happens in dispensers that sit in direct sunlight or in warm environments. To tackle this, use a stronger vinegar solution or a diluted bleach solution (one part bleach to ten parts water).
Pour the solution into the reservoir and let it sit for 20 to 30 minutes. Then scrub vigorously with your brush, paying special attention to the spotted areas. Rinse multiple times to ensure no bleach residue remains. After this treatment, consider moving your dispenser to a cooler, darker location to prevent future growth.
Handling Unpleasant Odors
Sometimes your dispenser might smell a bit off, even if it looks clean. This usually indicates bacteria or stale water sitting inside. Baking soda is your hero here. Sprinkle some baking soda into the reservoir and add a little water to create a paste. Let it sit for an hour, then scrub and rinse thoroughly. The baking soda absorbs odors rather than just masking them, so this approach actually solves the problem.
How Often Should You Actually Clean Your Dispenser?
Creating a Maintenance Schedule
Here’s the honest truth—you should do a basic cleaning at least once a month. A quick rinse with vinegar and a brush takes about 30 minutes, and it prevents major buildup from occurring. If you use your dispenser heavily or live in an area with hard water, consider doing it every two weeks instead.
Once every three months, do a more thorough deep clean like the one I’ve described above. This comprehensive approach ensures that nothing unsavory is hiding in the darker corners of your machine. Think of it like visiting the dentist—regular maintenance prevents more serious problems down the road.
Seasonal Considerations
During warmer months, mold and algae growth accelerates, so you might need to clean more frequently. Winter is generally easier on your dispenser since bacteria grow more slowly in cooler temperatures. But don’t use this as an excuse to skip maintenance during winter—consistency is what really matters.
Common Mistakes People Make When Cleaning Dispensers
Using the Wrong Type of Water for Rinsing
I can’t stress this enough—always use distilled water for rinsing. Tap water contains minerals and chlorine that can leave residue or affect your water’s taste. If you use tap water to rinse, you’re basically undoing all your hard work. It’s like washing your car with dirty water.
Neglecting the Bottle Connection Point
The area where the water bottle connects to the dispenser is often overlooked. This spot can harbor bacteria and mineral deposits. When you remove the bottle, take a moment to wipe this connection point with a clean cloth. If it’s really gunky, use a slightly damp cloth with a tiny bit of vinegar.
Skipping the Tap Cleaning
Many people focus exclusively on the internal reservoir and forget about the dispensing tap. But the tap is where your water actually comes out, so it’s arguably one of the most important parts to keep clean. Make tap cleaning a non-negotiable part of your routine.
Preventing Future Buildup and Contamination
Smart Placement Strategies
Where you put your dispenser matters more than you might think. Keep it away from direct sunlight, which promotes algae growth. Place it on a stable, level surface away from moisture sources like windows or sinks. The cooler and darker the location, the slower bacteria will accumulate.
Proper Bottle Handling
When you change your water bottle, take a second to inspect the bottle connection point on both the dispenser and the bottle itself. A tiny bit of dust or debris here can lead to contamination. Wipe the bottle’s connection point with a clean cloth before inserting it into the dispenser.
Using Distilled Water in Your Dispenser
If possible, opt for distilled water rather than mineral water. Distilled water has fewer minerals that can build up over time, so your dispenser will stay cleaner longer. Yes, it might cost a bit more, but it’s an investment in both your health and your appliance’s longevity.
When to Call a Professional
Most cleaning tasks you can handle yourself, but there are situations where professional help is warranted. If your dispenser isn’t cooling or heating water properly despite being clean, there might be an internal mechanical issue. If you notice a persistent taste or odor that cleaning can’t eliminate, a professional inspection might reveal a problem you can’t see.
Also, if your dispenser is still under warranty, check whether doing maintenance yourself affects the warranty coverage. Some manufacturers have specific requirements for upkeep.
The Bottom Line: Make Cleaning a Habit
Keeping your 5-gallon water dispenser clean doesn’t require special skills or expensive equipment. It just requires consistency and a little elbow grease. By following this guide and establishing a regular cleaning schedule, you’ll ensure that every glass of water you draw is as fresh and clean as possible.
Your family’s health and your dispenser’s longevity depend on it. Take 30 minutes once a month, follow these steps, and you’ll have a perfectly functioning dispenser that provides clean, great-tasting water year after year. It’s really that simple.
Conclusion
Cleaning your 5-gallon water dispenser is one of those household tasks that often gets pushed to the back burner, but it really shouldn’t be. The process is straightforward, the supplies are inexpensive, and the benefits are significant. You’re not just keeping your dispenser looking nice—you’re protecting your family’s health and extending the life of your appliance.
Start with a thorough cleaning using the step-by-step method I’ve outlined. Then establish a monthly maintenance schedule to keep things running smoothly. Pay special attention to problem areas like the tap and the bottle connection point. Within just a few minutes each month, you’ll maintain a dispenser that delivers crystal-clear, fresh-tasting water every single time.
Remember, water is something you and your family consume multiple times every day. It deserves the same care and attention you’d give to any other important aspect of your home. Your dispenser will thank you for it, and your taste buds will too.
Frequently Asked Questions
How long does it take to completely clean a 5-gallon water dispenser?
A thorough deep cleaning typically takes between 45 minutes to an hour, depending on how much buildup your dispenser has accumulated. A quick monthly maintenance clean usually takes about 20 to 30 minutes. The first time you do it might take a bit longer since you’re learning the process, but once you’re familiar with the steps, you can work more efficiently.
Is it safe to use bleach when cleaning my water dispenser?
Bleach can be used, but it should always be diluted significantly—at most one part bleach to ten parts water. It’s best reserved for cases where you have visible mold or algae growth. Regular white vinegar is generally safer for routine cleaning and is just as effective for most situations. Always rinse multiple times if you do use bleach to ensure no residue remains.
Can I use regular tap water to rinse my dispenser after cleaning?
While it won’t hurt the machine, using tap water isn’t ideal. Tap water contains minerals and sometimes chlorine that can leave residue or affect the taste of your water. Distilled water is inexpensive and ensures you get a truly clean rinse without introducing new contaminants. It’s worth the small extra cost.
What’s that white film that appears inside my dispenser?
That white film is almost certainly mineral buildup, typically calcium and magnesium deposits from hard water. This is completely normal and doesn’t indicate a problem with your water quality. It does indicate that you need to