How to Clean Out Sediment From Water Heater: A Complete Guide
If you’ve noticed that your hot water doesn’t feel quite as hot as it used to, or maybe you’re hearing strange rumbling sounds coming from your water heater, there’s a good chance sediment buildup is the culprit. Think of your water heater like a coffee maker—over time, mineral deposits accumulate at the bottom, reducing efficiency and potentially damaging your appliance. The good news? Cleaning out that sediment is something you can handle yourself without calling in an expensive professional.
In this guide, I’m going to walk you through everything you need to know about sediment in your water heater, why it matters, and exactly how to clean it out step by step. Let’s dive in.
Understanding Water Heater Sediment: What You Need to Know
Before we get into the cleaning process, let’s talk about what sediment actually is and why it forms in the first place. Sediment in your water heater isn’t dirt or debris floating around—it’s primarily made up of minerals like calcium and magnesium that naturally occur in your water supply. When water is heated, these minerals lose their solubility and sink to the bottom of your tank, forming a layer of sediment over time.
This process is similar to how salt crystallizes when water evaporates. The hotter your water heater’s temperature setting, the faster this sediment accumulates. If you live in an area with hard water (water with high mineral content), you’re probably dealing with sediment buildup more frequently than someone in a soft water region.
The Impact of Sediment on Your Water Heater
So why should you care about this sediment layer? The answer is straightforward: it directly affects your water heater’s performance and lifespan. When sediment builds up on the heating element, it acts as an insulator, making your heater work harder to reach the desired temperature. This increased workload translates to higher energy bills and faster wear on your equipment.
Additionally, sediment can trap moisture against the metal tank walls, creating an environment where rust and corrosion develop more quickly. Over time, this corrosion can lead to leaks and complete tank failure. Regular sediment removal is like changing the oil in your car—it’s preventative maintenance that extends the life of your investment.
Signs That Your Water Heater Needs Sediment Cleaning
How do you know when it’s time to clean out your water heater? Here are the most common warning signs:
- Reduced hot water temperature despite the thermostat being set correctly
- Rumbling, popping, or crackling sounds coming from the tank
- Discolored or cloudy hot water
- Longer wait times for hot water to arrive at your faucets
- Unusually high energy bills
- Small leaks around the tank base
If you’re experiencing any of these issues, your water heater is probably sending you a message: it’s time for a cleaning session.
Tools and Materials You’ll Need
The beauty of cleaning your water heater is that you don’t need specialized equipment. Let me break down exactly what you should gather before starting:
- A garden hose or utility hose long enough to reach from your heater to a floor drain
- An adjustable wrench or socket set
- A flathead screwdriver
- Bucket (for catching water)
- Towels or rags for drying
- Safety glasses
- Work gloves
- A submersible pump (optional, but helpful for faster draining)
Having everything ready before you start will save you time and frustration. There’s nothing worse than getting halfway through a job and realizing you’re missing something important.
Safety Precautions: Protect Yourself First
Before you touch anything on your water heater, let’s talk safety. Water heater tanks contain extremely hot water under pressure, and if you’re not careful, you could get seriously burned. I’m not trying to scare you—just being honest about what you’re dealing with.
Essential Safety Steps
First, turn off the power supply to your water heater. If you have an electric heater, switch off the breaker at your electrical panel. If you have a gas heater, turn the thermostat to the pilot setting. Wait at least thirty minutes for the water inside to cool down to a safer temperature. I know thirty minutes feels like a long time, but trust me, burns from 140-degree water are no joke.
Next, wear safety glasses and work gloves throughout the entire process. The water that comes out might contain sediment particles that could irritate your eyes, and your hands will thank you for the protection. Finally, make sure your work area is well-ventilated and that you have easy access to the drain valve and fill valve.
Step-by-Step Guide: How to Drain and Clean Your Water Heater
Now for the main event. Follow these steps carefully, and you’ll have your water heater running like new in no time.
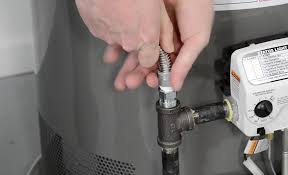
Step 1: Locate and Prepare Your Drain Valve
On the bottom of your water heater tank, you’ll find a drain valve that looks like a small faucet. This is your gateway to draining the sediment. Before you open it, decide where you’re going to direct the water. Ideally, you want to use a floor drain, but if you don’t have one nearby, you can run a hose outside or to a sump pump. Attach your garden hose to the drain valve if your setup requires it.
If your drain valve is small or corroded, you might need to use an adjustable wrench to open it. Be gentle—if the valve breaks, you’ll have a much bigger problem on your hands.
Step 2: Open the Cold Water Supply Valve
At the top of your water heater, you’ll see the cold water inlet valve. Open this valve slightly, just a crack. This allows air to enter the tank as water drains, which makes the draining process much faster and more efficient. Without this step, you’ll deal with a vacuum that slows everything down significantly.
Step 3: Open the Drain Valve and Let It Flow
Now it’s time to open the drain valve fully. Stand back and let the water flow out. Remember, this water is hot, so give it space and don’t put your hands underneath. The first water that comes out will be the dirtiest, containing most of the sediment and debris. As the tank drains, the water should become progressively clearer.
Depending on your tank size, complete draining can take anywhere from fifteen minutes to an hour. This is a perfect time to grab a coffee or catch up on your email. Just stay nearby so you can monitor the process.
Step 4: Flush the Tank to Remove Remaining Sediment
Once the tank is completely drained, don’t close the drain valve yet. Instead, open the cold water inlet valve fully to allow fresh, cold water to rush into the tank. This incoming water will stir up any remaining sediment that hasn’t drained out and flush it through the drain valve. You’ll notice the water coming out gets dirty again—this is exactly what you want to happen.
Let this flushing process continue for several minutes. It’s common to need to repeat this cycle multiple times until the water flowing out appears clear. Some people perform this flush cycle three to five times for optimal results, especially in heavily sediment-laden tanks.
Step 5: Close the Drain Valve and Refill
Once you’re satisfied with the water clarity, close the drain valve completely. Make sure it’s tight, but don’t over-tighten it or you might damage the valve. Now you can also close the cold water inlet valve. Disconnect your garden hose from the drain valve.
Next, open all your hot water faucets throughout your home and let them run for a minute. This helps purge air from the lines. You might see some air bubbles or spitting—this is completely normal and will settle down quickly.
Post-Cleaning: Getting Your Water Heater Back to Normal
Congratulations—you’ve successfully cleaned out your water heater! But the work isn’t quite finished. There are a few final steps to ensure everything operates smoothly.
Restoring Power to Your Water Heater
If you have an electric water heater, wait until the tank is completely full and the air has been purged from the lines before turning the breaker back on. For gas heaters, you can turn the thermostat back to your desired temperature setting. The water heater will now begin reheating your fresh, sediment-free water.
It typically takes an hour or two for your tank to reach full temperature, depending on the size and heating capacity. During this time, you might hear some unfamiliar sounds as the heating element warms up—this is normal and will subside once the water reaches temperature.
Checking for Leaks
Over the next couple of hours, periodically check around the base of your water heater and near the drain valve for any signs of leaking. If you spot water, it could mean the drain valve didn’t seal properly. In that case, you might need to tighten it further or, if it’s severely damaged, replace it.
Preventing Future Sediment Buildup
Now that you’ve gone through the effort of cleaning your water heater, you probably want to minimize how often you need to do this again. The good news is there are several strategies you can employ.
Regular Maintenance Schedule
The frequency of sediment cleaning depends on your water hardness. If you have soft water, you might only need to flush your tank annually. With moderately hard water, aim for a flush every six to twelve months. If you live in an area with very hard water, you might benefit from quarterly maintenance.
I recommend marking your calendar with a reminder so you don’t forget. Think of it as an appointment with your water heater—show up on time and you’ll both be happier.
Install a Water Softener
If sediment buildup is a persistent problem in your home, investing in a water softening system could be worthwhile. Water softeners remove the minerals that cause sediment formation in the first place, meaning your water heater will stay cleaner longer and run more efficiently. While there’s an upfront cost, the energy savings and extended appliance lifespan often justify the investment.
Lower Your Water Heater Temperature
Here’s something most people don’t realize: lowering your water heater temperature from 140 degrees to 120 degrees not only reduces sediment accumulation but also saves energy and makes accidental scalding less likely. Unless you have a specific reason for extremely hot water, 120 degrees is typically sufficient for most household uses.
When to Call a Professional
While sediment cleaning is a task many homeowners can handle themselves, there are situations where professional help is warranted. If your drain valve is corroded or broken and won’t open, if you notice significant leaking after cleaning, or if you’re uncomfortable working with your specific water heater model, calling a licensed plumber is the smart choice.
It’s not a sign of failure—it’s a sign of good judgment. A professional can address issues more quickly and with less risk of damage to your system.
Common Mistakes to Avoid
Let me share some mistakes I’ve seen people make so you don’t repeat them:
- Skipping the cool-down period and getting burned by hot water
- Forgetting to open the cold water inlet valve, which slows draining significantly
- Over-tightening the drain valve and breaking it
- Closing the drain valve before all sediment is flushed out
- Not allowing enough time for the tank to refill before turning power back on
- Ignoring leaks after cleaning and hoping they’ll go away
Avoid these pitfalls and your cleaning project will go smoothly.
Understanding Your Water Heater Better
Taking the time to clean your water heater is also a great opportunity to familiarize yourself with how the system works. Understanding the location of your drain valve, the temperature and pressure relief valve, and the cold water inlet makes future maintenance easier and faster.
You might even want to take a photo or two of your water heater and its components so you have a reference if you need to troubleshoot issues later. Knowledge is power when it comes to home maintenance.
Cost Comparison: DIY Versus Professional Service
A professional water heater flush typically costs between eighty and two hundred dollars, depending on your location and the complexity of your system. Doing it yourself costs virtually nothing beyond your time—maybe ten to twenty dollars for any supplies you don’t already have on hand. If you’re comfortable following instructions and taking basic safety precautions, the DIY route offers substantial savings.
Conclusion
Cleaning sediment from your water heater is one of those home maintenance tasks that seems intimidating until you actually do it, at which point you realize it’s manageable and straightforward. By following this guide, you’re taking control of your home’s efficiency and prolonging the life of an appliance that provides daily comfort to your family.
Remember to prioritize safety, take your time with each step, and don’t hesitate to call a professional if you encounter any problems beyond your comfort level. Regular maintenance—whether you do it yourself or hire someone—will keep your water heater running smoothly for years to come. Your future self will thank you for the effort you put in today.
Frequently Asked Questions
How often should I clean sediment from my water heater?
The frequency depends on your water hardness. In areas with soft water, an annual flush is usually sufficient. For moderately hard water, aim for every six to twelve months. If you have very hard water, consider flushing quarterly. Pay attention to the warning signs like reduced hot water temperature or rumbling sounds—these indicate it’s time for cleaning regardless of the schedule.
Can sediment buildup completely ruin my water heater?
Yes, unchecked sediment accumulation can eventually cause your water heater to fail completely. The sediment traps moisture against the tank walls, promoting rust and corrosion that can lead to leaks and structural failure. Additionally, the constant strain of operating with a sediment layer significantly reduces your appliance’s lifespan. Regular cleaning prevents this scenario.
Is it dangerous to drain hot water from my water heater?
The water in your tank can be extremely hot—often over 140 degrees Fahrenheit—which can cause serious burns. This is why I emphasize waiting at least thirty minutes after turning off power before opening the drain valve. Always wear protective gear, keep children and pets away from the work area, and test the water temperature with your hand before fully exposing yourself to the drain area.
What if my drain valve won’t open?
A corroded or stuck drain valve is frustrating but not uncommon, especially in older systems. Try using penetrating oil like WD-40 around the valve stem and wait fifteen minutes before attempting to open it. If it still won’t budge, you may need to replace the entire valve. This is an excellent time to call a professional plumber rather than risk damaging your tank further.
Will cleaning my water heater improve my water pressure or water quality?
Cleaning your water heater won’t significantly affect your water pressure throughout your home, as pressure is maintained by your municipal water system or well pump. However, you may notice clearer, better-tasting