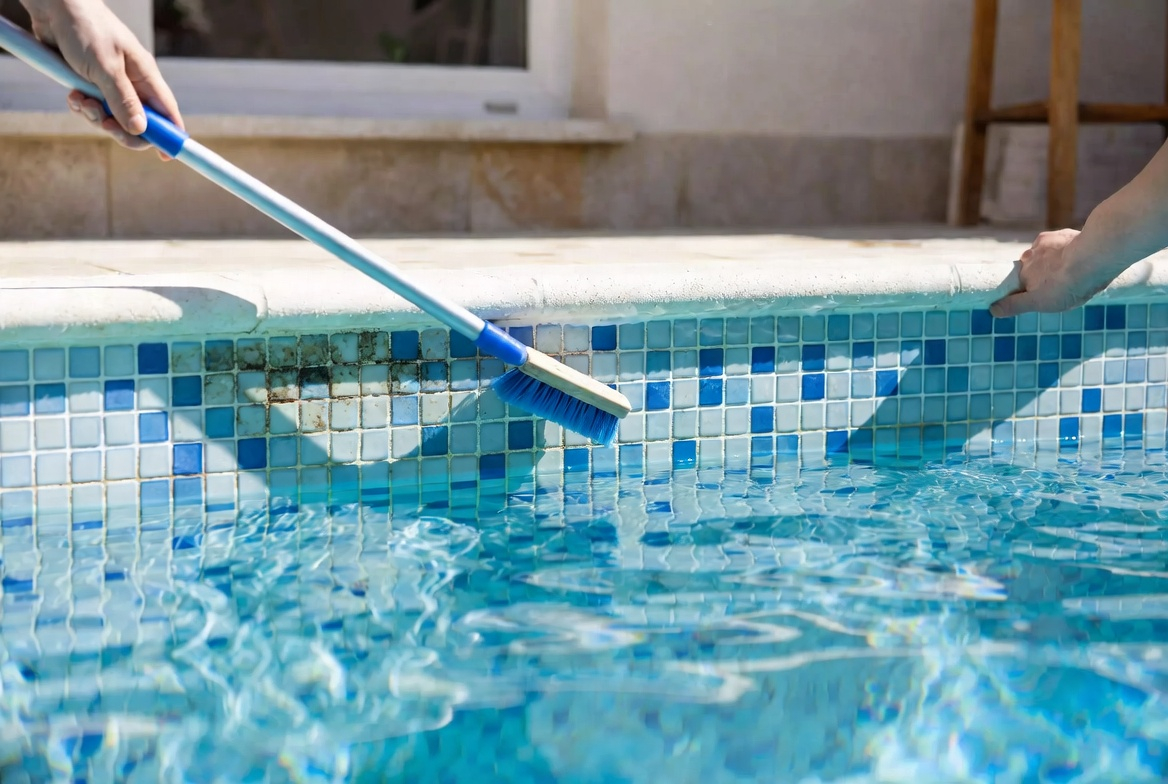
How to Clean Pool Tiles Above Water Line: A Complete Guide to Sparkling Poolside Beauty
There’s something deeply satisfying about looking at a pristine swimming pool, isn’t there? The crystal-clear water gleaming in the sunlight, the deck perfectly maintained—it all contributes to that resort-like atmosphere we all crave in our backyards. But here’s the thing: many pool owners focus so much on water chemistry and filtration that they completely overlook one of the most visible parts of their pool—the tiles above the waterline.
If you’ve noticed unsightly white crusty deposits, dark mold spots, or stubborn algae stains creeping up your pool tiles, you’re not alone. This is one of the most common pool maintenance challenges, and it can make even the most beautiful pool look neglected. The good news? I’m going to walk you through exactly how to clean pool tiles above the water line so they look brand new again.
Understanding Why Pool Tiles Get Dirty Above the Waterline
Before we jump into the cleaning methods, let’s talk about why these tiles get so grimy in the first place. When you understand the enemy, you can fight it more effectively.
Calcium and Mineral Buildup
Think of your pool water as a mineral cocktail. When water evaporates from the pool surface, it leaves behind all the dissolved minerals it contained. Calcium is the biggest culprit here. Over time, these minerals accumulate right at the waterline, creating those stubborn white or gray crusty deposits that seem nearly impossible to remove. This buildup is especially pronounced in areas with hard water.
Algae and Mold Growth
The tiles above the waterline are like a perfect breeding ground for algae and mold. They get splashed regularly, which keeps them moist. They’re exposed to sunlight. They’re in a warm environment. It’s basically paradise for these unwanted microorganisms. The result? Dark green or black spots that make your pool look unhygienic, even if the water itself is perfectly balanced.
Environmental Debris
Dust, pollen, leaves, and other environmental debris settle on the tiles and combine with moisture to create a grimy coating. This debris can also interact with minerals in the water to create stubborn stains that regular water won’t wash away.
Essential Tools and Materials You’ll Need
Before you start scrubbing away, gather your supplies. Having everything ready prevents frustrating mid-project trips back to the store.
- A soft-bristled brush or pool brush
- A stiff-bristled brush for more stubborn deposits
- White vinegar
- Baking soda
- A pressure washer (optional but highly effective)
- Rubber gloves to protect your hands
- Safety glasses to keep splashes out of your eyes
- A bucket for mixing solutions
- An old toothbrush for tight spaces
- Towels for drying
- Commercial pool tile cleaner (optional)
The White Vinegar Method: Nature’s Cleaning Champion
I’m a big advocate for using natural cleaning solutions when possible, and white vinegar is genuinely one of the best tile cleaners you can use. It’s safe, effective, affordable, and you probably already have some in your kitchen.
Why Vinegar Works So Well
Vinegar is acidic, and that acidity is what makes it such a powerhouse against calcium deposits and mineral buildup. The acid dissolves the mineral compounds that regular water can’t touch. Plus, it’s gentle enough that it won’t damage your tiles or harm the pool water when small amounts splash back.
Step-by-Step Vinegar Cleaning Process
Pour undiluted white vinegar into a spray bottle. You don’t need to dilute it for tough deposits—straight vinegar gives you maximum cleaning power. Spray the affected tiles generously, coating them completely. Let the vinegar sit for about ten to fifteen minutes. This dwell time is crucial because it allows the acid to work on breaking down the mineral deposits.
Now grab your soft-bristled brush and scrub in circular motions. For light deposits, the soft brush is usually sufficient. For heavier buildup, switch to your stiff-bristled brush and apply more pressure. Once you’ve scrubbed away the bulk of the deposits, spray the area with clean water to rinse everything away.
For Stubborn Calcium Deposits
If you’re dealing with really stubborn deposits that won’t budge, create a paste by mixing white vinegar with baking soda. This combination creates a mild abrasive that works mechanically as well as chemically. Apply the paste to the problem areas and let it sit for twenty minutes. Then scrub with your stiff brush and rinse thoroughly.
The Baking Soda Approach for Gentle Yet Effective Cleaning
Sometimes you want a gentler option, especially if your tiles are delicate or if you’re worried about damaging the grout. Baking soda is your answer.
Creating Your Baking Soda Solution
Mix three parts baking soda with one part water to create a paste that’s thick enough to cling to your tiles without immediately running off. You want consistency similar to peanut butter. If it’s too thick, add a tiny bit more water. If it’s too thin, add more baking soda.
Application and Scrubbing
Apply your baking soda paste directly onto the tiles above the waterline. Use your soft-bristled brush to work it in with gentle circular motions. Baking soda is less aggressive than vinegar, so you might need to apply a bit more elbow grease, but it’s still highly effective. Let the paste sit for about ten minutes before scrubbing for the best results.
Pressure Washing: The Heavy Hitter Method
If you’re dealing with years of buildup or really stubborn stains, a pressure washer can be a game-changer. However, this method requires some caution.
Safety Considerations When Pressure Washing
First and foremost, never aim the pressure washer at anyone or any living thing. The water pressure can cause serious injury. Always wear safety glasses because water spray can bounce back at your face. Start with low pressure and test a small, inconspicuous area first to make sure the pressure won’t damage your tiles or grout. Some tiles or grout can be damaged by excessive pressure, so go gradually.
Best Practices for Pressure Washing Pool Tiles
Use a pressure washer with around 1500 to 2000 PSI for most pool tiles. Hold the nozzle at about a forty-five degree angle and keep it moving so you don’t concentrate pressure on one spot. Work from top to bottom so dirty water runs down naturally. This method is fantastic for removing mineral deposits, algae, and general grime in one pass.
Tackling Algae and Mold Stains
Algae and mold require a slightly different approach than mineral deposits because you’re dealing with living organisms that need to be killed, not just dissolved.
The Bleach Solution Method
Mix one part bleach with four parts water in a bucket. Wear rubber gloves and safety glasses for this one because bleach is caustic. Apply the solution to the affected areas using a spray bottle or brush. Let it sit for fifteen to twenty minutes—the bleach needs time to kill the algae and mold spores. Scrub gently with your soft-bristled brush, then rinse thoroughly with clean water. The key here is that bleach kills the organisms, preventing them from returning as quickly.
Preventing Algae Regrowth
After cleaning, keep the tiles as dry as possible. Algae loves moisture, so improve water drainage around your pool deck if you can. Consider installing a pool skimmer to catch more debris that might otherwise settle on the tiles. Maintaining proper chlorine levels in your pool water also helps prevent algae from spreading to the waterline area.
Commercial Pool Tile Cleaners: When to Use Them
Sometimes natural solutions aren’t enough, or you simply don’t have time for DIY methods. Commercial pool tile cleaners can be incredibly effective.
Choosing the Right Commercial Cleaner
Look for products specifically designed for pool tiles. Read the label carefully to understand what they’re designed to remove—mineral deposits, algae, or general grime. Some are specifically formulated for above-waterline cleaning, which means they’re more likely to rinse away completely without affecting your pool chemistry.
Following Manufacturer Instructions
This is crucial. Different products have different application methods, dwell times, and safety precautions. Don’t skip the instructions, and always test on a small area first. Wear the recommended protective equipment, and ensure proper ventilation if the product has strong fumes.
The Importance of Regular Maintenance
Here’s something many pool owners don’t realize: consistent light maintenance beats occasional heavy-duty cleaning every single time. Think of it like brushing your teeth daily versus waiting until you have cavities to see a dentist.
Weekly Maintenance Routine
Once a week, spend fifteen minutes wiping down the tiles above the waterline with a damp cloth. This prevents buildup from accumulating in the first place. It’s so much easier to wipe away fresh deposits than to battle calcified mineral crusts that have been sitting for months.
Monthly Deep Cleaning
Once a month, do a more thorough cleaning using one of the methods I’ve described. This keeps your tiles looking pristine and prevents the need for major restoration work later. Monthly cleaning is genuinely a small time investment that pays huge dividends in pool appearance and longevity.
Dealing With Grout Lines
Grout lines are notorious for trapping dirt and showing stains prominently. They require special attention.
Cleaning Grout Without Damage
Use your old toothbrush with your vinegar or baking soda solution to carefully clean grout lines. The soft bristles of a toothbrush allow you to get into narrow spaces without forcing too hard. For stubborn grout stains, a small wire brush can work, but be careful not to scratch the grout or the tiles themselves. Work patiently—rushing leads to damage.
Sealing Grout for Future Protection
After cleaning, consider applying a grout sealer. This creates a protective barrier that makes future cleaning easier and prevents stains from penetrating as deeply. Grout sealer is a simple application that takes minimal effort and provides months of protection.
Preventing Future Stains and Buildup
An ounce of prevention is worth a pound of cure, as they say. Here are practical steps to keep your tiles cleaner longer.
Water Chemistry Balance
Maintaining proper water chemistry reduces mineral precipitation at the waterline. Work with your pool professional to keep calcium hardness at recommended levels. High calcium hardness accelerates deposit formation, so staying on top of this makes a real difference.
Improve Drainage
Ensure water drains properly away from your pool deck. Standing water leads to more algae and mineral deposit formation. Good drainage is your silent ally in keeping tiles clean.
Maintain Proper Chlorine Levels
Adequate chlorination prevents algae and mold growth. Your pool professional can recommend ideal levels for your specific pool.
When to Call in Professional Help
Sometimes the situation is beyond DIY solutions, and that’s okay. Professional pool cleaners have industrial-grade equipment and specialized training.
Signs You Need Professional Cleaning
If you’ve tried multiple methods and the stains persist, if you notice damage to your tiles or grout, or if you simply don’t have the time or physical ability to clean properly, professional services are worth the investment. They can often restore tiles to like-new condition using methods not available to homeowners.
Conclusion
Cleaning pool tiles above the waterline doesn’t have to be an overwhelming challenge. Whether you choose the natural route with vinegar and baking soda, the heavy-duty approach with a pressure washer, or a combination of methods, you now have the knowledge to restore your pool’s appearance. The key is understanding that consistency matters more than intensity—regular light maintenance prevents the need for extreme measures later.
Start with the method that seems most appealing to you, and don’t hesitate to adjust your approach based on results. Every pool is different, and what works perfectly for your neighbor might need tweaking for your specific situation. Most importantly, commit to a regular maintenance routine. Your future self will thank you when you’re not battling years of accumulated buildup. Your pool deserves to look as good as it feels, and now you have all the tools and knowledge to make that happen.
Frequently Asked Questions
Can I use regular household bleach to clean my pool tiles above the waterline?
Yes, you can use regular household bleach diluted at a ratio of one part bleach to four parts water. This solution effectively kills algae and mold spores. However, always wear gloves and safety glasses, ensure proper ventilation, and test a small area first. Avoid getting bleach in your pool water, and rinse thoroughly with clean water after cleaning. If you have any concerns about your specific tile material, consult the manufacturer’s recommendations first.
How often should I clean the tiles above my pool’s waterline?
Ideally, you should do light maintenance weekly by wiping the tiles with a damp cloth, and perform a more thorough cleaning monthly. In areas with high humidity, hard water, or lots of environmental debris, you might need to clean every two to three weeks. Some pool owners in challenging climates clean every week. The frequency depends on your specific conditions and how quickly buildup accumulates in your pool.
Will vinegar damage my pool tiles or affect the pool water?
White vinegar is safe for pool tiles and won’t damage most tile materials or grout. The small amount that might splash back into the pool won’t significantly affect your water chemistry. However, if you’re using large quantities, some pH adjustment might be needed. Always rinse thoroughly after cleaning with vinegar to minimize any amount entering the pool water.
What’s the best way to clean pool tiles if I have calcium deposits that seem impossible to remove?
For stubborn calcium deposits, create a paste from white vinegar and baking soda and let it sit for twenty minutes before scrubbing. If that doesn’t work, a pressure washer at 1500-2000 PSI can be highly effective. As a last resort, commercial calcium removal products designed specifically for pool tiles can dissolve stubborn deposits that other methods can’t tackle. Always follow the product instructions carefully.
Is it safe to use a pressure washer on all types of pool tiles?
Not all tiles respond equally to pressure washing. Ceramic and porcelain tiles generally handle pressure well, but natural stone tiles like travertine can be damaged by high pressure. Always start with low pressure and test on a small, inconspicuous area first. Hold the nozzle at a 45-degree angle and keep it moving rather than concentrating on one spot. When in doubt, use gentler methods like vinegar or commercial cleaners to protect your tiles.
“`