How to Drain Water in LG Washing Machine Easily: A Complete Guide
Why You Might Need to Drain Your LG Washing Machine
Have you ever found yourself staring at your LG washing machine, wondering why water won’t drain properly? You’re not alone. Sometimes your washing machine gets stubborn, and you need to take matters into your own hands. Whether you’re dealing with a clogged drain, a malfunctioning pump, or you’re simply preparing your machine for storage, knowing how to drain water manually is an essential skill every homeowner should have.
Think of your washing machine like a living organism that occasionally needs help to function properly. Just as we sometimes need a little assistance to get back on track, your washing machine might require manual intervention now and then. Understanding this process isn’t just about fixing an immediate problem—it’s about taking control of your appliance’s health and longevity.
Safety First: Preparing Your Machine for Drainage
Essential Safety Precautions
Before you even think about touching your washing machine’s drain system, let’s talk about safety. I can’t stress this enough—safety should always come first. Here are the critical steps you need to follow:
- Unplug your LG washing machine from the electrical outlet completely
- Wait at least five minutes after unplugging to ensure all electrical charge has dissipated
- Wear protective gloves to protect your hands from sharp edges and bacteria
- Ensure the area around your machine is dry to prevent slipping hazards
- Have towels or a bucket nearby to catch water that will drain out
- Make sure children and pets are not nearby during the draining process
Why am I emphasizing these precautions so much? Because water and electricity are never friends, and you want to avoid any potential accidents. Taking these steps might feel like overkill, but they’re the difference between a safe, successful repair and a potentially dangerous situation.
Gathering Your Tools and Materials
You won’t need a professional toolkit to drain your LG washing machine. In fact, most of us have these items lying around our homes. Here’s what you’ll need:
- Two to three large towels or absorbent cloths
- A bucket or container with a capacity of at least five gallons
- A flashlight for better visibility
- Protective gloves (rubber or latex)
- A small flathead screwdriver (sometimes needed to open panels)
- Optional: a wet vacuum for faster water removal
Having everything ready before you start is like preparing ingredients before cooking. You won’t waste time searching for items mid-process, and your draining experience will be smooth and hassle-free.
Understanding Your LG Washing Machine’s Drainage System
How the Drainage System Works
Let me explain how your LG washing machine actually drains water so you can better understand what’s happening inside. Your washing machine has a drainage system that works like this: water from your wash cycle is pushed out by a drain pump, travels through a drainage hose, and exits into your home’s drainage system or a laundry sink.
However, the journey isn’t always smooth. Along the way, water passes through a drain pump filter—a small but mighty component that catches lint, coins, and other debris that shouldn’t make it into your pipes. When this filter gets clogged, it’s like a traffic jam in your machine’s water flow, and that’s when you need to step in.
Different LG Washing Machine Models
Not all LG washing machines are created equal. Your model might be a front-loader or a top-loader, and each has slightly different drainage approaches. The good news? Once you understand the basic principles, you can adapt them to your specific machine. Most LG machines follow similar drainage patterns, which means these instructions will work for the vast majority of their products.
Locating the Drain Pump Filter on Your LG Machine
Finding the Access Panel
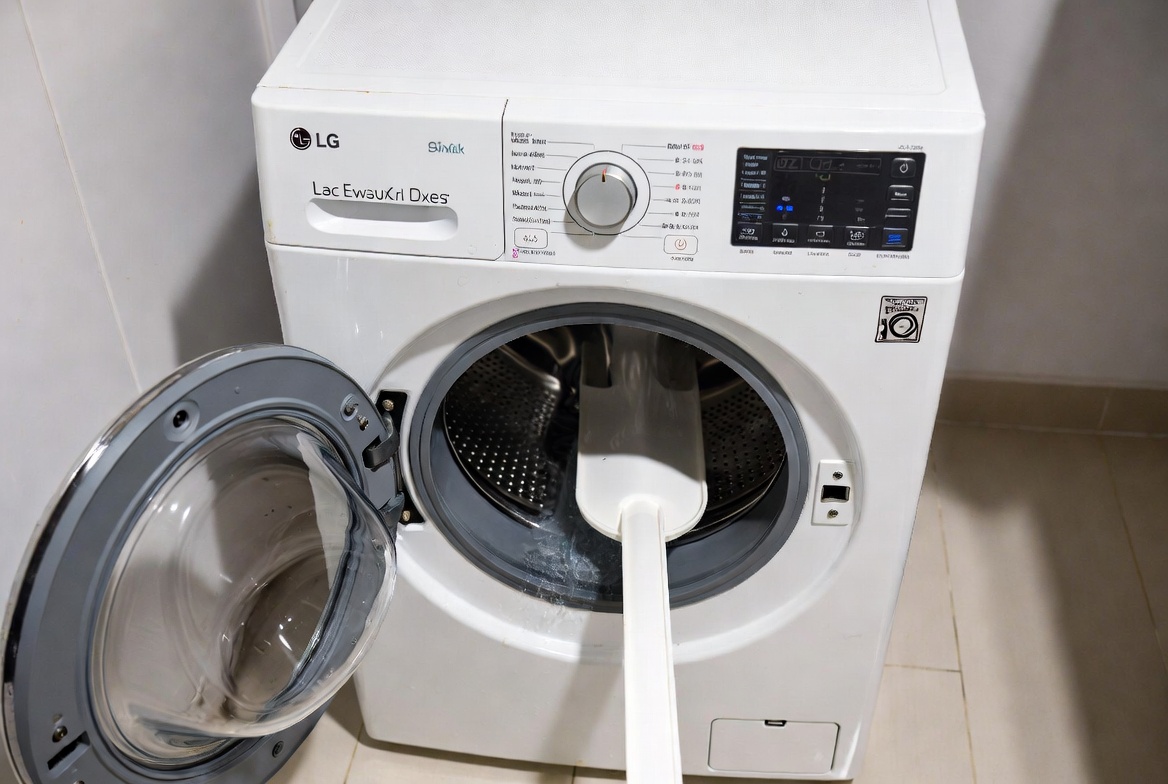
The first step in the actual draining process is finding where your drain pump filter is located. On most LG front-loading washing machines, the drain pump filter is located at the bottom front of the machine. You’ll need to open the front access panel, which is usually held in place with a few simple clips or screws.
Pull the bottom of the panel toward you gently. Don’t force it—let it come away naturally. If it seems stuck, check for additional clips or screws you might have missed. Some models have a small plastic tab you need to press to release the panel. Think of it as a puzzle—there’s always a logical solution.
Identifying the Drain Pump Filter
Once you’ve opened the access panel, you’ll see the drain pump filter. It’s usually a cylindrical or oval-shaped component, and you can easily identify it by its distinctive appearance. It typically has a large knob or handle that you can grip and turn.
Next to the filter, you might also notice an emergency drain valve. This is a small tube or lever that we’ll talk about using in a moment. Having a flashlight handy here is really helpful because the access area can be quite dark, and you want to see exactly what you’re working with.
Method 1: Using the Emergency Drain Valve
Quick Water Release Technique
If your washing machine has an emergency drain valve, this is probably the quickest way to get water out. This valve is specifically designed for situations exactly like this—when you need immediate drainage without waiting for the regular cycle.
Locate the small hose or tube near your drain pump filter. This is your emergency drain valve. Place your bucket or towels underneath it. Gently pull or twist the valve cap, and water will start flowing out. The flow might be forceful at first, so make sure your container is ready. This method is like opening a fire hydrant compared to other methods—it’s fast and effective.
Keep the bucket in position until the water stops flowing. Depending on how much water is in your machine, this could take anywhere from two to five minutes. Once the flow completely stops, you can replace the valve cap and move on to the next step if needed.
Method 2: Manual Draining Through the Pump Filter
Step-by-Step Draining Process
Now let’s go through the manual draining process step by step. This method is slightly more involved than using the emergency valve, but it’s incredibly effective and allows you to access the filter itself, which might be clogged.
First, take your flashlight and get a clear view of the drain pump filter. Position your bucket directly underneath it. Some water will spill out when you open the filter, so having your towels ready is essential. Now, grasp the handle of the drain pump filter firmly and turn it counterclockwise. You might need to apply some gentle pressure, but it should rotate smoothly.
As you turn, water will begin draining out. Continue rotating until the filter is completely removed. Don’t pull it straight out—turn it all the way until it’s free from its housing. Some machines have a slight threading, so rotating ensures a clean removal.
Inspecting and Cleaning the Filter
Once the filter is out, take a moment to examine it. You’ll likely be surprised at what you find—lint, coins, small objects, and other debris accumulate here over time. This is probably why your machine wasn’t draining properly.
Rinse the filter under running water, removing all visible debris. Use your fingers to gently scrub away stubborn lint. If there’s significant buildup, let it soak in warm water for a few minutes, then gently scrub again. Never use harsh chemicals or abrasive materials on the filter—just warm water and your hands.
Reinstalling the Filter
After cleaning, it’s time to put the filter back. Insert the filter back into its housing and turn it clockwise. You should feel some resistance when it reaches the correct position—this means it’s seated properly. Turn it until it’s snug but don’t over-tighten. Think of it like closing a jar—firm enough that it’s secure, but not so tight that the next person can’t open it.
Complete Water Drainage Process
Ensuring All Water Is Removed
Sometimes, even after using the emergency valve and the filter method, water still remains in your machine. This residual water often sits in the drum or pump area. Here’s how to ensure you’ve gotten every last drop:
After reinstalling the filter, tilt your washing machine slightly if it’s a front-loader. Place a bucket underneath the drain area and open the filter access again. Any remaining water will drain out. It’s like shaking the last drops from a water bottle—it takes a little extra effort but ensures completeness.
Checking the Drain Hose
The drain hose is another potential source of water backup. This is the hose that runs from your machine to your home’s drainage system. Check that it’s not kinked or bent in a way that would prevent water flow. If it appears clogged, you might need to disconnect it and run water through it to clear any blockages.
To disconnect the drain hose safely, you’ll typically need to unscrew the connection points at both ends of the hose. Have your bucket ready because there will be water in the hose itself. Once disconnected, you can spray water through it with your kitchen faucet to clear any debris.
Troubleshooting Common Draining Problems
Water Still Won’t Drain After Filter Cleaning
If water stubbornly refuses to drain even after you’ve cleaned the filter and checked the hose, there might be a deeper issue. The drain pump itself could be faulty, or there might be a blockage in your home’s drainage system. Try running your kitchen sink or taking a shower—if they drain slowly too, the issue is likely with your home’s plumbing, not your machine.
Another possibility is that the pump itself isn’t functioning. Listen carefully when your machine is in drain mode. You should hear a humming sound, which indicates the pump is working. If you hear nothing, the pump might need replacement, and that’s when you should call a professional.
Excessive Noise During Draining
If your machine makes grinding or rattling noises when draining, something solid is probably stuck in the pump. This could be a foreign object like a piece of wire from an underwire bra, a button, or even a coin that made it past the filter. Unfortunately, removing these objects sometimes requires professional help, but it’s worth checking the filter area thoroughly first.
Slow Draining Issues
Maybe your machine does drain, but it takes forever. This is usually a sign that your drain pump filter needs cleaning, or the drain hose has a partial blockage. Start with the filter cleaning method we discussed, and if that doesn’t improve things, inspect and clean your drain hose. Slow draining is often the most frustrating problem, but it’s usually the easiest to solve.
Preventive Maintenance to Avoid Future Drainage Problems
Regular Filter Cleaning Schedule
Prevention is always better than cure, and the same applies to your washing machine. I recommend cleaning your drain pump filter at least once a month, especially if you have a large family or do a lot of laundry. This simple maintenance task takes just five minutes but prevents most drainage problems from occurring in the first place.
Mark it on your calendar or set a phone reminder. Making it a habit is key. Think of it as brushing your teeth for your washing machine—a small regular effort prevents major problems down the road.
Checking for Lint and Debris
Use a lint trap or filter bag in your washing machine if your LG model offers one. These catch lint before it reaches the drain system. Additionally, empty your pockets before washing clothes. Those coins, tissues, and small objects are the main culprits that cause drainage problems.
Inspecting Hoses Regularly
Every three months, visually inspect your drain hose for kinks, cracks, or signs of wear. If you notice any damage, replace the hose immediately. A small crack can develop into a major leak, and a kinked hose can restrict water flow. Most replacement hoses are inexpensive and easy to install yourself.
When to Call a Professional Technician
Signs You Need Professional Help
While many drainage issues are DIY-friendly, some situations require professional intervention. If you’ve cleaned the filter, checked the hose, and water still won’t drain, it’s time to call in the experts. Similarly, if you hear electrical humming but no mechanical sounds, or if you smell burning, stop immediately and contact a technician.
Water leaking from underneath your machine is another sign that you should get professional help. This could indicate a pump seal failure, which requires replacement. Additionally, if the filter is cracked or the pump housing appears damaged, professional repair is necessary.
Finding a Qualified LG Technician
When searching for a technician, look for someone certified by LG or someone with substantial experience fixing LG appliances specifically. Ask for references and check online reviews. Make sure they provide a warranty on their work. Getting multiple quotes is a smart approach—compare pricing and services before making your decision.
Additional Tips for LG Washing Machine Maintenance
Maintaining Your Machine’s Overall Health
Beyond drainage, your LG washing machine needs regular care. Run a cleaning cycle monthly using a commercial washing machine cleaner. This removes detergent buildup and keeps your machine fresh. Leave the door open between cycles to prevent mold and mildew growth—this is especially important for front-loaders.
Use the correct amount of detergent. Using too much actually reduces cleaning effectiveness and creates excessive suds that can interfere with drainage. Modern detergents are more concentrated than older formulations, so you often need less than you think.
Understanding Your Machine’s Cycles
Familiarize yourself with your LG machine’s different cycles and settings. Many people use settings that aren’t ideal for their loads. For example, delicate cycles use less water and gentler agitation, which might not fully drain on their own. Understanding these nuances helps you use your machine more effectively and avoid problems.
Conclusion
Draining water from your LG washing machine might initially seem like a daunting task, but as you’ve learned throughout this guide, it’s actually quite straightforward. Whether you use the emergency drain valve for quick relief or go through the more thorough manual draining process by accessing the pump filter, you now have the knowledge to handle this situation confidently.
Remember that the key to long-term success is preventive maintenance. Clean your filter regularly, inspect your hoses, and treat your washing machine with care. Most drainage problems are preventable with just a little attention and effort. By taking these steps, you’re not just fixing an