How to Install a Toilet Water Supply Valve Easily
Are you tired of dealing with a leaky or malfunctioning toilet water supply valve? Perhaps you’re moving into a new home and need to install a fresh one. Whatever the reason, replacing a toilet’s water supply valve can seem like a daunting task for the average homeowner. However, I’m here to tell you that with a little know-how and the right tools, it’s actually a relatively straightforward process that you can tackle yourself.
In this comprehensive guide, I’ll walk you through the step-by-step process of installing a new toilet water supply valve. I’ll cover everything from choosing the right valve, to turning off the water supply, to making the final connections. By the end, you’ll have the confidence and skills needed to get your toilet’s water flow working like new. So, let’s dive in and get that valve replaced!
Preparing for the Installation
Gathering the Necessary Tools
Before you can begin the installation, you’ll need to make sure you have all the necessary tools and materials on hand. Here’s what you’ll typically need:
- New toilet water supply valve
- Adjustable wrench
- Pliers
- Teflon tape
- Bucket or towel
- Flashlight (optional)
Turning Off the Water Supply
The first and most crucial step is to turn off the water supply to your toilet. This is typically done by locating the shut-off valve behind the toilet and turning it clockwise until it stops. Once the water is shut off, flush the toilet to release any remaining water in the tank and bowl.
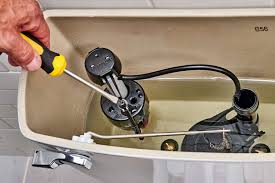
Removing the Old Valve
Disconnecting the Supply Line
With the water supply turned off, you can now begin removing the old valve. Start by disconnecting the supply line from the valve. This is usually done by unscrewing the nut that connects the line to the valve using an adjustable wrench.
Removing the Valve from the Wall
Next, you’ll need to remove the valve from the wall. This may involve unscrewing it from the wall or, in some cases, cutting the valve off if it’s been soldered in place. Be careful during this step, as the valve may be stuck in place and require some elbow grease to remove.
Installing the New Valve
Preparing the Wall
Before you can install the new valve, you’ll need to prepare the wall. This may involve cleaning the surface, filling any holes, or making adjustments to the plumbing if necessary.
Attaching the Valve to the Wall
With the wall prepared, you can now attach the new valve. This is usually done by screwing the valve into the wall or connecting it to the existing plumbing. Make sure to use Teflon tape on the threads to ensure a tight, leak-proof seal.</
Connecting the Supply Line
Once the valve is securely in place, you can reattach the supply line. Simply screw the nut back onto the valve, making sure it’s tight and secure.
Turning the Water Back On
With the new valve installed, it’s time to turn the water supply back on. Slowly turn the shut-off valve counterclockwise until the water starts flowing, and then check for any leaks around the valve or supply line connection.
Conclusion
Replacing a toilet water supply valve may seem like a daunting task, but with the right tools and a little bit of know-how, it’s a job that any homeowner can tackle. By following the steps outlined in this guide, you’ll be able to install a new valve quickly and easily, ensuring that your toilet is functioning properly and leak-free. So, don’t be afraid to take on this plumbing project – with a little patience and perseverance, you can have your toilet’s water supply working like new in no time.
FAQs
How do I know if my toilet water supply valve needs to be replaced?
There are a few signs that your toilet water supply valve may need to be replaced, such as a leaky valve, difficulty turning the valve, or a malfunctioning toilet fill valve. If you notice any of these issues, it’s a good idea to inspect the valve and consider replacing it.
What type of toilet water supply valve should I use?
The type of valve you choose will depend on the specific requirements of your toilet and plumbing system. Most standard toilets use a 1/2-inch supply valve, but it’s always a good idea to measure the existing valve and purchase a replacement that matches the size and configuration.
Can I turn the water back on before the new valve is installed?
No, it’s important to wait until the new valve is fully installed and secured before turning the water back on. Turning the water on before the installation is complete could result in leaks or other water damage.
How do I prevent leaks around the new valve?
To prevent leaks around the new valve, be sure to use Teflon tape on the threads and tighten all connections securely. It’s also a good idea to check for any cracks or damage in the wall where the valve is being installed, and address any issues before proceeding.
Can I replace the toilet water supply valve myself, or should I hire a plumber?
In most cases, replacing a toilet water supply valve is a relatively straightforward DIY project that can be completed by the average homeowner. However, if you’re not comfortable working with plumbing or have any concerns about the complexity of the installation, it’s always a good idea to hire a professional plumber to ensure the job is done correctly.