How to Check Heating Element on Water Heater: A Complete DIY Guide
Introduction: Why Your Water Heater Matters
Have you ever jumped into a cold shower without warning? That’s what happens when your water heater’s heating element fails. Your water heater is like the heart of your home’s hot water system, and the heating element is essentially the engine that keeps it pumping. Think of it as the spark plug in your car—when it goes bad, everything stops working properly.
If you’ve noticed your water isn’t getting hot anymore, or if it’s only lukewarm at best, there’s a good chance your heating element needs attention. The question is: do you need to call an expensive technician, or can you check it yourself? The truth is, with some basic knowledge and the right tools, you can absolutely test your heating element without breaking the bank.
Understanding What a Heating Element Actually Is
The Basic Function
Let’s talk about what we’re actually dealing with here. A heating element is essentially a coiled wire or rod that heats up when electrical current flows through it. It’s similar to the heating coil in a toaster or a microwave, but designed specifically for water. Most electric water heaters have one or two of these elements—one near the top of the tank and potentially another near the bottom.
When you flip the switch on your water heater, electricity travels through the heating element, causing resistance that generates intense heat. This heat transfers to the water surrounding it, warming it up to your desired temperature. It’s a straightforward process, but when something goes wrong, it can leave you without hot water faster than you can say “cold shower.”
How Many Heating Elements Does Your Heater Have?
Most residential electric water heaters come equipped with two heating elements. The upper element usually turns on first to heat water at the top of the tank, while the lower element takes over once that section reaches the set temperature. This dual-element setup ensures efficient heating and faster recovery times. However, some smaller units or older models might have just one element.
Your water heater’s manual will tell you exactly how many elements yours has, but you can also determine this by looking at the side or top of your tank. You’ll see round covers or plates—each one is an access point to a heating element.
Safety First: Precautions Before You Begin
Electricity and Water Don’t Mix
Before we go any further, let me be crystal clear about something: electricity and water are a dangerous combination. This isn’t just a safety suggestion—it’s essential. When working with your water heater’s electrical components, you’re dealing with potentially lethal voltage. Respect that power, and you’ll stay safe.
The first thing you absolutely must do is cut power to your water heater. Locate your water heater’s circuit breaker and switch it off completely. Don’t just turn it to a lower setting—actually switch it off. Wait a few minutes after doing this before you touch anything electrical. The electrical charge needs time to dissipate.
Drain the Tank Before Testing
Your water heater likely contains 40 to 80 gallons of hot water under pressure. When you open the access panels to reach the heating elements, you could get scalded. This is no minor concern—we’re talking about water that could be 120 degrees Fahrenheit or hotter. To prevent this, you need to drain some water from the tank first.
Turn off the cold water inlet valve, then open the drain valve at the bottom of your water heater. Let water drain into a bucket or out of a hose until the pressure decreases and it’s safe to work. You don’t necessarily need to drain the entire tank, but lowering the water level below where you’ll be working is crucial for your safety.
Other Safety Measures
- Wear safety glasses to protect your eyes from splashes and debris
- Use insulated gloves when handling any electrical connections
- Keep a fire extinguisher nearby, just in case
- Never work on your water heater during storms or electrical warnings
- If you’re uncomfortable at any point, stop and call a professional
Tools and Equipment You’ll Need
Essential Tools for Testing
You don’t need an extensive toolkit to check your heating element, but having the right tools makes the job significantly easier and safer. Let’s go through what you’ll actually need:
- A multimeter (digital or analog) for testing electrical continuity
- An adjustable wrench or socket set for removing the heating element
- A screwdriver set (both Phillips and flathead)
- A bucket for catching water
- Towels or rags for cleanup
- Safety glasses and insulated gloves
- A flashlight for better visibility inside the tank
- A thermostat tester (optional but helpful)
Understanding Your Multimeter
A multimeter is your best friend when testing a heating element. This device measures electrical properties like voltage, current, and resistance. You can pick up a basic digital multimeter for under thirty dollars, and it’s an investment that pays for itself. If you’ve never used one before, don’t worry—we’ll walk through exactly how to use it step by step.
Step-by-Step: How to Check Your Heating Element
Step One: Turn Off Power and Drain Water
We’ve mentioned this before, but it bears repeating because it’s so important. Switch off the circuit breaker for your water heater. Give it several minutes. Then, turn off the cold water inlet valve and open the drain valve to release pressure and lower the water level.
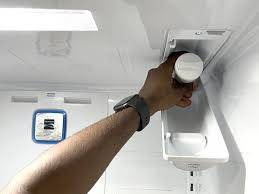
Step Two: Remove the Access Panel
Once power is off and water has drained, locate the upper heating element access panel. You’ll typically find it on the side of the water heater, protected by a metal or plastic cover. Remove any insulation or blanket surrounding it, then use your screwdriver to remove the screws holding the access panel in place. Be gentle—you’ll want to reuse these screws later.
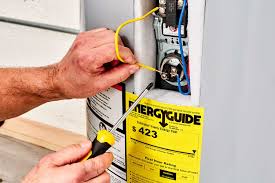
Step Three: Identify the Electrical Connections
Under that access panel, you’ll see the heating element assembly. It consists of several parts: the heating element itself (usually a visible metal rod or coil), terminal screws where wires connect, and often a thermostat dial. Take a moment to observe the setup. Take a photo with your phone if it helps you remember how to reassemble everything.
Step Four: Test Using a Multimeter
Set your multimeter to the resistance setting (usually marked with an ohm symbol that looks like an upside-down U with a line). This measures continuity—whether electricity can flow through the element. The resistance of a working heating element typically falls between 10 and 20 ohms, though this varies by model.
Disconnect the wires from the heating element terminals. Touch the multimeter probes to each terminal of the heating element. A working element will show a resistance reading within the normal range. A broken element will show either zero resistance or infinite resistance (typically displayed as “OL” on your meter, meaning “overload” or no continuity).
Step Five: Visual Inspection
Sometimes you don’t even need a multimeter. If you can see the heating element directly, look for obvious signs of failure. A visibly burned out or corroded element is clearly done for. You might see white, chalky deposits (mineral buildup), rust, or actual cracks or holes in the metal.
Interpreting Your Test Results
What Good Results Look Like
If your multimeter shows a resistance reading between 10 and 20 ohms, congratulations—your heating element is likely functioning properly. This means electricity is flowing through it as intended, generating heat as it should. If this is your result, your lack of hot water might stem from a different problem, like a faulty thermostat or a broken dip tube.
What Bad Results Look Like
If your meter reads “OL” or shows no resistance at all, your heating element has failed and needs replacement. Similarly, if you get an extremely high or extremely low resistance reading (way outside the normal range), the element is compromised. It’s not worth trying to repair an element—replacement is the correct solution.
The Gray Area: Questionable Readings
Sometimes you get readings that seem off but not completely wrong. If you’re getting inconsistent results or readings that seem borderline, the element might be failing gradually. In this situation, I’d recommend replacing it sooner rather than later. A partially failed heating element is just a failure waiting to happen.
When to Replace Your Heating Element
Signs of a Failing Element
Beyond the multimeter test, several real-world signs indicate your heating element is on its way out. Has your water heater been making loud popping or cracking noises? That’s typically mineral buildup on the element burning off. Is the water sometimes scalding hot and sometimes lukewarm? That suggests an element struggling to maintain consistent temperature. Do you notice the recovery time is longer than it used to be? A weakening element heats water more slowly.
The Age Factor
Most heating elements last between eight and fifteen years, depending on water quality and usage. If yours is approaching the upper end of that range and showing any signs of trouble, replacement might be wise simply as preventive maintenance. It’s far better to replace an element proactively than to be without hot water unexpectedly.
Cost Considerations
A replacement heating element itself typically costs between fifty and two hundred dollars, depending on your water heater model. If you do the replacement yourself, you’re only paying for the part. A technician visit, on the other hand, might run you three hundred to six hundred dollars when you factor in labor and service calls. That’s a compelling reason to consider the DIY route if you’re even slightly comfortable with it.
Troubleshooting Common Problems
The Multimeter Won’t Turn On
First, check the batteries. A dead battery in your multimeter is the most common culprit. If batteries are fine but it still won’t power on, the device itself might be faulty. Try borrowing one from a friend or buying another—they’re inexpensive.
You Can’t Get a Clear Reading
Make sure you’ve completely disconnected the wires from the heating element terminals. If wires are still partially connected, your reading will be inaccurate. Also, ensure the multimeter probes are making solid contact with the terminals. Sometimes oxidation or dirt prevents good contact—wipe the terminals clean with a dry cloth and try again.
The Element Looks Fine But There’s Still No Hot Water
Your heating element might be perfectly fine, but other components could be failing. The thermostat that controls temperature is a common culprit. The dip tube that carries cold water to the bottom of the tank can break, mixing cold water with your hot supply. The check valve might be failing. These issues require different solutions than element replacement.
DIY Replacement Versus Professional Service
When DIY Makes Sense
If you’re mechanically inclined, enjoy learning, and have confirmed the heating element is definitely the problem, replacing it yourself can save significant money. The process isn’t dramatically more difficult than testing it. You’d simply remove the old element and screw in a new one, reconnect the wires, refill the tank, and restore power.
When Professional Help Is Worth It
If you’re uncomfortable working with electricity, if your water heater is still under warranty (replacing it yourself might void the warranty), or if you discovered something unexpected during your inspection, call a professional. A licensed technician can handle unexpected complications and guarantee the work. Peace of mind sometimes justifies the cost.
Preventing Future Heating Element Problems
Regular Maintenance Practices
You can extend your heating element’s life through simple maintenance. Flushing your water heater annually removes mineral buildup that corrodes elements. Installing a water softener if you live in a hard water area reduces sediment accumulation. These preventive steps add years to your equipment’s lifespan.
Temperature Settings Matter
Setting your thermostat too high stresses the heating element. Most homes only need water heated to 120 degrees Fahrenheit. Lowering the temperature by just ten degrees can meaningfully extend element life while also saving energy costs. It’s a win-win situation.
Conclusion
Checking your water heater’s heating element isn’t as mysterious or complicated as it might initially seem. With basic safety precautions, the right tools, and our step-by-step guidance, you can confidently test whether your heating element is working properly. Remember that safety comes first—disconnect power, drain water, and take your time. If your testing reveals a failed element, you have options: tackle the replacement yourself if you’re comfortable doing so, or call a professional to handle it. Either way, you now understand what’s happening inside your water heater and can make informed decisions about repairs and maintenance going forward. Your hot showers await.
Frequently Asked Questions
How long does it typically take to test a heating element?
The actual testing process usually takes between fifteen and thirty minutes once you’ve safely accessed the element and prepared your multimeter. Factor in additional time for draining the tank, removing access panels, and carefully reconnecting everything. The entire job from start to finish might take an hour or two, but most of that is preparation and safety procedures rather than the testing itself.
Can I test a heating element while the power is still on?
Absolutely not. Testing with power connected is extremely dangerous and could result in electrocution. Always switch off the circuit breaker and wait several minutes before touching any electrical components. This is non-negotiable for your safety. A few minutes of waiting is worth your life.
What does it mean if my multimeter shows infinite resistance?
Infinite resistance (typically shown as “OL” on your meter) means the heating element has an open circuit—electricity cannot flow through it at all. This indicates a broken element that needs replacement. It’s no longer capable of generating heat and cannot be repaired. Replacement is your only option.
Is it safe to use my water heater if I suspect a bad heating element?
Technically, a failed heating element won’t cause your water heater to explode or create an immediate safety hazard beyond the obvious lack of hot water. However, you shouldn’t delay replacing it. A non-functioning element means your water stays cold, which affects your comfort and daily routine. Additionally, a heating element that’s failing might be causing electrical strain on other components, potentially leading to additional problems.
Can mineral deposits damage my heating element?
Absolutely. Mineral buildup is one of the primary reasons heating elements fail prematurely. Hard water deposits create a