How to Check Salinity of Water Accurately: A Complete Guide
Understanding Water Salinity: What You Need to Know
Water salinity might sound like a technical term reserved for scientists in lab coats, but honestly, it’s something many of us encounter without realizing it. Simply put, salinity refers to the amount of salt dissolved in water. Think of it like making tea—the more sugar you add, the sweeter it becomes. Similarly, the more salt dissolved in water, the higher its salinity.
Most people associate salinity with ocean water, and they’re right to do so. Ocean water contains roughly 35 parts per thousand of dissolved salts, which is why it tastes so distinctly salty. But here’s where it gets interesting: salinity levels vary dramatically depending on where that water comes from. Freshwater rivers might have almost zero salinity, while inland salt lakes can be even saltier than the ocean itself.
Why Does Salinity Matter in Different Contexts?
You might be wondering why you should care about checking salinity in the first place. Well, the answer depends entirely on what you’re using the water for. If you’re managing an aquarium, the salinity level directly impacts whether your fish and coral can survive. Get it wrong, and your beloved aquatic pets won’t last long. If you’re involved in agriculture, soil salinity affects crop growth dramatically. For industrial applications, water salinity can impact everything from cooling systems to manufacturing processes.
Then there’s the health angle. People who consume water with extremely high salinity levels might experience health complications. Even in smaller amounts, high salinity can affect taste and water quality in your home. This is why municipalities test water salinity regularly, and why you might want to do the same if you rely on well water.
The Science Behind Salinity Measurement
How Salt Affects Water Properties
Here’s something fascinating: salt doesn’t just make water taste bad. It actually changes the water’s physical properties in measurable ways. When you dissolve salt in water, it increases the water’s density. This is why it’s easier to float in the Dead Sea than in a regular swimming pool—the higher salinity makes you more buoyant.
Salt also affects the conductivity of water, meaning it changes how well water conducts electricity. Pure distilled water is actually a poor conductor of electricity, but add some salt to it, and suddenly it conducts electricity much more effectively. This principle is the foundation behind one of the most popular salinity testing methods.
What We’re Actually Measuring
When scientists talk about salinity, they’re typically referring to the total amount of dissolved salts, measured in parts per thousand or PSU (practical salinity units). However, in practice, we’re often measuring the conductivity of the water, which correlates directly with salinity. It’s an indirect measurement, but it’s incredibly reliable and much easier to perform than chemically analyzing every salt particle in a sample.
Digital Salinity Meters: The Modern Approach
How Digital Meters Work
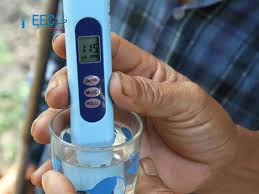
Digital salinity meters, also called conductivity meters or TDS meters, are probably the most straightforward tools for checking salinity at home. These handheld devices measure electrical conductivity and convert that measurement into salinity readings. They’re the modern solution to an age-old problem, and they’re incredibly user-friendly.
The mechanism is elegantly simple. Inside the meter, there are two electrodes that create a small electrical field. When you dip the meter into your water sample, the dissolved salts complete the circuit and allow electricity to flow. The meter measures the resistance to this flow and calculates salinity based on that resistance. Higher salinity means better conductivity, which means lower resistance.
Choosing the Right Digital Meter
Not all digital meters are created equal. You’ll find options ranging from budget-friendly models under twenty dollars to professional-grade instruments costing several hundred. For casual home testing, a mid-range meter between fifty and one hundred dollars usually provides excellent accuracy.
When selecting a digital meter, look for these features:
- A display that’s easy to read, preferably with backlight for use in dimly lit areas
- Automatic temperature compensation, which adjusts readings based on water temperature
- A durability rating suitable for your environment
- Calibration capability so you can ensure accuracy over time
- A measurement range that covers your expected salinity levels
Using a Digital Meter Step by Step
Using a digital salinity meter is straightforward, but doing it correctly ensures you get accurate readings. First, calibrate your meter according to the manufacturer’s instructions. Most meters come with calibration solution, and this step is crucial because even small calibration errors compound over time.
Next, take a fresh water sample in a clean container. Avoid using containers that previously held salty water or soap, as residue can contaminate your sample. Allow the water to reach room temperature if possible, since temperature affects conductivity readings. Then simply immerse the meter’s sensor into the water sample, wait for the reading to stabilize, and note the salinity value. Most meters stabilize within thirty seconds to a minute.
Refractometer Method: The Precision Tool
Understanding Refractometry
A refractometer works on a completely different principle than a digital meter. Instead of measuring electrical conductivity, a refractometer measures how light bends as it passes through water. Salt-laden water bends light differently than pure water, and by observing this difference, we can determine salinity.
These instruments are particularly popular in marine aquarium hobby circles and professional marine biology. They tend to be more accurate than digital meters for extremely high salinity levels, making them ideal if you’re working with seawater or hypersaline solutions.
How to Use a Refractometer
Using a refractometer feels almost scientific, which some people genuinely enjoy. You’ll place a small drop of your water sample onto the instrument’s prism. Then you’ll look through the eyepiece at a scale that appears in the viewing area. The scale shows where the light and shadow boundary falls, and this directly corresponds to salinity.
The process takes only a minute or two. However, accuracy depends on consistent technique and proper calibration. Most refractometers require calibration with distilled water before use. If you purchase a quality refractometer, expect to spend between sixty and two hundred dollars depending on the precision level you need.
Advantages and Limitations of Refractometers
The main advantage of refractometers is their superior accuracy, especially at higher salinity levels. They’re also less susceptible to contamination from ions other than salt. The biggest limitation? They require a steady hand and good eyesight, plus they’re more expensive than digital meters. They also require more careful maintenance and can be damaged if dropped.
Hydrometer Testing: The Traditional Method
What Is a Hydrometer?
Before digital electronics transformed laboratory work, hydrometers were the standard tool for measuring water density and, by extension, salinity. A hydrometer is simply a weighted tube that floats in water. The denser the water, the higher the hydrometer floats. By marking the hydrometer with a scale, you can read off the salinity directly.
Hydrometers are relatively inexpensive, typically costing between ten and thirty dollars, and they require no batteries or calibration. They’re simple, mechanical, and have been used successfully for centuries. However, they’re less accurate than modern alternatives, and they require a fairly tall glass of water to work properly.
Using a Hydrometer Correctly
To use a hydrometer, fill a tall, narrow glass with your water sample. Gently place the hydrometer into the water and allow it to float freely. Wait a few moments for it to stabilize, then read the scale where the water line intersects the hydrometer’s body. Most hydrometers have different scales for different purposes, so make sure you’re reading the correct scale for salinity.
One critical factor: temperature matters with hydrometers. The scale is typically calibrated for a specific temperature, often sixty degrees Fahrenheit. If your water is warmer, it’s less dense and the hydrometer floats lower. If it’s colder, it floats higher. Many hydrometers include temperature correction charts to account for this variation.
DIY Home Testing Methods for Water Salinity
The Evaporation Method
If you want to understand salinity conceptually and don’t need precise measurements, try the evaporation method. It’s the most hands-on approach and gives you a visual demonstration of how much salt is actually in your water.
Here’s how it works: Take a measured amount of your water sample—say, one cup—and pour it into a shallow dish. Leave it in a warm location where it can evaporate naturally or place it in an oven set to low temperature. As the water evaporates over several hours or days, the salt remains behind. Once all the water has evaporated, weigh the remaining salt crystals and compare that weight to your original water volume. This ratio gives you a rough salinity measurement.
This method is far from precise, but it’s educational and requires nothing but containers you probably already have at home.
Conductivity Testing Without a Meter
Here’s a surprising fact: you can get a very rough idea of water salinity using a simple battery and LED circuit. Pure water doesn’t conduct electricity well, so an LED won’t light up. But add salt to water, and suddenly the conductivity increases dramatically, and the LED glows. By observing how brightly the LED glows, you can make a rough comparison between different water samples.
This method isn’t accurate enough for scientific purposes, but it’s a fun demonstration and works in a pinch if you need a ballpark comparison between water samples.
Common Mistakes People Make When Testing Salinity
Neglecting Calibration
The number one mistake people make with digital meters is skipping calibration. A meter that hasn’t been calibrated recently will give you readings that are off, sometimes by significant amounts. Calibration should be done before your first use and regularly afterward, typically once every month or two depending on how frequently you test.
Using Contaminated Water Samples
Another common error is using dirty containers or allowing soap residue to contaminate samples. Even tiny amounts of soap can dramatically affect conductivity readings. Always use clean containers that haven’t previously held salty substances, and rinse them with distilled water before use.
Ignoring Temperature Effects
Temperature significantly impacts conductivity and refraction. Testing water that’s just come out of the refrigerator will give different results than testing room-temperature water. Wait for your sample to reach room temperature before testing, or use a meter with automatic temperature compensation.
Not Maintaining Equipment
Digital meter sensors can degrade over time, especially if exposed to harsh conditions. Refractometer lenses can get scratched or cloudy. Hydrometers can develop cracks. Regular maintenance and proper storage extend your equipment’s life and ensure continued accuracy.
Maintaining Your Salinity Testing Equipment
Digital Meter Care
After each use, rinse your digital meter’s sensor with distilled water to remove any residual salt. Never let it dry with salt crystals on it. Store it in a cool, dry place away from extreme temperatures. Replace batteries before they completely die, as dead batteries can sometimes damage the circuit. Protect the sensor from sharp objects and physical damage.
Refractometer Maintenance
Refractometers require more delicate care. After use, wipe the prism surface with a soft, lint-free cloth. Never use harsh chemicals or solvents unless specifically recommended by the manufacturer. Store it in a protective case and keep it away from extreme temperatures and humidity. Check the calibration regularly, especially if the refractometer hasn’t been used in a while.
Hydrometer Storage
Hydrometers are fragile instruments. Store them lying flat in a protective case or standing upright in a tall container with distilled water. Never let them dry out completely, as the glass can become brittle. Handle them gently and avoid dropping them on hard surfaces.
Comparing Different Salinity Testing Methods
Each method has strengths and weaknesses. Digital meters are fast, affordable, and user-friendly but require occasional calibration. Refractometers are extremely accurate but more expensive and require careful handling. Hydrometers are inexpensive and reliable but less accurate and temperature-sensitive. DIY methods are free but provide only rough estimates.
For most home aquarium enthusiasts, a digital meter offers the best balance of price, accuracy, and ease of use. For professional or scientific work, refractometers are worth the investment. For educational purposes or when you just need a quick comparison, hydrometers work fine.
Best Practices for Accurate Salinity Measurements
Preparing Your Water Sample
Start with a clean container and use distilled water to rinse it if you suspect contamination. Collect enough water to submerge your testing device fully, usually at least a quarter cup. Allow the sample to reach room temperature before testing. If testing multiple samples, use a fresh container for each one to avoid cross-contamination.
Testing Technique
Take measurements consistently using the same technique each time. With digital meters, immerse the sensor fully but gently, without pressing it against the container bottom. With refractometers, use the same amount of sample each time and ensure consistent light conditions. With hydrometers, use the same depth of water each time.
Recording Your Results
Keep a log of your measurements along with the date, time, and water source. Record the temperature when you took the measurement. Over time, this log reveals trends and helps you identify problems. If salinity suddenly increases or decreases unexpectedly, that log helps you investigate what changed.
Understanding Salinity Readings and What They Mean
Pure distilled water reads zero salinity or zero PSU. Freshwater typically ranges from zero to one PSU. Brackish water, which is a mix of salt and fresh water found in estuaries, usually falls between one and ten PSU. Seawater averages around thirty-five PSU. Hypersaline waters like the Dead Sea or Utah’s Great Salt Lake can exceed fifty PSU or even higher.
For aquarium purposes, saltwater fish need readings around thirty-five PSU, while brackish fish prefer five to fifteen PSU. Freshwater fish absolutely cannot tolerate anything above two or three PSU. These ranges aren’t arbitrary—they reflect what these creatures evolved to survive in.
Troubleshooting Common Salinity Testing Issues
Digital Meter Readings Seem Off
If your meter is giving inconsistent readings, first suspect the calibration. Recalibrate using fresh calibration solution. If readings are still off, the sensor might be dirty. Try cleaning it gently