How to Check Thermostat on Electric Water Heater: A Complete Guide
Have you noticed your shower water isn’t as hot as it used to be? Or maybe you’re getting scalding hot water that seems wasteful? The culprit might be hiding inside your electric water heater, and it goes by the name of thermostat. Think of your water heater’s thermostat like the heart of the system—it’s responsible for keeping everything running at just the right temperature. If you’re wondering how to check thermostat on electric water heater, you’ve landed in exactly the right place.
I’m going to walk you through this process step by step, breaking it down so that even if you’ve never touched a water heater before, you’ll feel confident enough to diagnose what might be going wrong. Let’s dive in and get your water heater back to delivering that perfect, consistent temperature you deserve.
Understanding Your Electric Water Heater and Its Thermostat
Before we jump into the nitty-gritty of checking your thermostat, let’s talk about what this component actually does. Your electric water heater contains one or two thermostats, depending on whether it’s a standard or commercial model. These thermostats act as temperature sensors and control switches all rolled into one neat package.
The primary thermostat sits near the bottom heating element and acts as the main controller. If your water heater has a second thermostat, it’s usually positioned higher up and functions as a backup or upper thermostat. These little devices are constantly working behind the scenes, turning the heating element on and off to maintain your desired water temperature.
Why Your Thermostat Matters More Than You Think
Here’s the thing—a malfunctioning thermostat can throw your entire water heating system into chaos. When it’s working properly, your thermostat ensures that your water stays at a consistent, safe temperature without being wastefully hot or disappointingly cold. When it starts to fail, you might experience fluctuating water temperatures, insufficient hot water, or even dangerously scalding water coming from your taps.
The good news is that checking your thermostat doesn’t require a plumbing degree or specialized tools. You just need a basic multimeter, some safety precautions, and about thirty minutes of your time.
Safety First: Preparation Before You Begin
I cannot stress this enough—working with electrical appliances demands respect and caution. Before you even think about opening up your water heater, you need to take several critical safety steps.
Essential Safety Precautions
- Turn off the power supply at your breaker box. Flip the circuit breaker that controls your water heater to the off position.
- Wait at least ten to fifteen minutes after shutting off power. This allows any remaining electrical charge to dissipate safely.
- Test the power outlets near your water heater with a non-contact voltage tester to confirm the power is truly off.
- Wear safety glasses to protect your eyes from any debris or mineral deposits.
- Use an insulated screwdriver when working with electrical components, just to be extra safe.
- If you have any doubts whatsoever, call a licensed plumber. Your safety is worth the investment.
Gathering Your Tools and Materials
You won’t need an extensive toolkit, but having the right items on hand will make this process smoother and safer. Here’s what I recommend gathering before you start:
- A multimeter with ohm and voltage settings
- Insulated screwdrivers (both flathead and Phillips)
- A non-contact voltage tester
- Safety glasses
- Work gloves
- A flashlight or headlamp for better visibility
- A notepad to record thermostat settings
Locating Your Electric Water Heater’s Thermostat
Now that you’re properly prepared, let’s find that thermostat. On most electric water heaters, the thermostat isn’t just sitting out in the open like the temperature dial on your oven. It’s tucked behind an access panel, usually covered with insulation.
Where to Look for Your Thermostat
Look at the side of your water heater tank. You’ll see a metal or plastic cover plate, typically rectangular in shape. This is your access panel. In some cases, there might be two of these panels stacked vertically—one for the upper thermostat and one for the lower. The lower thermostat is usually your primary control point.
Once you’ve located the panel, you might notice it’s held in place with screws or it might just be a flip-off cover. Some newer models have what looks like a rectangular outline with small slits—this is where you’ll need to insert a flathead screwdriver to pry it open gently.
Removing the Access Panel Safely
If your panel is screwed in, carefully remove the screws and set them aside in a safe place where you won’t lose them. If it’s a clip-on design, insert your flathead screwdriver into one of the slits and gently pry outward. The panel should come free without too much resistance.
Behind that panel, you’ll see your thermostat. It’s usually a rectangular device with a dial or digital display on the front. You might also see an upper access panel above it if your water heater has two thermostats.
Understanding Thermostat Controls and Settings
Before you start checking anything, let’s make sure you understand what you’re looking at. Your thermostat has several important features.
The Temperature Dial and Settings
The most visible part of your thermostat is usually a dial with temperature markings. These typically range from around 90 degrees Fahrenheit on the low end to 150 degrees Fahrenheit on the high end. Most manufacturers recommend setting your water heater to 120 degrees Fahrenheit, which strikes a balance between comfort and energy efficiency while reducing scalding risks.
Some thermostats have settings labeled as “Low,” “Medium,” and “High” instead of specific temperatures. If yours is this type, “Medium” typically corresponds to around 120 degrees.
Other Components You’ll See
Beyond the dial, you might notice a reset button—that’s a safety device that trips if the water gets too hot. There are also usually two electrical terminal connections where wires attach to the thermostat. These connections are crucial for the thermostat’s operation and for your testing.
How to Check If Your Thermostat Is Working Properly
Alright, here’s where the actual checking begins. There are several ways to determine if your thermostat is functioning correctly.
Method One: The Visual Inspection Approach
Start with the simplest method. Look at your thermostat carefully. Is the dial in a reasonable position? Does it seem stuck or damaged? Sometimes a thermostat fails simply because minerals and sediment have caked onto the sensor, preventing it from reading temperature accurately.
If you notice any of the following visual signs, your thermostat likely needs attention:
- Corrosion or white crusty deposits on the thermostat body
- A dial that won’t move when you try to adjust it gently
- Burn marks or discoloration on the electrical contacts
- Visible water damage or leaking around the thermostat area
Method Two: The Temperature Comparison Test
Here’s a practical test you can do without any special equipment. Check what temperature your thermostat is currently set to. Then, turn on the hot water at a sink and let it run for a minute. Use a reliable thermometer to check the actual temperature of the water coming out.
If your thermostat is set to 120 degrees but your actual water temperature is only 100 degrees, or if it’s scalding at 140 degrees when it should be at 120, you’ve identified a problem. This discrepancy suggests your thermostat isn’t accurately controlling the heating element.
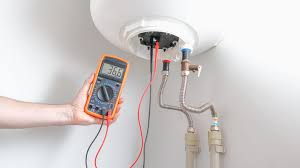
Method Three: The Multimeter Test
This is the most definitive way to check your thermostat. A multimeter measures electrical resistance and voltage, which tells us whether your thermostat is actually communicating properly with the heating element.
Start by setting your multimeter to the ohms setting. This measures electrical resistance. At room temperature, your thermostat should show a closed circuit, meaning low resistance. When you adjust the temperature dial upward and then downward, you should hear or feel a clicking action, and the resistance reading should change.
If your multimeter shows infinite resistance regardless of the dial position, or if it stays the same no matter how you adjust the dial, your thermostat is likely defective and needs replacement.
Testing the Upper and Lower Thermostats
If your water heater has two thermostats, you need to test both. The lower thermostat does most of the heavy lifting during normal operation, but the upper one kicks in when you’ve used a lot of hot water quickly and the lower element needs help recovering.
Testing the Lower Thermostat First
The lower thermostat is usually your starting point. Follow the multimeter test I described above. Set it to ohms, connect your meter probes to the terminal connections, and observe how the reading changes as you adjust the dial. A properly functioning lower thermostat should show a transition from low to high resistance as you turn the dial from the minimum to maximum setting.
Testing the Upper Thermostat
Once you’ve confirmed the lower thermostat, move to the upper access panel if your water heater has one. The testing process is identical, but keep in mind that the upper thermostat might behave slightly differently since it’s designed to engage only under specific conditions.
Common Thermostat Problems and What They Mean
As you conduct your tests, you might discover specific problems. Let’s walk through what different findings actually indicate about your thermostat’s condition.
Problem One: Thermostat Won’t Click or Move
If the dial feels completely stuck or won’t move when you try to adjust it, mineral buildup is likely the culprit. Sediment accumulates inside your tank and can cake onto the thermostat’s internal components. Sometimes, gently tapping the thermostat with your screwdriver handle can help dislodge particles, but usually, replacement is the better option.
Problem Two: Water Temperature Constantly Fluctuates
If your water temperature bounces wildly between hot and cold, your thermostat might be cycling on and off erratically. This often happens when the temperature sensor is dirty or the contacts are corroded. Your multimeter test should reveal whether the thermostat is properly transitioning between open and closed states.
Problem Three: No Resistance Change When Adjusting Temperature
When your multimeter shows the same resistance reading no matter how you adjust the dial, your thermostat contacts are likely worn out or stuck. This means the thermostat can’t communicate the temperature change to the heating element, so the element either stays on constantly or stays off completely.
Problem Four: Water Is Constantly Too Hot or Too Cold
If water is always scalding regardless of your thermostat settings, the thermostat might be stuck in the on position. If water is always lukewarm, it might be stuck in the off position. Either situation indicates a thermostat that’s failed and needs replacing.
When to Adjust Versus When to Replace
Before you assume replacement is necessary, let’s talk about simple adjustments that might solve your problem.
Making Temperature Adjustments
If your testing shows the thermostat is working but your water temperature is just slightly off from where you want it, you might simply need to adjust the dial. Turn it carefully, making small quarter-turn adjustments. Wait at least thirty minutes after each adjustment to allow the system to stabilize before checking your water temperature again.
Remember, going above 120 degrees wastes energy and increases scalding risk, while going below 110 degrees can encourage bacterial growth in your tank. Stay within that sweet spot.
When Replacement Is Necessary
If your multimeter tests reveal no electrical response, if the dial is completely stuck, or if water temperature doesn’t match thermostat settings even after adjustment, replacement is your best option. A faulty thermostat won’t improve with time—it will only get worse.
Replacement thermostats are relatively inexpensive, typically ranging from thirty to eighty dollars, depending on your water heater model. Hiring a plumber to install one usually costs between one hundred fifty to three hundred dollars, though this provides peace of mind and ensures proper installation.
Preventative Maintenance to Extend Thermostat Life
Want to avoid thermostat problems altogether? Here are some maintenance practices that can keep your thermostat happy and functional for years.
Regular Flushing and Maintenance
Flushing your water heater tank annually removes sediment that accumulates at the bottom. This sediment can migrate upward and coat your thermostat, reducing its accuracy. A simple annual flush takes just an hour and can significantly extend your thermostat’s lifespan.
Avoid Temperature Extremes
Don’t tempt fate by setting your water heater to maximum temperature. Running your thermostat in the comfortable middle range, around 120 degrees, puts less stress on the component and helps it last longer. Plus, you’ll save energy and reduce scalding risks.
Monitor Water Quality
If you have hard water with high mineral content, consider installing a water softener. Hard water accelerates thermostat corrosion and sediment buildup. A water softener protects not just your thermostat, but your entire water heating system.
When to Call a Professional Plumber
I’ve walked you through checking your thermostat, but there are definitely situations where professional help is warranted.
Call a plumber if you’re uncomfortable working with electrical components, if your water heater is still under warranty, if you discover water leaking from the thermostat area, or if you’re uncertain about any step in the process. Professionals have experience with every water heater model and can diagnose problems faster than you can. Sometimes the peace of mind alone is worth the investment.
Conclusion
Checking your electric water heater’s thermostat is more achievable than you might have initially thought. By following the safety precautions, understanding what you’re looking at, and running through the testing methods I’ve described, you can determine whether your thermostat needs adjustment, repair, or replacement.
Remember that your thermostat is the unsung hero of your hot water supply system. When it’s working properly, you barely notice it. But when it fails, you certainly feel the consequences. Taking the time to check it periodically and maintain your water heater properly ensures you’ll have consistent, safe, and efficient hot water for years to come.
Whether you decide to tackle the checking yourself or call in a professional, now you understand what’s actually happening behind that access panel. You know what a healthy thermostat looks and acts like, and you’ll recognize signs of trouble immediately. That knowledge is power—the power to keep your water heater running smoothly and your household comfortable.
Frequently Asked Questions
How do I know if my electric water heater thermostat is faulty?
A faulty thermostat typically shows itself through inconsistent water temperatures. If your water is always too hot or too cold despite adjusting the thermostat dial, if the dial is


